Nineteenth and penultimate entry for the Christmas Challenge.


Click to reveal AAR
This time, we’re taking the Douglas DC-6B made by PMDG.


Setting up fuel and payload

Hopping on the Cloudmaster

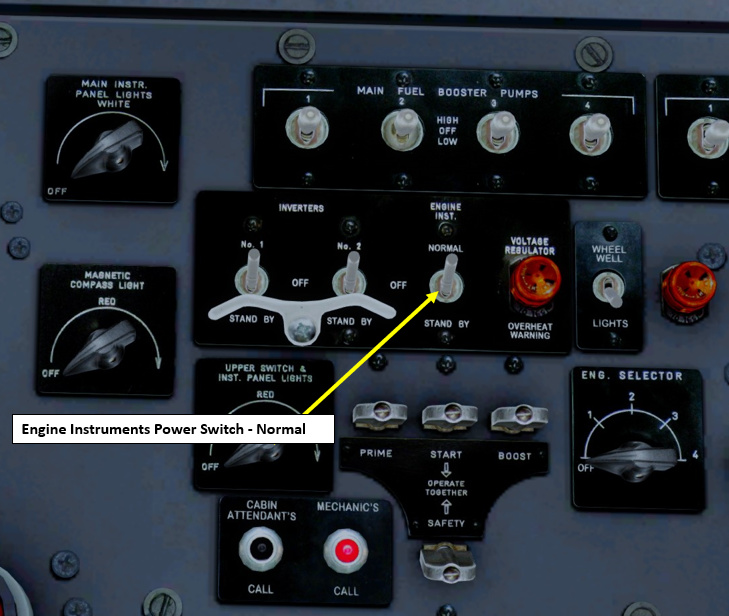
There is so much stuff on the overhead panel compared to the Connie. However, there is no flight engineer station for this aircraft.

By default, the Gust Lock is set, which blocks all control surfaces from moving.

Gust Lock removed and parking brake set

BATT. & GND. PWR. Switch - ON
Three Inverter Switches - ON
Generator Switches - ON
Fuel Booster Pump Switches - OFF

Set Engine Instruments Switch to NORMAL or you may have some instruments unpowered like the Flaps Position Lever
Cowl Flaps Selector Switches - OPEN

- Open throttle about 1 inch forward
- Set Fuel Tank Selector levers - MAIN (FWD)
- Set Propeller Pitch lever - Forward (Fully Fine)

We will start the engines in the following order: 3, then 4, then 2, then 1.
- First, set fuel booster pump to LOW.
- Then, set Engine Start Selector switch to No. 3 Engine.
- Hold the Engine Starter Switch to begin engine cranking.

After three blade revolution counts (the co-pilot will count them for you), set and hold the Engine Primer switch.

After twelve blade revolution counts, set and hold the Engine Boost switch.

Just after the engine boost switch has been set, turn the No. 3 Engine Ignition (Magneto) Switch to BOTH.

Once the engine is starting to “catch”, set the fuel mixture lever to AUTO RICH.

Success!

Adjust throttle to 800 to 1000 engine RPM, watching for engine and cabin supercharger oil pressure rise. If pressure does not show within 30 seconds after starting, stop engine and investigate.

Then, set Fuel booster pump - OFF. Then, repeat to start remaining engines.

Set Cabin Pressure (we intend to fly at about 15000 ft).

Set cowling flaps to 4 deg

Set flaps to 20 degrees


We need to make sure we disconnect the GPU cart. Here we see that we still have Ground Power ON

I disconnect ground power by setting the GROUND POWER / PLANE BATTERY switch to PLANE BATTERY.

I do my engine run-up, then release the parking brake and start taxiing. Steering is done with the steering wheel.


Rolling back the runway to line up on 34.


Lined up

Before Takeoff, we’ll set up our radios and our navigation VOR frequencies. Normally, we’d use the same old school NAV radios like the ones we used on the Connie. However, in this version of the PMDG DC-6 they are not functional.

We’ll set up our Bendix-King radios instead. We set up the first VOR: Wellington (WN). We will follow a heading of 344 from WN to WU (Wanganui) by tracking WN frequency first (112.30), then the WU frequency 116.00). This leg should be approx. 83.2 nm.

Frequency table for our VORs

We first set up our desired frequency with the NAV frequency tuning knob, which will set the frequency to the Standby freq. We then press the NAV TFR (Transfer) button to set our desired freq as our active nav frequency.

Final result (WN is our active freq, WU is our standby freq)

I set the DME power switch to N1 to select VOR 1 and set a Course of 344 on the Garmin VOR indicator…

We’re now more or less ready for our takeoff roll! I didn’t mention a ton of stuff but maybe the rest will come in a guide at some point. For this takeoff, I won’t use the AFE (Automated Flight Engineer). I’ll hold brakes, set my propeller pitch to full fine (d’uh!) and then set my throttle to 30 in Hg of manifold pressure. I will wait for the engines to stabilize.

Set full power (about 55 in Hg manifold pressure), then release brakes. Rotate at 100+ mph.

Gear up (then to Neutral), flaps up.

Climbing

Setting climb power: 48 inches Hg manifold pressure, 2600 RPM. We’ll set our climb speed to 150 mph. Cowl flaps are set to 10 deg for Climb.

DME receiver seems to be working

Here’s a little overview of the Sperry A-12 autopilot

To engage the autopilot:
- Make sure the aircraft is properly trimmed so you can let go of the yoke
- Set Gyropilot switch ON (UP) to arm this mode. This acts as a HEADING HOLD function.
- Set the Autopilot Master Lever ON (UP).
- Set autopilot mode to Gyropilot. This will engage the Heading Hold mode.
- Steer the aircraft using the TURN knob.
- Control aircraft pitch (if desired) using the Autopilot Pitch wheels.
- Once you have reached your cruising altitude and are flying level (watch your climb rate indicator), set Altitude Hold switch ON (UP) to engage the Altitude Hold mode if desired.

Once reaching cruising altitude, I set my power to 33 inches of Hg (manifold pressure) and 2300 RPM. I then set my cowl flaps to 0 deg.

The Whanganui National Park


Cruising

Mount Ngauruhoe

More Cruising

Mount Ruapehu

That DC-6 is really a treat to fly

Approaching Auckland

We will land with 50 deg flaps and touchdown smoothly at 90 mph. Cowling flaps are set to 4 deg to allow a go around if we need to throttle up and abort our landing.

The airport

On final. A bit of crosswind


The landing is smooth as butter. My wheels barely graze the ground.


Vacating the runway

Welcome to Auckland!


Engines off, passengers and cargo unloading… I can almost smell Pago Pago now.

