And now, here is the twentieth and last entry for the Christmas Challenge.


Click to reveal AAR
For this particular flight, we will be taking the DC-8 Series 50 by Aerosoft.

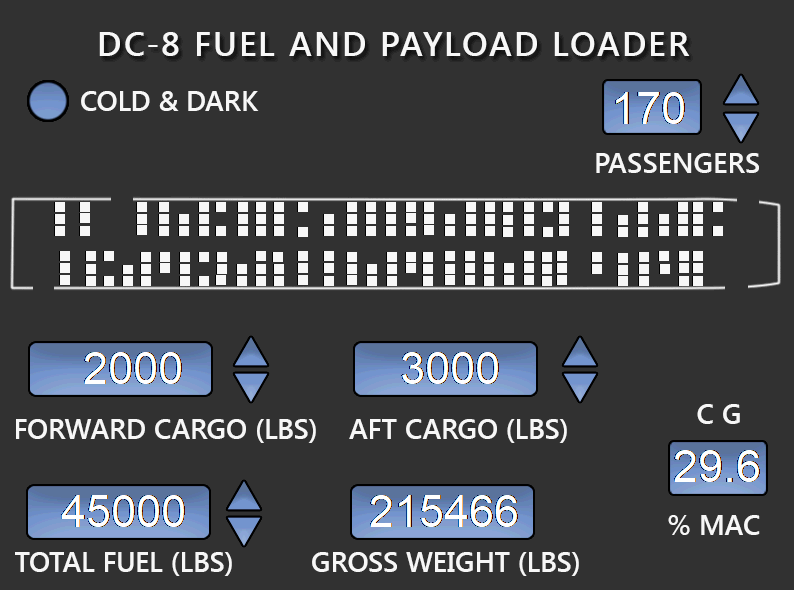
LSHIFT+3 allows you to load cargo, passengers and fuel.
I hop in the cockpit and marvel at that old jet’s analog gauges.


First, I have to set my parking brake on. Then, I set the external power by pressing “LCTRL+W” (default P3D Water Rudder control) and set the Battery switch to EXT PWR (DOWN). This switch is on the Flight Engineer Panel


As I start going through my checklists rain starts to fall

- Generator Switches - ON
- Electrical Bus Tie Switches - ON

- Master Heater Switch - ON

- Set Cabin Pressure Altitude to Cruise Level (For a flight altitude of FL 320, or 32000 ft… we will set a cabin pressure altitude of about 4000 ft)

- Set Galley Power Switch - ON
- Set Flight Spoiler Switch - NORMAL

- Set Oil Cooler Door Switches - AUTO (UP, use mousewheel)
- Fuel Selector Levers - MAIN
- Fuel Cross-Feed Levers - NORM (OFF)
- Center Fuel Tank Levers - As Required (ON)
- Auxiliary Fuel Tank Lever - As Required (ON)
- Main Fuel Booster Pump Switches - OFF
- Alternate Fuel Booster Pump Switches - OFF

Now, let’s switch to the CIVA (Delco Carousel IV-A) INS (Inertial Navigation System).
First, we pull the CIVA Mode knob, then turn it to STBY, then push it back in. We do it for both CIVAs.

We then set both CIVA DATA knobs to POS. This will give us our current position coordinates (which, thankfully, has been already entered for us). Then, we click on the CIVA 2 REMOTE button, then on the CIVA 1 REMOTE button. This will allow the INS system to take directly what we input from CIVA 1 and transfer it to CIVA 2. This way, we don’t need to enter data twice. Interestingly, you can verify the position by pressing LSHIFT+Z to show your current coordinates. Sometimes I have to re-enter the POS coordinates manually or the alignment will not complete since the CIVA detects some sort of missing information or input error.

Once that’s done, set both CIVA Mode knobs to ALIGN.

For “how to enter CIVA coordinates”, I suggest you guys check the “Chuck’s Guide to the FlyJSim 727-100” for X-Plane. I go into details. Here is a preview of the coordinates I plan to input in the CIVA

To enter coordinates, set the CIVA DATA switch to WAYPOINT. Then, set Waypoint Selector to 1 (we will enter the coordinates for Waypoint 1 - SELKA). We will then enter the South coordinates by pressing 8 (South key), then enter 34086 (rounded up 34 deg 08 Min 57 sec) from the keypad. We then enter these coordinates by pressing the INSERT key.

We repeat the same step, but for the Eastern coordinates.

Waypoint 2 (DRAWN)

Waypoint 3 (NSTU)

We can also monitor the status/progress of the alignment. From the 727 guide:


Once the alignmen is complete (code 0 05), we set the CIVA Mode switches to NAV on the overhead panel.
We must also not forget to set our INS/Radio Navigation Selector switch to INS to track the INS waypoint since this is what we’re going to use instead of VORs.

The performance calculations need to be done by hand. Old school. Luckily, the developer provided these charts. However, I’ll spare you the details. ![]()

Now, time to fire up these old JT3 engines (sequence: No. 3, 4, then 2 and finally 1). To start the engines, we need to be aware that there is no APU (Auxiliary Power Unit) on this aircraft. Therefore, we will need a ground air cart to provide pneumatic pressure to drive the starter. We can call the Air Cart with LSHIFT+Q.

Note: We need at least 30 psi of manifold air pressure for an engine start.
- Confirm Air Pressure cart provides at least 30 psi of manifold pressure. Check that Freon Compressor switches and Cabin Compressor switches are OFF to ensure maximum available pneumatic pressure.
- Engine 3 Main Fuel Tank Selector Lever - MAIN (UP)
- No. 3 Engine Main Fuel Booster Pump - ON/UP (BOOST & FEED)

- Throttles at IDLE

- Starter & Ignition Switch - ARMED
- Push IN the No. 3 Engine Starter Switch

- Once N2 reaches 17 % RPM, introduce fuel by setting the Engine Fuel Control lever to ON (FWD)

Introducing fuel

Engine lightoff

To do an engine cross-start, it’s a bit tricky. You need to disconnect the Air Cart (LSHIFT+Q), then set the running engine’s Pneumatic Pressure switch to HIGH, then set the running engine’s throttle high enough to generate a manifold pressure of about 30 psi. IDLE throttle will only generate about 10 psi, which is insufficient. Throttling up will allow enough bleed air to be generated for an engine start.

Once all engines are started, we can set the Starter & Ignition Switch to OFF and turn on the Pitot Heat and arm the emergency lights .

We then disconnect the ground power unit (LCTRL+W), then set the Battery switch to BATT. Check generator and bus tie switches are ON, then press the GEN PARALLEL switch (IN) to ensure all generators are running in parallel.

Anti-Skid ON, setting target altitude

Setting Pneumatic Pressure switches to HIGH, Hydraulic Pump switches ON, Freon Compressor switches ON, Recirculation Fans ON.

Setting flaps and elevator trim for takeoff. Spoiler lever OFF.

All right, time to fly!


Taxiing


Ready for takeoff

Up we go!


Climbing


Passing through the overcast


Using the autopilot isn’t very complicated. To use in conjunction with the CIVA, we have to make sure we have the proper “WY PT CHG” code set. As an example, 01 means Current Position to Waypoint 1.

We then set arm our desired PITCH (vertical) and NAV SELECT (lateral) autopilot modes, then set the Autopilot Master Lever to AUTOPILOT. Ta-dah! In our case, since we want to track a CIVA while climbing, we will set the NAV SELECTOR to AUX NAV (CIVA) and the PITCH selector to VERT SPEED. We adjust the climb rate with the Vertical Speed Setting wheel. If the Vertical Speed Setting wheel is set to ALT HOLD, the aircraft levels off and sets a climb rate of 0.

There are other components of the autopilot at the front, like the Heading Select knob if we want to use the NAV SELECT HDG SEL mode. We can also use the TURN KNOB to turn manually. It is quite similar to the autopilot installed on the 727. However, Aerosoft confirmed that the IAS-HOLD mode was not implemented since it was not fitted on this version of the DC-8. I guess we’ll just have to control our airspeed with the throttles since the DC-8 we have isn’t equipped with one.


Approaching Great Barrier Island

Over the Pacific

As we reach 32,000 ft, I hear the most annoying warning sound ever. That’s the cabin pressurization system that’s unhappy: I forgot to set the pneumatic pressure switches back to LOW and I overshot the 32,000 ft to 33,000, which triggered the warning. Thankfully, I corrected the mistake and pressed the Warning Horn Mute button. I have a theory that every annoying sound in the MD-80s were actually created by Douglas.

Contrailing


That DC-8 is really a beautiful aircraft


The view during the flight isn’t really exciting… but I can feel Pago Pago getting nearer after all these miles travelled throughout the world!

More cruising

As the flight goes on I need to do some manual fuel management.

The Main tank valves now start pumping their fuel from the alternate tanks. Alternatively, I could’ve simply set the Fuel Selector levers to the Alternates directly instead of transferring the alternates to the mains.

More beauty pics


I start making a bunch of quick calculations in my head to estimate how I am doing on fuel.
If I have about 13,000 lbs of fuel left…

And about an hour left to go, I will probably have to set my throttles from a 3000 pph fuel flow to a 2000 pph setting. 12000 lbs for an hour of flight (4 x 3000 pph) is just way too dangerous. With 8000 lbs (4 x 2000 pph) for an hour of flight, or maybe a bit more… it feels much more reasonable even if we spend a bit more time in the air.

As we are about 80 nm from DRAWN (which is 20 nm from Pago Pago), I start my descent. I arm my spoilers, set throttles to IDLE and set my VERT SPEED wheel to maintain a descent rate of 2000 ft/min. My target altitude is 2000 ft.


Uh oh… weather doesn’t look good down there!

Doesn’t look good at all!


We’re in the middle of a thunderstorm. Oh man…


Turning into the last segment

Wow… the aircraft shakes like crazy.

Rain… tons of rain


Pago Pago!!! It’s real!!!

Getting closer I’ll land with full flaps with a touchdown speed of about 120 kts (ballpark figure, this value needs to be calculated from the charts based on the aircraft gross weight at landing)

There is a lot of wind, which won’t make my job easy. Curse you, Active Sky and your awesome weather model!

Starting my approach. The Autopilot can’t help me… so I grab the yoke and proceed with caution.

Windy… Rainy… I really picked the wrong day for this!

Turning on final


On final

Touchdown


Taxiing back to the parking area


Phew. Finally made it. What an adventure!

So many memories… feels good to finally get that “achievement unlocked”.

Merry Christmas everyone!
