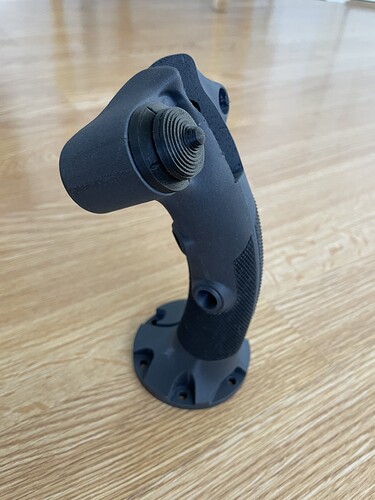
Announcing the 'Styrspak FPL 37 Viggen'

The 3D printer I got came highly recommended by @Fridge and it has not let me down. It’s one of the best filament printers available, but that doesn’t mean that there aren’t issues that you need to overcome, every once in a while.

When printing the left side knurling, I ran into trouble with the corners.

This happens because I’m printing the object slanted at 45° to get a better definition on the knurls. A filament printer, like mine, prints in layers. Any 3D object you want to print must be converted to layers and then a trace pattern of how the printer shall lay down its string of plastic. You get the best result if the printer can string the plastic continously. Think of every knurl as a small pyramid. If I printed it laying down, the top pyramids would end up becoming a last little drop of plastic, instead of a continous string.
If I print the small pyramids at an angle, the printer can string the plastic along one side of the pyramid, turn at the peak and continue to string down the other side.
This is how it looks in the software, commonly referred to a Slicer, because it slices the object into thin layers of tracks for the printer to follow.

This picture is an illustration of the path the printer nozzle will follow, when stringing its plastic at this particular layer. When finished with one layer it loweres the print bed floor 0,08mm and continues on the next slice.

Here’s the difference between printing the knurls laying down (right) and printing slanted 45° (left).

When printing any object that has a small contact surface to the printer bed, like the corners here, there is a risk that the object won’t stick to the bed and this is what plagued my attempts.

I’m happy to report that I solved the issue by adding parts to the knurled object, around the corners, and this is the result.

Here’s a detailed picture of the parts I added. The other parts you see in the print above are those that the Slicer software adds to support the print.

Anyway, when 3D printing, you will have to deal with similar issues, no matter how good your printer is. Some parts just don’t want to be printed, it seems. :sunglasses:

7 Likes

Those look awesome. In the actual jet, are those pieces made of hard or soft rubber?

1 Like

Aluminium.
The stick grip is cast, presumably in sand moulds, and then finished by hand…

Some detail pics of the real thing.


I have decided to separate the parts for the knurling to facilitate angled printing of the knurls while still being able to print the stick grip body halves laying down. This adds to the strength of the parts that will take the largest bending loads.

3 Likes

Ahh, that’s right, you explained that.

1 Like

Very nice! Still waiting on a good commercial implementation of non-planar printing which would be a game changer for things like this.

3 Likes

It’s just a matter of time until they are commercially available.
The speed at which 3D printing is evolving is mind blowing!

4 Likes

Working on a trim switch, for the Viggen stick.
The switch arrangement works great, but the spring centering is a challenge…


10 Likes

You can’t source those pre-made, or is this substantially cheaper?

For a trim switch it’s substantially cheaper to make your own - I’ve looked into this myself :+1:

Edit: and that’s before you start looking for one with a specific form factor, travel, hat etc…

1 Like

We’re talking about aircraft grade parts, so yes, this is substantially cheaper. But I’m looking to recreate the long throw and loose center of the real switch.

3 Likes

I think I have finally have a design that works!

11 Likes

Amazing work there … I salute you sir :saluting_face:

4 Likes

I like the amount of travel you’ve got there, and it sounds like the resistance and engagement are tactile enough… how does it feel?

2 Likes

@Troll OMG, that’s a work of beauty!

1 Like

Here’s the real switch in action, for comparison.
I think it’s close.

I used this magnetic type of centering. It gives a very distinct feel and return centering force.
The real switch is softer around center and has a harder switch break. My switch isn’t exactly like the original, but I think it has a good quality feel to it. The switches are 360g force activation so it is a solid switch with good tactile feedback.

https://no.mouser.com/ProductDetail/Wurth-Elektronik/431256038736?qs=wr8lucFkNMWz7xStwyif0A%3D%3D&countryCode=NO&currencyCode=NOK

11 Likes

That’s very nice! Well done!

1 Like

Did some testprints of the stick body halves using PETG plastic. The advantages of PETG are wear and heat resistance, but unfortunately it’s also slightly flexible.
Trying with carbon fibre infused PLA now, and then I will try carbon fibre PETG.


Edit.
Also tried some engineered supports, but PETG sticks to itself like nothing else, so it was too much work to remove, which is why there’s a lump of plastic where the safety and trigger mechanism goes.

9 Likes

Here’s the right half in PLA CF. Noticeably stiffer than the prints in the post above.


I like the grey color too. Note that the black knurled part is PETG.

Printing the other half in PETG CF now…

13 Likes

Now that looks the part!!

The PETG CF part is finished.
I tried tree supports for this part and that didn’t work, so the inside (where the supports went) looks like :poop: but the outside looks like :moneybag:

The Left half of the stick is the PETG CF and the right half is PLA CF.

Note that the knurled parts are the same black PETG parts as in earlier pics.


You control the strength of a printed part by how many walls you want the shell to have and how much infill you want.

I will print the right half in PETG CF and I think I will increase the number of walls from 3 to 4 (default is 2) and the infill from 25 to 30% (default is 15%). I will also try to change the infill pattern to see if that has any effect.

9 Likes