
With this mission we have to take our flagship from the Jupiter moon Callisto and mop up minor enemy fleets in orbits around the moons Europa and Io. Our ship is vastly superior to what the enemy can muster, but the Jupiter system involves some difficult maneuvering between the moons, and we have to get through engagements with multiple ships while retaining mission capability to the end. We have 2 months to complete the task, before enemy reinforcements can be brought in from Saturn.

Our flagship. Don’t let the Gunship designation fool you, this 9860 ton monster is among the most heavily armed and armored vessels in the solar system. It has a good delta-V of 5.48 km/s and 0.17g acceleration, both common values for warships. The ship is accompanied by a Methane Tanker. In addition, our side managed to broker access to a neutral Methane Depot at the Europa-Jupiter Lagrange Point 4.


The enemy ships we have to destroy.

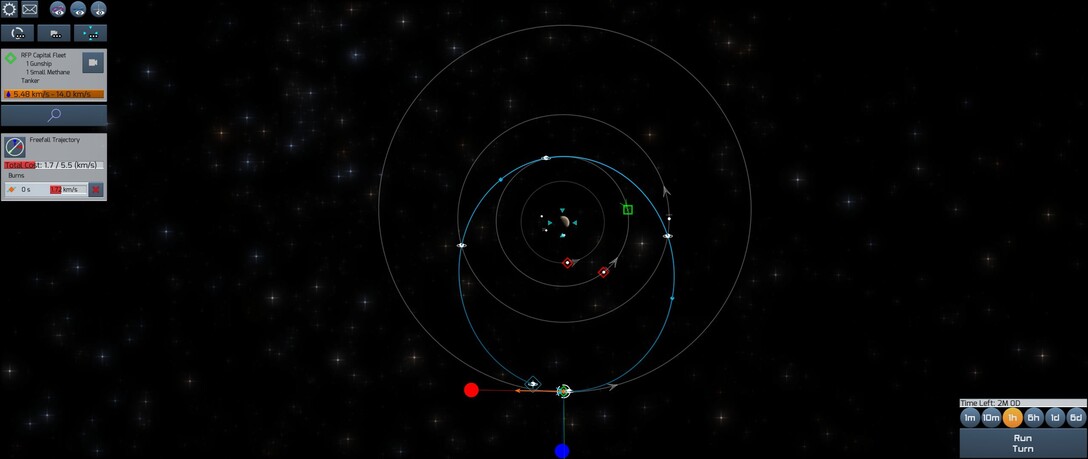
The starting situation with the fleets in orbit around their respective moons and the Methane Depot at the Europa-Jupiter L4 (green box top right). Staring at a moon so far out from Jupiter, getting to the lower orbits will require a lot of delta-V. Therefore our first step will be to get down to the Europa orbit and resupply at the Methane Depot.

Our starting orbit around Callisto.

Our first prograde burn to eject us from Callisto’s orbit and into orbit around Jupiter. The position is selected to be retrograde and decelerating in relation to Jupiter, putting us into a transfer orbit towards the inside of the system.
The result is a Hohmann transfer to the Europa orbit.

At perigee (lowest point) of the transfer orbit we plan another burn to stabilize us in this orbit. We do not do the full burn for the circular orbit yet, as we first need to get in phase with the Methane Depot. A slightly elliptical orbit results, slow at the higher portion of the trajectory and timed to meet the Methane Depot after one circumnavigation.

With the first part of the trajectory planned solid, lets pass some time. After 5 days our fleet approaches the first of the lower decelerating burns. I add a small 120 m/s out of plane burn to more precisely align our orbital plane with that of Europa and the Methane Depot. The moon Europa itself and the first target fleet is actually pretty close at this point, but in orbital mechanics physical distance and practical distance are two completely different things, so no need to worry.

After passing another day, the correction burn is complete and we plan the second large retrograde burn to align to the circular trajectory of the Methane Depot.
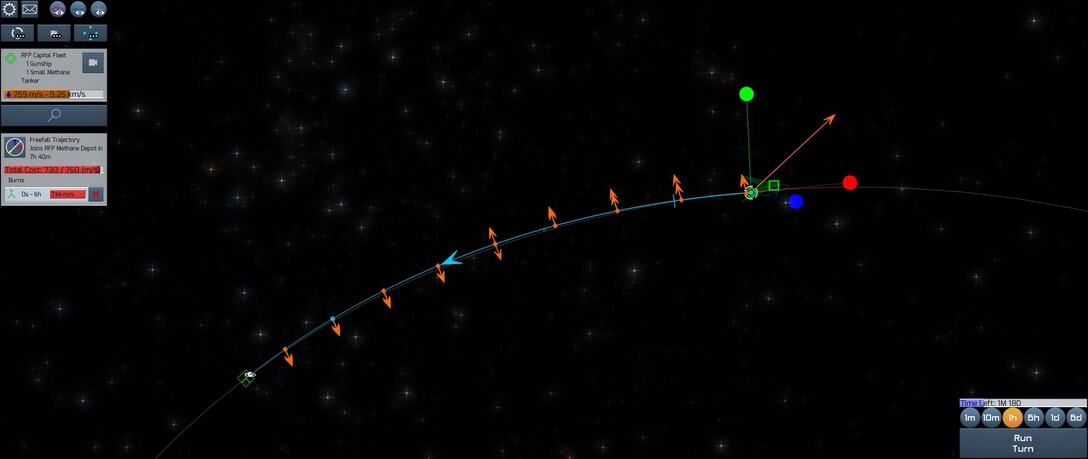
After another 6 days the second burn is complete, placing us next to the Methane Depot. At this point we can select an automatic join up where the game will plot a series of burns to maneuver us together. Note that this uses up 730 m/s delta-V of our remaining 780 m/s budget of the Gunship. Not much left, tough we would still have had more fuel in the accompanying Methane Tanker.

After the join up is complete, we end up in this funny orbit around the Europa-Jupiter Lagrange Point 4.

The Gunship and the Methane Tanker top of their propellant tanks from the depot.

With full delta-V available again, lets get the first fleet around Europa. Our targets are behind, so we burn forward into a higher and slower orbit, letting them come up below us. After one orbit we will meet them and perform an intercept maneuver.

After 4 days, the moon Europa and the enemy fleet come on the inside and the intercept is about to take place.

At about 40 km our Gunship opens up with 8mm railguns.

One enemy Marauder takes hits, loosing its primary weapon. But the hostiles are burning away, slowly opening distance. Having more thrust than we do, they start to pull away and escape.

Back at the orbital map, a game of interception and evasion maneuvers begins. This goes ahead multiple time, but each time we get a little closer.

Eventually another intercept succeeds, with our Gunship burning on target with a good rate of closure.

As the targets come in range, our Gunship rotates for a broadside. The 11mm railgun and the 100 MW laser open up.

One Marauder is disabled.

All our remaining weapons open up, including the 286mm coilgun.

The enemy is hit at an oblique angle, so his armor withstands several hits, but exposed components are disabled.

Under a stream of awesome firepower form our Gunship, the second Marauder is eventually destroyed.

The maneuvering for the interception and the engagement have put us into a very unhealthy orbit around Europa. Time to do something against crashing on the moon!
To be continued…


