CIVA INS Navigation Tutorial
By @TheAlmightySnark - December 5, 2017
Originally published at: Articles - Mudspike Forums

Mudspike Contributor Casper ‘TheAlmightySnark’ de Wit first added this excellent CIVA INS Navigation Guide for X-Plane in our forums. It was so good as reference material for civil aviation navigation so we’ve added it as an article. Thanks TheAlmightySnark!
Welcome to the CIVA INS navigation tutorial! Today we shall explore the joys of using a INS unit to find our way around the virtual world.
Part 1 – Introduction
INS stands for Inertial Navigation System, this is a system that tracks every tiny bit of movement from the aircraft, and by adding up all of these small bits of movement it can figure out where the aircraft currently is. It does this by a series of gyroscopes that are on a rotating platform, which is also where the Carousel part of its full name comes from: “Delco Carousel IV-A”. There’s more reading material for the technically inclined among us that wish to know more, but it’s not important for this article.
Before INS units, when people crossed the Atlantic in an aircraft, they had to plot their course/position in much the same way as ships have been doing for centuries, with a sextant. The INS solved this problem by allowing pilots to punch in a bunch of numbers to let the computer handle the rest. This method eliminated a lot of potential human error and workload out of navigating.
The CIVA can be found on a lot of aircraft from the 60s onward, almost all Boeing aircraft from that era, the DC-8, the C-5 and possibly the most famous one, the Concord.
Part 2 – familiarization
For this I will be using the FlyJSim(FJS) 737-200 for X-plane 10/11, with the 3D CIVA INS Addon. The CIVA can be installed in any aircraft, but the FJS 737 and 727 both have an option to display a functional 3D version in the Virtual Cockpit.

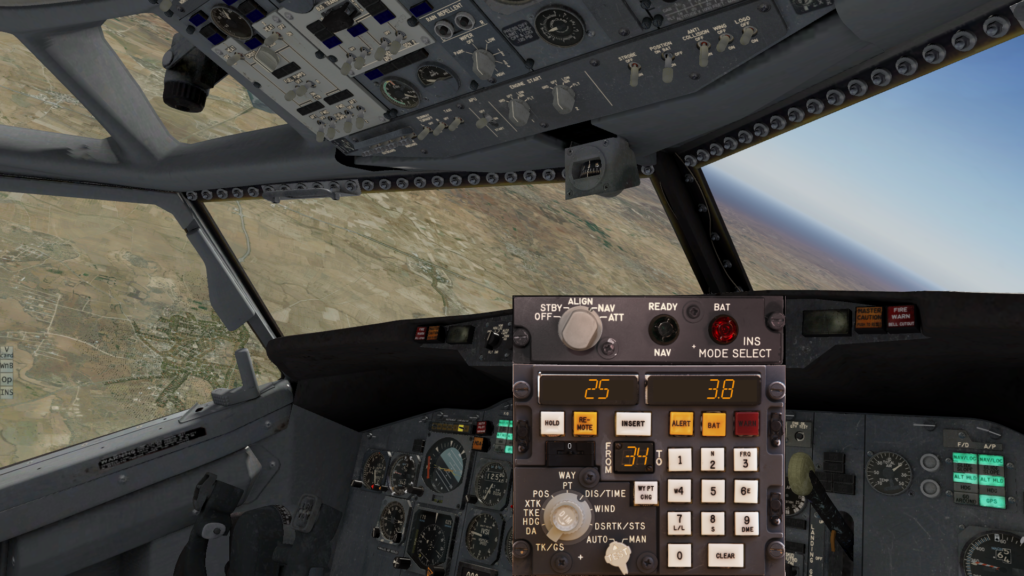
The FJS aircraft have a blue button in the bottom left with “INS” on it, if you click that it will show you the above image. For the sake of this tutorial I will go through a Cold and Dark scenario. Both the aircraft and the INS unit are fully shut down. You can start with the unit warmed up if you like, simply select the Engines Running option in the “OP” window.

Connect the Ground Power by putting a blue check mark in the box in front of the “Connect Ground Power” sentence. Make sure the Parking Brake is on, Ground Ops people are a bit wary of pilots not putting on brakes, and as it turns out, refuse to leave the break room coffee machine if you don’t.
Let’s go over the functions of the CIVA unit. The FJS version consists of two parts rolled into one. The upper panel, which is the rectangular area above the display windows, is called the Mode Selector Unit (MSU) panel. This is commonly mounted on the overhead panel, but in the FJS aircraft you can find it on the pedestal together with the rest of the CIVA unit.

From left to right we find on the MSU:
Mode Selector Knob(MSK) with the following options:
OFF – The unit is not operational, the good news is is that it doesn’t drain battery!
STBY – Standby Mode, you can configure the unit in this mode, putting in waypoints and the current position.
ALIGN – Align Mode. This is only used when the aircraft is parked, not moving, and ready for alignment.
NAV – Navigation Mode. It’s important to put the unit into NAV before taxi, otherwise everything will be in vain!
ATT – Attitude Mode. A form of emergency mode used when NAV data has become unreliable or if the INS computer fails.
READY NAV light, this will light up green when the unit is aligned and ready for use. Clicking on this allows you to “cheat” through the warm up period, instantly aligning the CIVA.
BAT INS. This will light up red if the INS unit has shutdown whilst operating on battery. This usually only happens if you diddle around too long on the ground and forget to power up the APU or Ground Power.
If you wish to use keyboard input then click on the top left of the MSU. A small orange K will appear, now you can use the numpad keys as data entry.

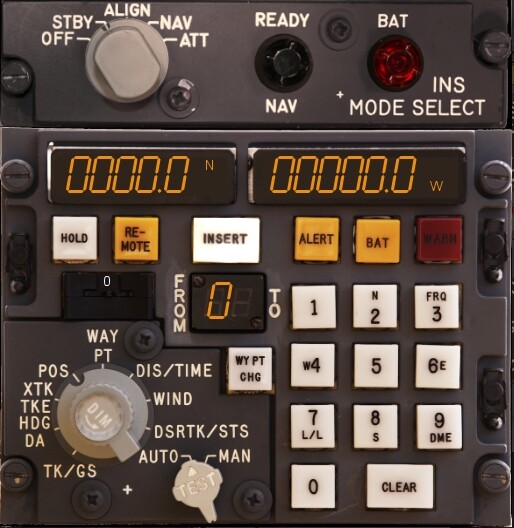
Below the Mode Selector Unit(MSU) we find the Control Display Unit(CDU). The CDU consists of two display screens that show the coordinates in a North/South and East/West fashion. A regular keypad for data entry, a smaller display to tell you what the CIVA is navigating to. And finally a bit selector knob.

The first row consists of 3 buttons(HOLD, REMOTE, INSERT) and 3 warning lights (ALERT, BAT, WARN).
HOLD – Freezes data displayed in the screens, you can use the (TK/GS, POS, WIND) as frozen data.
RE-MOTE – Only used for X-plane Flight Plans. I’ve personally never used.
INSERT – General button used to confirm input in the display windows.
ALERT – This will light up two minutes before a waypoint is reached. It will auto extinguish. The real manual says that it only lights if the groundspeed is over 250kts.
BAT – This will light up once in ALIGN mode and when the INS is operating on the battery.
WARN – Lights red when an error is detected. Not sure how deeply this is simulated.
Just below HOLD/REMOTE is a rotary wheel that selects waypoint 0 to 9, this is called the Waypoint DME Selector Switch. Waypoint 0 is always the current position of the aircraft and cannot be used as an input in NAV or ALIGN mode. Waypoint 1 through 9 can be selected as navigation targets.
Right of the Waypoint DME Selector Switch is the FROM-TO Display. During normal flight this show what leg the aircraft is flying on, in the above image it’s between waypoint 0 (current position) and waypoint 1.
Right of that is as standard numerical keypad with a CLEAR button. Use this to fix a mistake when you are typing in a coordinate.
Below the FROM-TO display is the WY PT CHG button, this allows you to either directly navigate to any waypoint or intercept a leg. You can only intercept legs in flightplan order. So intercepting the leg between waypoint 3 and 4 is valid but between 4 and 3 isn’t.
The big rotating knob on the bottom left is called the Data Selector Switch, it has the following functions.
TK/GS – Ground Track/Ground Speed related to the true north to the nearest tenth of a degree and speed in knots.
HDG/DA – Current Heading related to the true north to the nearest tenth of a degree and the Drift Angle relative to the wind from 0-180, left or right to the airplane axis.
XTK/TKE – Cross Track Error in tenths of a nautical mile, left or right. Track Angle Error 0-180, Left or Right relative to the aircraft axis as well.
POS – This shows the current coordinates of the aircraft.
WAYPT – This shows the coordinates of the selected waypoint in the Waypoint DME Selector Switch.
DIS/TIME – Distance in tenth of a nautical mile, time in minutes, to the selected waypoint, check the FROM-TO Display to find out your leg, and thus what waypoint you are heading to.
WIND – Wind direction in degrees relative to the true north and speed in knots.
DSRTK/STS – Desired Track Angle to the selected waypoint and the status codes of the INS.
Part 3 – Lets fly!
I’ve been writing this as I am heading down towards Christmas Island for the annual Mudspike Christmas Extravaganza Flying Circus Events ;). Therefore, I find myself currently on Cyprus with the FJS 737-200. There’s a nice little scenery you can download on the X-plane.org website:
https://forums.x-plane.org/index.php?/files/file/18763-lclk-larnaca-airport/
The rest of my scenery consists of Orth4XP with World2XP overlays and the standard X-Plane 10 land mesh.
I’ve placed myself at LCLK, and the first thing we need to do is find our current coordinate. I recommend doing this for yourself since you might have picked a different gate/ramp/parking than I have, or if you are flying with the standard scenery then you will find that the apron is on the wrong side of the runway.
To find your coordinates in X-plane go to Settings → Data Input & Output, then select the 4th check mark for option 20, Close the window and see if you now have a black/blue box in the top left as follows:
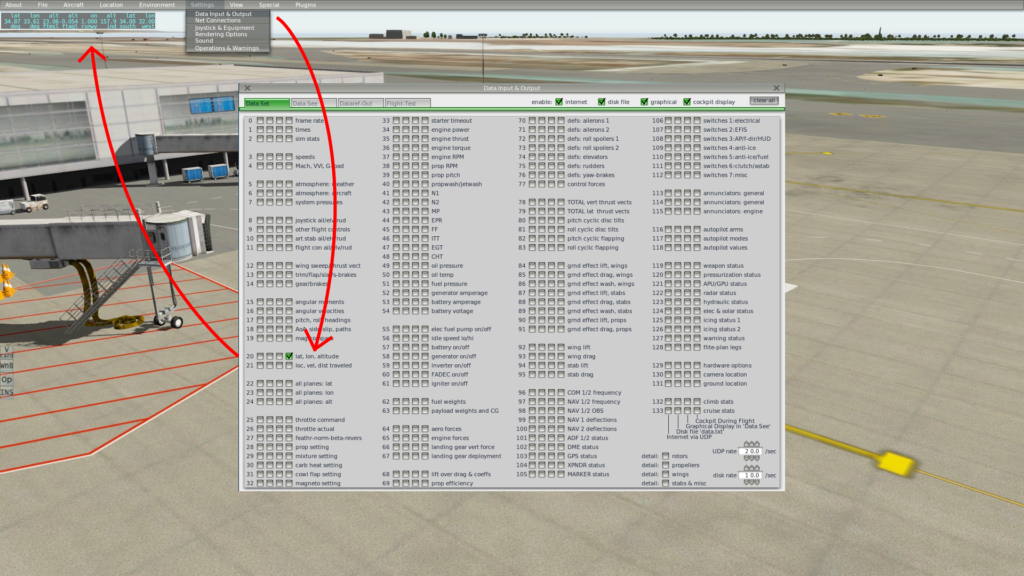
The box that has appeared will now have a Lat and Long coordinate in Decimal Degrees. Unfortunately the CIVA works with the Decimal Minutes Seconds (DMS) system so a little conversion is in order to get something workable.
To do that go to the following website: https://www.directionsmag.com/site/latlong-converter/
And put the Lat coordinate in the Decimal Degrees box, click convert and read the DMS at the output.

We only need the first 5 decimals of the DMS output. So in this case 345212 becomes 34521, we drop the last digit since the CIVA simply doesn’t accept it. This does mean we lose some accuracy in our navigation, you won’t miss an airport but don’t expect the aircraft to navigate itself down to the threshold with this.
Repeat this with the Long coordinate and note them down. This will become waypoint one.
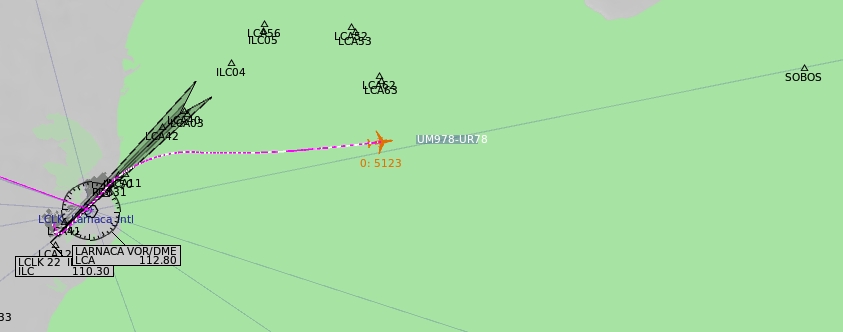
What follows is the flightplan we will be using today. I’ve got the waypoint 0 coordinate from the simulator and the rest of the plan has been made at the https://skyvector.com website.
| Waypoint | North | East | Reference |
| 0 | N34521 | E33363 | LCLK |
| 1 | N34555 | E33567 | SOBOS |
| 2 | N35022 | E34392 | ALSUS |
| 3 | N35550 | E34009 | VESAR |
| 4 | N36092 | E33169 | NEKES |
| 5 | N35560 | E33169 | DOREN |
| 6 | N34524 | E33374 | LCA(112.80) VOR |

As you can see, I first add the waypoints I want to fly over in the flightplan, then you can double click on them, and on the map click the right mouse button over them to get the coordinates.

As you can in the above image, VESAR has a east coordinate of 34° 0.54’. In the flightplan I put in “E34009” First of all it depends a little on how close you are with the mouse, therefor it’s different in the image compared to the flightplan. What is of note is that Minutes of the Decimal Minutes Seconds system is empty, but the CIVA will always read the same digits as minutes input. So that is why I’ve put in two zeros instead of 1. The CIVA unit doesn’t have any other way to determine what is a decimal, minute or second other than the digit position on the display.
In short, make sure you pad the coordinates so that they ‘fit’ the display.
Now that we have our coordinates and a flightplan we can start programming the INS. If you have followed along then our INS is already in Standby, if not then turn the MSU MSK to STANDBY.
On the Waypoint DME Selector make sure that waypoint 0 is selected and turn the CDU DSK to POS. Exactly the same as you can see in the images earlier on in the article.
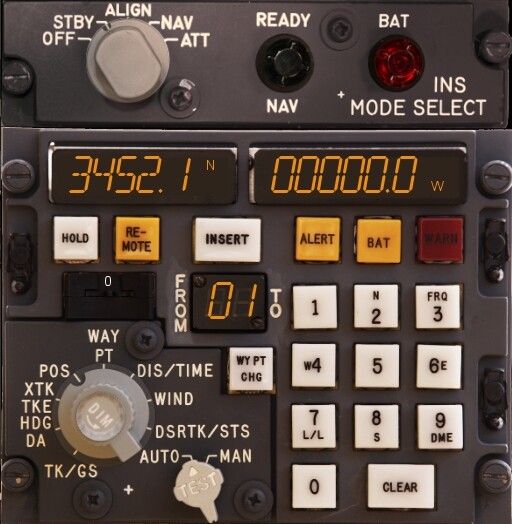
Let’s first put in our own position. To do this select a direction, on the keypad you will see that the numbers 2, 4, 6 and 8 have a wind direction next to them(North, West, East, South). We are located on a North East coordinate, so press the 2 keypad.
The insert button will light up, and the left display on the CDU will change from indicating South to indicating North. Now we can start putting in the actual digits that tell the INS where we are. In my case I will put in the North coordinate that I’ve got from the simulator and conversion website: “34521”.
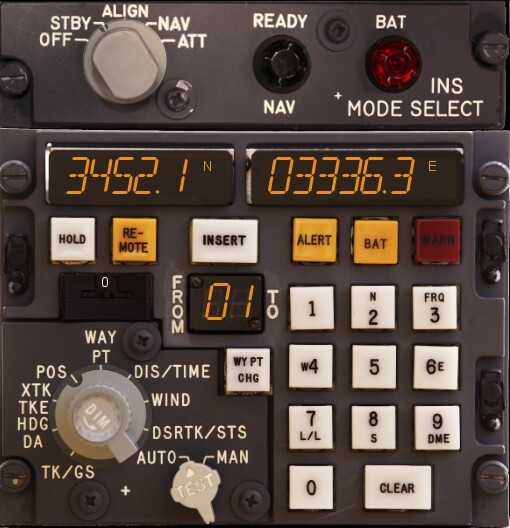
Repeat the same procedure for the East coordinate, press 6 first though, to select the right display and the East direction.
You can now flip the MSU MSK to ALIGN and the CDU DSK to DSRTK/STS. This will start aligning the unit and show the Status Codes in the right display.
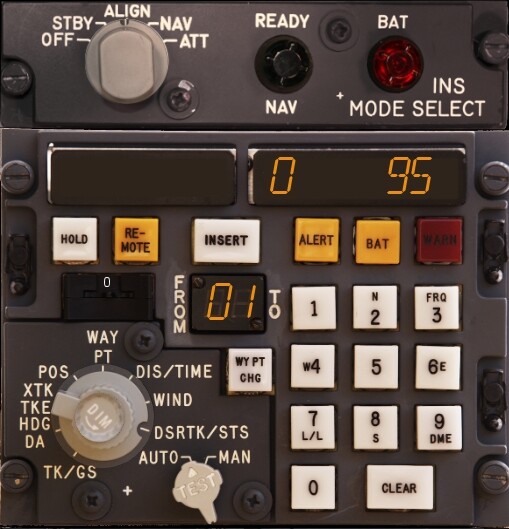
In the right window you can see a “0 95”. From left to right it means the following.
0 – Status code, changes to 1 when the MSU MSK is in NAV.
9 – Performance Index, how accurate the INS is, although there’s quite a bit more behind the real thing.
5 – Desired Performance Index when 5 is reached in the actual Performance Index(9 at start) the INS will start aligning.
Once this display reads “0 05” the INS is aligned and ready for navigation. The green READY NAV light on the MSU will light up at “0 55”.
This part is lightly simulated but here’s what happens with the real thing:
“0 95” – Standby Warmup. Gyro’s run up to speed 2 minutes after warmup is completed. Gimbals remained caged in pitch and roll.
“0 85” – Coarse Level: Gimbals aligned to the horizontal plane. Battery unit is tested(see warning light).
“0 75” – Coarse Azimuth: Initial estimate of True North.
“0 65” – Fine Align: knowledge of True North is refined. Gyro’s and Accelerometers are calibrated.
“0 55” to “0 05” – Refinement of alignment. The INS may be advanced to NAV at any time during this mode.
During this process you can enter the waypoints by selecting WAY PT on the CDU DSK and selecting any number on the Waypoint DME Selector that is NOT 0, remember that that is always the position of the aircraft.
Here I’ve started entering the first waypoint:


As you can see there is one extra digit on the right display on the CDU. This is because you can go up to 100 and above when entering as east/west coordinates in the Decimal Minute Seconds system. During this flight the left most digit in the right display will not be used.
Enter the rest of the waypoints from the flightplan, then double check them. You will be in for a fun surprise when the aircraft turns in an unexpected direction somewhere mid-flight!
Let’s first tell the aircraft to load in the data from the INS unit. In the FJS 727 you need to select AUX NAV on the auto pilot panel just in front of the fuel cut-off switches. It is the rotary knob at the far right of the panel.

For the FJS 737 you need to flip the switch that selects the data source from NAV to GPS. The switch is located just above the Standby Attitude Indicator (SAI).
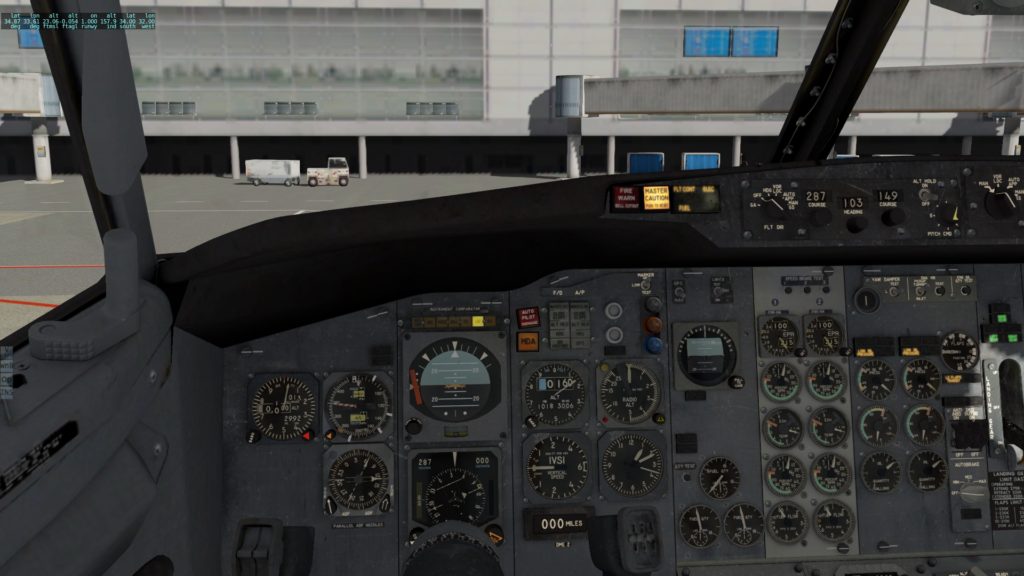
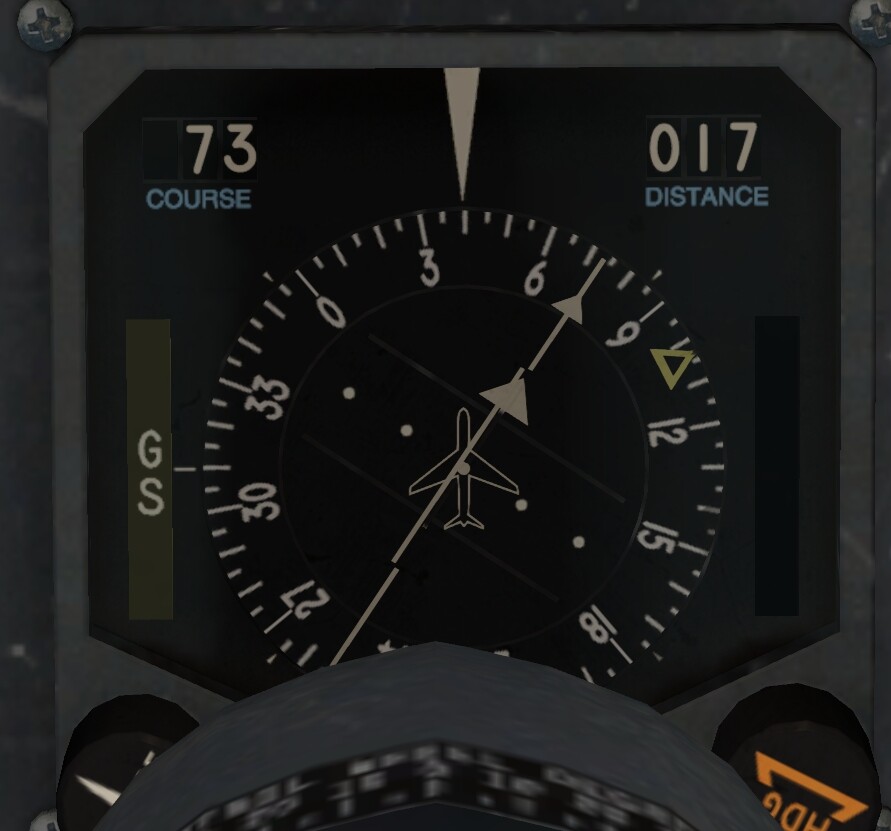
As soon as you do this you should see the HSI need change, pointing to the first waypoint just east of the airfield.
Once you have started up the aircraft of choice select the NAV mode on the MSU panel and start your pushback/taxi depart as you would normally and activate the auto pilot.
A fun thing to do is to keep an eye on the POS on the CDU DSK. You can see it change during taxi. Same goes for the DSRTK/STS, you will see that the Status has changed to 1.


I’ve started turning right to intercept waypoint one soon after take-off, and giving the autopilot control a minute later. It will start turning towards SOBOS and in my case keep 250kts whilst climbing to FL120.

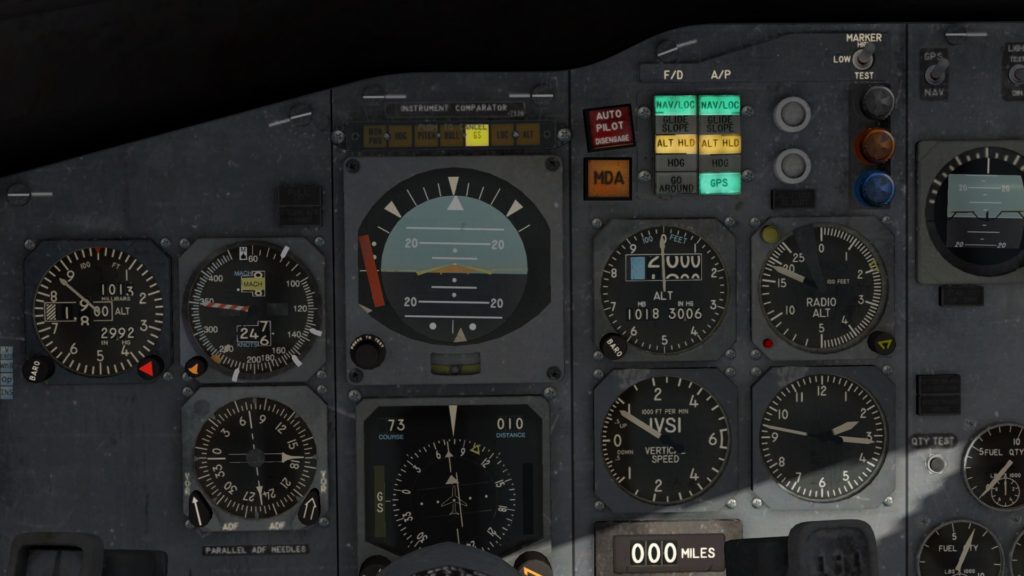
In the following screenshot I am 1NM away and 24 seconds(0.4 * 60) away from SOBOS. Given that I am flying fast enough the ALERT button has lit up.

Part 4 – Extra’s
So far what you have learned in this tutorial will cover about 90% of how the CIVA is using, but if you fly in a online environment or you have emergencies then there is a chance that you need to make a change of plans.
Direct to Waypoint
If you want to fly directly to Waypoint 5 in our current plan then you can, on the CDU press the WYPT CHG button, followed by 05 on the keypad. This selects our current position (waypoint 0) and our desired waypoint.

Intercepting a leg
If you want to intercept a leg between two waypoints follow the same procedure, except now select 56 instead of 05. This will select the leg between waypoint 5 and 6.
I initially tried to fly intercept leg 3-4 but the INS did not like stepping back in the flight plan. It was happy enough to intercept leg 5-6 though!
There is one more feature, DME updates. This allows the INS system to regain accuracy by using 2 DME stations and their known coordinates in the world. I have never flown long or far enough to try this, but it’s on my list!
Questions? Comments? Let’s discuss them in the forum!
Resources
Internal view of the unit(copyrighted image)
https://airandspace.si.edu/collection-objects/carousel-navigation-unit-commercial-airline
Reading list –
Wikipedia: https://en.wikipedia.org/wiki/Inertial_navigation_system
Manuals/guides: https://forums.x-plane.org/index.php?/forums/topic/121127-original-delco-carousel-iv-ops-and-quickref-manuals-pdf/
Down in the technical weeds: http://www.strapdownassociates.com/Blazing%20Gyros%20For%20The%20Web.pdf
X-plane Files –
LCLK Scenery: LCLK Larnaca Airport - Scenery Packages (v11,v 10, v9) - X-Plane.Org Forum
CIVA: http://store.x-plane.org/CIVA-Navigation-System_p_196.html
FJS 737-200: http://store.x-plane.org/732-TwinJet_p_305.html
| Waypoint | North | East | Reference |
| 0 | N34521 | E33363 | LCLK |
| 1 | N34555 | E33567 | SOBOS |
| 2 | N35022 | E34392 | ALSUS |
| 3 | N35550 | E34009 | VESAR |
| 4 | N36092 | E33169 | NEKES |
| 5 | N35560 | E33169 | DOREN |
| 6 | N34524 | E33374 | LCA(112.80) VOR |