CMANO Northern Inferno AAR

4 more MiG-21 head out towards our E-2C. The Banak Alpha Strike managed to avoid them, but es the Bandits get close to the Hawkeye. Our CAP Tomcats are forced to respond and 4 MiGs are downed by 4 Phoenix.

Up north, the Kanin destroyer near Spitsbergen has been sunk by 4 Walleyes. The surface contact near Bear Island turns out to be a Kresta I cruiser and is sunk with two Walleyes. It seems as if all Soviet ships have been sunk now. 2 Corsair remain armed with Walleyes just in case, the rest can be reassigned to other missions.

6 MiG-23BN are detected heading down the cost towards Bodo, passing Narvik. This is unfortunate, 6 aircraft less to hit on the ground with the inbound strike.

The defensive line near Narvik comes under attack by armored forces, but there are no aircraft available to give CAS. The next batch are a couple of Harriers and Jaguars in 1:30 hours. If I just hadn’t wasted those RAF aircraft before.

Bodo gets attacked by MiG-23BN with tactical nuclear weapons! Two small 1kt bombs wipe out most of the base and all but one of the RAF Jaguars.

Our second Bardufoss Alpha Strike start their run-in, as two MiG-21 rise from the base. Both Phantom escorts get to work immediately. Two more MiGs take off just as our strikers are over the target and 2 Corsair are downed by the Fishbed’s guns. A Corsair wingman returns the favor and shoots one MiG with a Sidewinder, while the second takes a Sparrow from the Phantoms. Now a bunch more MiGs come down from over the ocean and a furball develops. Adding to the mess, a silent SA-6 goes active and starts to shoot SAMs, which is being engaged by Shrike from the remaining SEAD Corsair.

Next Evenes Air Base gets bombarded by frog surface-surface missiles.

The SEAD A-7 follows up its Shrike missiles and plasters the offending SA-6 site with cluster bombs, destroying it. Both Phantoms are in a turning fight with the remaining MiG-21, which they cannot win. As all retreating aircraft of the strike go feet wet, the Phantoms disengage and accelerate away with afterburner. The strike has been of dubious value. The bombs didn’t seem to have done much additional damage to the base. One SA-6 site was destroyed and around 5 MiG-21 shot down, for the loss of two A-7.

Next the strike on Banak is running in.

The situation on the ground looks very bad tough. Soviet mechanized forces are breaking through our lines and there is not much we can currently do about it.

TO BE CONTINUED

1 Like

The strike on Banak is successful, with the two Intruder and two Corsair dropping a total of 32 Mk-83 1000lb bombs. The hangar is destroyed and both ramp spaces heavily damaged. But the count of MiG-23BN destroyed on the ground is only 4. It seems most of the fighter bombers are currently airborne, evading destruction. Hopefully the destruction of the ramps is sufficient to prevent hosting them upon their return.

On egress, a SA-6 site goes active which is silenced with a couple of Standard ARM and Shrikes. All aircraft retreat without losses.

Meanwhile, our F-14 CAP splash another two inbound Bears.

Next next strikes become available in 1 hour.

Pretty soon, around 10-20 MiG-23 buzz over the front line. All those we missed at Banak on the ground.

Tomcats bag two more Bears.

As the next wave of aircraft gets ready, Soviet ground forces have achieved a breakthrough. Now it is time to launch a maximum effort of air support. Bardufoss was hopefully damaged sufficiently to stop operations. At least for the last hour there were no MiG-21 activities, but that is no guarantee. Banak seems to have been hit pretty hard. Intelligence (the scoring log) indicates another 10 MiG-23BN have been lost, so I assume these have run out of fuel after there was no ramp space left at Banak.

The first response is by 4 RAF Harriers from Evenes Air Base.

Saratoga launches 4 A-7E armed with Mk-84 (not optimal, I expected more airfield strikes), 4 Phantoms, a Prowler and a tanker. JFK launches 6 Intruder, 6 Corsair, a tanker and a Vigilante.

The 4 Harrier start their attack run immediately after take off. One photo recon Harrier provides target data. The Jump Jets are having a day at the range, first dropping cluster bombs and 1000lb bombs and then strafing targets with 30mm cannons. Around 10 vehicles are destroyed.

The 3rd wave of strikes is inbound. 4 MiG-21 are patrolling the front. So Bardufoss is still not disabled! Perhaps we can redirect some aircraft to the air base if there are bombs remaining after the attack on the 37th Motorized Rifle Division.

The Phantoms splash all for MiGs, then head for a tanker off shore. Bot two more MiGs rise from Bardufoss, engaging the F-4 in a wild dogfight. Eventually the MiGs are splashed and the Phantoms can finally head for the tanker.

As the 16 plane attack on Soviet ground forces is over, only 5 tanks and 2 artillery pieces are left. Unfortunately the Mk-83/84 loadout was sub-optimal for the task and we spent our last stocks of Mk-84. An additional attack on Bardufoss was not possible. But with 23 MiG-21 splashed in total so far, there should not be that much left to fly anyway.

The next wave of aircraft gets available in 1.5 hours and is opened by a pair of Harriers, which kill two artillery pieces and a tank.

Next a CAS mission of 9 Corsairs with support is launched. This is the first wave of CAS armed aircraft with Mk20 cluster bombs and Mk-82.

And as the previous aircraft head out, hopefully the final strike is launched. 4 A-6 armed with Mk-83 targeted on Bardufoss, plus some more tankers.

The CAS attack by 4 A-7E with Rockeye proves to be highly effective, destroying around a dozen of tanks. 5 more A-7 unload about 60 Mk-82 on the remaining 4 tanks (the Corsair carriers quite a payload) but to no effect. These remnant tanks are extremely frustrating to destroy, but I consider the Soviet attack to be broken up.

After 4 Intruders drop another 40 Mk-83 on Bardufoss Air Base, the runway and taxiway are further damaged.

At this point I consider the mission to be completed. Soviet resistance on the ground, sea and air has been broken and what remains is merely some more cleanup.

S7

S8

This has been an incredible fun scenario to play. It features some of the things I like most about CMANO: Extensive ASW, fleet defense planning and strike ops. All the aircraft on the US carriers are super cool, including some of my all time favorites such as the F-14A Tomcat, A-6E Intruder and A-7E Corsair II. I also really like the Norwegian Sea/North Norway theater. That would be so great to see in DCS.

The Tomcats just made a handful of kills and most of the aircraft were on alert for a Backfire attack that never came. I consider this a sign of success. If Tomcats need to kill a lot of stuff, something went really wrong. I was very concerned after the Tu-95 that was placed (unfairly) close at scenario start got within radar range. I am sure we were detected, but probably the enemy was unable to clearly identify our ships. That is one of the weaknesses of the AI. A human would be able to recognizance a task force when he sees it (as I did recognize the Soviet SAGs) without having a true identification of the radar contacts. After this episode, our anti-Bear screen worked flawless.

If there is one critique I have about the scenario, it is the order in which it appears in the campaign. I would have expected this to be scenario 5 or 6, definitely before Iceland is captured. I consider it very unlikely that the Soviet could stage an invasion of Iceland, let alone supply it by air and sea, with such powerful NATO formations, such as the CVBGs from this scenario, still intact. In fact, I would assume being defeated in this scenario, and loosing two CVBG, to be a prerequisite for the Soviets to be able to invade Iceland in the first place. But probably this scenario order has been chosen to have somewhat of a increasing complexity/difficulty curve.

3 Likes

I’d like to ask a thing…
Is any of the outcome of a previous mission impacting the following?

Because, I’ve notice that in the earlier missions you literally annihilated the Reds and they still come like nobody’s business.
Like, really- you erased several squadrons worth of vehicles+pilots and they still go on like that?

I understand not everything can be factored in when making a campaign but… are campaigns just a sequence of unrelated missions?

CMANO does offer now the ability to transfer over damage/destruction of units from one scenario to the next. At the time when NI was made, this ability did not exist, hence the scenarios are independent of each other.

Keep in mind that each scenario typically features multiple missions being executed within its timespan (e.g. first you run a SEAD mission, which hopefully opens up a hole in enemy air defences so that you can then execute a strike etc.), and of course unit damage and destruction (and logistics, and airops downtime etc.) persist within a scenario’s scope. So effectively any long-running scenario is by itself a small “dynamic campaign”.

2 Likes

:open_mouth:
NOW it’s clear!

Thanks! :smiley:

Beside that- brilliant ideas.:slight_smile:

Wow, that sounds great. That is actually something I thought about playing this campaign. That it would be cool to carry over (or have them sunk) some key units over to related scenarios. Perhaps even have some designated replacements. So for example if a certain vessel in your carrier escort survived a scenario, you get the same ship in a subsequent scenario. If the ship is lost, it is replaced by a different ship as defined by the designer. Perhaps a lesser ship from the reserve fleet, or if scenario balance mandates it, a ship from the same class but just with a different name.

I have a question related to my latest mission. I tried to shut down Bardufoss Air Base by cutting the connections to the underground aircraft caves (taxiways and runway access points). From what I could recognize, the parking areas were isolated from the runway/runway-capable-taxiways as good as possible, yet the base remained in operation. Is this actually a valid tactic? Meaning, are airbase elements linked in a linear way or can aircraft enter any runway from any runway access point?

The latter. Currently there is no specific X-to-Y “connection mapping” between facilities in airbases. So if even a single taxiway remains operational, all aircraft at all hangars/shelters can use it to transit to the runway(s).

(From the airbase layouts we have observed, this is mostly true in RL as well. Tons of redundancies built-in for this purpose).

However, each facility has a finite capacity, which is further degraded by damage. So that single surviving taxiway becomes a very real traffic bottleneck for the entire base, particularly if it is damaged. So there is real value in targeting parking and transit facilities in a base (and likewise, elevators and parking spots at a carrier) even if you are unable to bag all of them.

2 Likes

This is a FANTASTIC level of abstraction.
My deepest and utmost sicere congratulations for this design! :smiley:

Scenario 12 - Hunter or Hunted

S2

Another submarine scenario. We need to intercept a Soviet surface group centered on the aviation cruiser Kiev. Under our command are just 3 nuclear powered attack submarines: The Sturgeon-class USS Tinosa, the one-of-a-kind USS Narwhal and the British Churchill-class HMS Courageous. In addition we get some airborne electronic intelligence gathering by 3 RC-135 Rivet Joint from Sondrestrom Air Base in Greenland.

The US subs are armed with the potent Mk48 torpedoes as well as SUBROC and ASTOR nuclear missiles/torpedoes. HMS Courageous is armed just with lousy 28 kts Mk23 anti-submarine torpedoes and WWII era Mk8 Straight-Runners (the torpedoes used by HMS Conqueror to sink the Argentine cruiser General Belgrano during the Falkland War).

The Kresta II and Krivak escorts, as well as Kiev itself, have a potent low frequency active sonar and are all armed with long range rocket/missile deployed torpedoes and nuclear depth charges. And of course Kiev also brings along a 10-20 ASW helicopters. Getting close enough for a good shot should be difficult.

USS Narwhal detects a whale. Shortly into scenario we get an intel update with the last reported position, course and speed of Kiev. With its projected course, our three subs are ordered into position to set up an ambush in 10 hours.

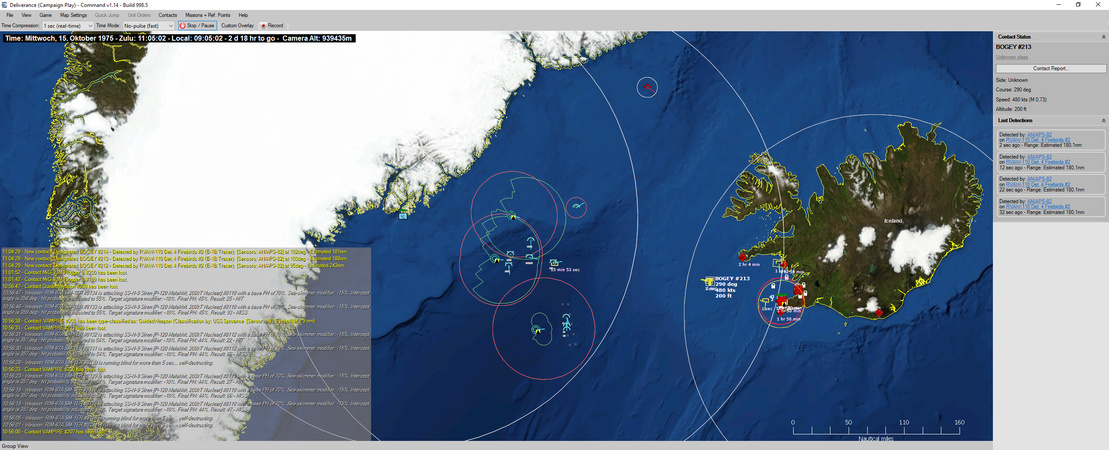
After one hour the RC-135 on patrol north of Spitsbergen starts to pick up radar emissions form a Krivak frigate and Kanin destroyer. But these are actually way ahead of the projected position of Kiev.

On her way, USS Tinosa makes several acoustic intercept contacts of medium and high frequency active sonars. This might be an independent ASW group. The signature points towards smaller ships. We try to avoid them by plotting a large detour, which seems to be successful.

Almost 7 hours after scenario start. Several active sonar intercepts are coming from further north. This might be our target group but it is about 30 NM off from where we expected it. Our subs need to make a sprint to get into position, which is quite dangerous. USS Narwhal moves to a intercept point at moderate 15 kts, HMS Courageous sprints at flank speed to a position ahead to lie in wait (she needs to be “run over” to use her torpedoes). USS Tinosa moves at 20 kts but has little hope to intercept the primary target.

The Krivak and the Kanin still seem to be between Spitsbergen and the small, long island. Looks like they are doing a barrier patrol and can be ignored.

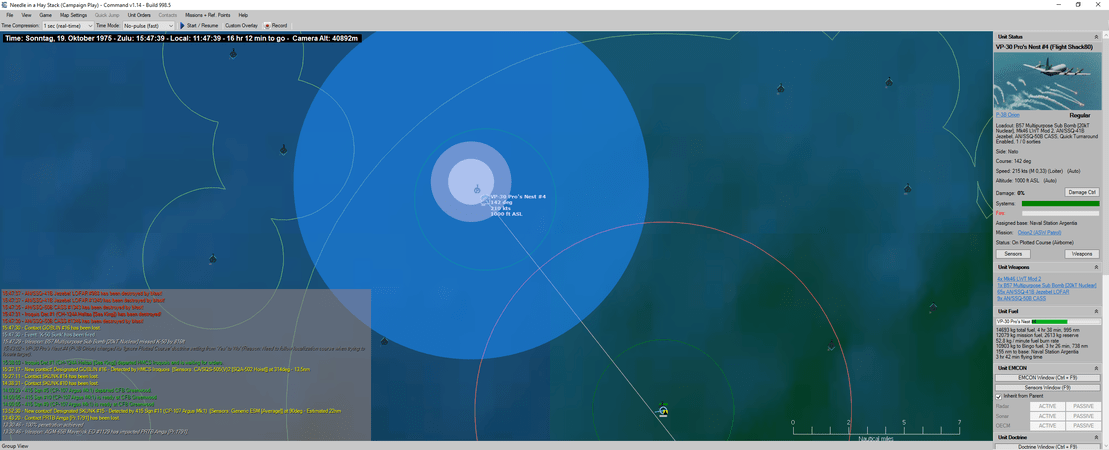
Narwhal reaches a good position and makes sonar contact with Kiev at 8 NM. HMS Courageous also gets into a good position ahead. USS Tinosa interrupts her run as she makes picks up active intercepts of another low frequency sonar pretty close. With Kiev already accounted for, this might be a Kresta II. She will initiate an attack on this target.

At a distance of 7 NM, Narwhal settles below the thermal layer and launches a salvo of 4 Mk48 against Kiev.

The torpedoes are detected pretty soon and most enemy ships break EMCON in defense. The RC-135 Rivet Joint now collects all the signals and quickly identifies all ships. The lead has a Krivak I frigate, north of it a Kynda cruiser. Kiev is in the center as expected, being trailed by another Krivak. And on the left flank, as suspected, a Kresta II cruiser.

It seems as when Kiev went all out with emissions, it picked up the RC-135 on its air search radar 150 NM away, as the Rivet Joint picks up signals from two Yak-38 fighters. Time to turn tail and throttle up.

Kiev is running at full speed, but the torpedoes catch up. Meanwhile, also USS Tinosa takes a shot of two Mk48 against her Kresta II cruiser.

Just some minutes later, Tinosa picks up a helo dipping sonar 4 NM east of her.

Kiev is struck by 3 Mk48, the fourth apparently malfunctions. For the moment the big ship is still afloat, and by now out of range for a follow up shot. Narwhal has to close again.

Narwhal is launching her second salvo of 4 Mk48. Two against the limping Kiev and two against a Kynda cruiser approaching from the north-west. To the east, Tinosa’s torpedoes are running down the Kresta II.

Just short of connecting, both Mk48 targeted at the Kresta II run out of fuel and disable.

Narwhal fares better and scores another two hits on Kiev, but the aviation cruiser is still alive. The Kynda is also hit once, with the second weapon being a dud. Both the Kiev and the Kynda now sit dead in the water.

Narwhal is about the get low on weapons. Only two more Mk48 are left to be loaded. The other two tubes are loaded with an old NT-37C torpedo and the sub’s sole ASTOR nuclear torpedo. This would have been a good weapon to attack Kiev, but it lacks the performance of Mk48.

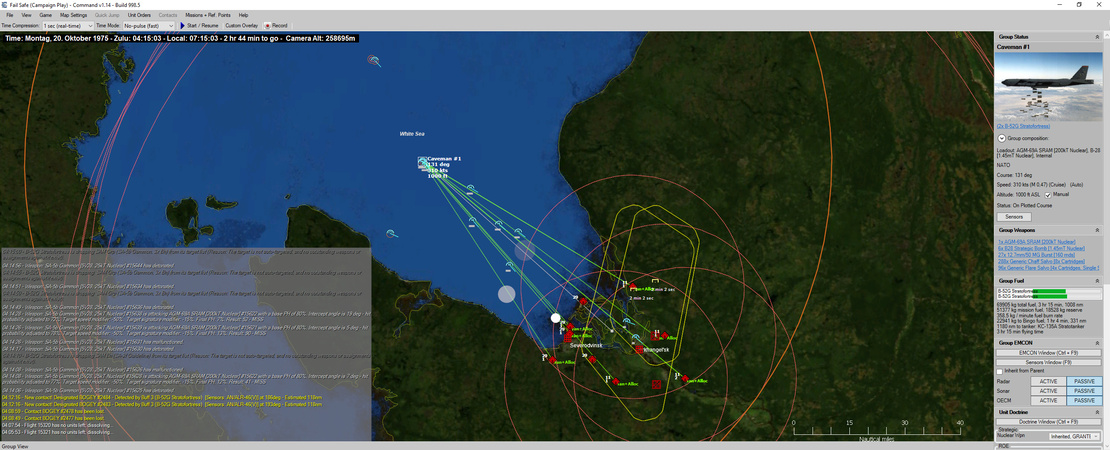
Its not long until a helo dips it sonar just 2 NM behind Narwhal. This is probably the the beginning of her end. Shortly after an object is detected splashing into the water above the sub and it is being vaporized by the detonation of a 80kt nuclear depth charge. 13 second later, the underwater shock wave reaches HMS Courageous 11 NM away and crushes this sub too!

Now Tinosa gets the attention of two helos. The dipping sonars are probably still out of range, but now it seems only a question of time. With foresight, one torpedo tube is loaded with a UUM-44A SUBROC. There is still hope that Kiev will sink after taking 5 Mk48. But if Tinosa is threatened to be sunk, we are going to send a 10 kt nuclear depth charge right next to Kiev as long as we still can.

30 minutes after last contact, Kiev is reported has having sunk.

After another hour, also the Kynda sinks.

Tinosa moves into position to launch another attack on the Kresta II, launching two Mk48 at 6 NM. This time, both weapons connect, sinking the cruiser.

To the west and south are Krivak I frigates which seem to head in Tinosa’s general direction at high speed. But as the cruiser is sunk, they seem to turn away to their original heading. As the Krivaks move away, Tinosa tries to call it a day and retreat.

But all the sunken ships seemed to have raised attention from the the ASW groups that have been monitored around the island to the east, as another Kresta II and a Kanin destroyer approach the area. Tinosa needs to engage again, launching two Mk48 at the approaching Kresta II at 6 NM.

Tinosa’s position has again raised the interest of a lot of ships around, even if the sub itself still remains undetected. At least the helo menace seems to be over with the sinking of Kiev.

The second Kresta II is run down and sunk by the first Mk48.

Next, a Kanin destroyer and a Krivak frigate are attacked with a single torpedo each. It seems as if the lesser ships are unable to detect the weapons. The Kanin is hit but stays afloat, the weapon targeting the Krivak is spoofed by a towed decoy. A follow up shot kills the Kanin.

I could continue to attack the various smaller warships around, but I don’t want to stress our luck. With the primary target plus a couple of major warships sunk, the mission is completed and our remaining SSN is woth more than all remaining enemy ships combined. Tinosa finds an opening to the south and retreats.

After 12 hours USS Tinosa passes Bear Island and has successfully disengaged from he combat area.

S20

S21

That was actually pretty fun :slight_smile:

3 Likes

Scenario 13 - Deliverance

S2

Finally we are going to retake Iceland. An amphibious group centered on the battleship USS Iowa is tasked to land US Marines at Reykjavik and Keflavik. Cover is provided by the last of the Essex-class attack carrier, the USS Oriskany. The old O-Boat already made some experience with Iceland. In addition, France has sent its carrier Clemenceau to support the operation. A very interesting collection of ships.

Soviet fighters and bombers at Keflavik NAS need to be neutralized in order to allow a safe approach of the amphibious group to the landing beaches. This will be the responsibility of the carriers. Once the air threat has been taken care of, Iowa can approach Iceland and bombard the enemy ashore. Of course we will have to take the usual measures against the submarine threat. Nuclear weapons have been used in abundance lately and a single nuclear tipped cruise missile could wipe out a task group.

Oriskany’s air group has suffered slightly since we last met her:
16/18 F-8J Crusader fighter
17/23 A-7B Corsair II attack/buddy tanker
2/3 RF-8G Crusader photo recon
2/3 E-1B Tracer AEW
6/6 SH-3H Sea King ASW
1/1 SH-3D Sea King ASW (on escorts)
2/2 SH-2D Seasprite ASW (on escorts)

Clemenceau’s air group is a little smaller:
8/10 F-8E Crusader fighter
14/15 Etendard IVM attack
4/4 Etendard IVP photo recon/buddy tanker
6/8 BR.1050 Alize ASW
2/2 Alouette III ASW (on escorts)

The amphibious group has a large contingent of Marines helicopters but just 4 SH-2D Seasprites for ASW duty.

For air defense we do not take special measures. The Crusader doesn’t have a great endurance and isn’t well suited for CAP. We will keep some alert Crusaders ready on both Oriskany and Clemenceau and launch them when ready. Of course we will but up the usual E-1 Tracer AEW patrol. But for as long as we are still operating under the radar cover of a ground station on Greenland, the Tracer will remain silent and collect ESM data only. I want to keep a profile as low as possible until Keflavik NAS is neutralized.

For anti-submarine defense, we have a Sea King dipping sonar sccreen ahead of the Oriskany battle group and a Alize sonobuoy screen ahead of the Clemenceau battle group. The amphibious group has to rely on its escort vessels only. All groups have additional ASW helicopters to prosecute submerged contacts once contact is made. The escorts keep their sonar in passive mode only. We intend to slip in the force silently and unnoticed.

Now lets get on to strike planning.

Lets have a look at Keflavik NAS first. It is a large base but it is not reinforced. There are 9 hangars and 25 open tarmac spaces, so plenty of room for many aircraft to disperse. Aircraft on the ground will be easy to destroy but it will take a lot of time. If we can shut down the base, this might be a job for naval gunfire by the battleship Iowa. There are two large runways but with just 6 runway access point in total. That is the weak point. If we can destroy these runway access points, air operations will be stopped.

Once the air base is neutralized, strikes can be shifted to coastal defense targets (artillery, surface-surface missile sites) in order to ensure a safe approach of the amphibious group and ultimately CAS against enemy ground forces.

S7

Oriskany’s A-7 are prepared fairly well and we will use what is available instead of re-arming aircraft (which causes delay of 6 hours). We can launch a 6 plane strike (plus support) instantly against the runway access point and follow up with a 6 plane strike in 2 hours to target hangars and ramps. Once the first strike returns, these planes can be rearmed as necessary for the next strike in 6 hours.

S8

Clemenceau’s aircraft were not prepared optimally. The Etendard is fuel/payload challenged, and the ready aircraft had heavy loadouts with just under 200 NM range. Not enough to strike Iceland anytime soon. All Etendards except two will be rearmed with long range loadouts featuring fuel tanks, for the first French air strike in 6 hours. After this strike the aircraft can be rearmed with heavy loadouts again and be ready in time for the fleet to close distance to Iceland. Two ready aircraft with bombs are retained though, to have an available reserve against surface targets (such as spy trawlers).

Time to launch the first strike. This will have a deception element to it. First an A-7 buddy tanker is launched, followed by 4 Crusaders. The Crusaders are to proceed to a position south of Iceland and fuel up. Then the actual strike is launched consisting of 3 A-7 armed with 2 Walleye and 3 A-7 armed with 6 Mk-83 each. SEAD escort is provided by two A-7 armed with 4 Shrike each. Two Crusaders will provide close escort and require fuel along the way by another A-7 tanker. The 3rd tanker is launched last to help out any returning aircraft that needs it.

Once the strike is descending to approach the last 100 NM to Iceland at low level, the 4 Crusaders will approach from the south in full view of the enemy search radar in order to draw away any CAP.

Finally, Clemenceau will provide an Etendard photo recon supported by an Etendard buddy tanker in order to make a bomb damage assessment flowing the strike.

As the first Alpha Strike is outbound, a Bear D is coming down the coast of Greenland. A pair of Crusaders from Oriskany is launched to intercept, but the amphibious group is already well within radar range of the snooper.

About halfway out, the strike force picks up a submarine based air search radar. It seems the Soviets have set up a submarine radar picket. The element of surprise might have been lost.

The Alpha Strike descended to sea level for the final 100 NM run in to Keflavik. The close escort Crusades are topping their tanks again, they burn fuel like hell down low. The decoy flight to the south has turned on their radar to draw attention. Its tanker is already heading back. In the center, the French photo recon Etendard is heading out. To the north, the Bear is about to be intercepted. And finally, USS Dale has launched its Sea King helicopter to check out the emitting submarine. Its a 200 NM flight out, so will be close to the limits of the helicopter.

Shortly later the Bear D is downed.

As the Corsairs initiate their attack run, two Bogeys rise from Keflavik.

The attack is a disaster. One A-7 misses with bombs and 3 out of 6 Walleye dropped malfunction. 3 Corsair and one Crusader are shot down by SA-6 over the base before the SAM site can be silenced with Shrikes.

On egress, the package is attacked by 8 MiG-23M which shoot down two more Corsair and three Crusader. Just two MiGs are shot down in return. For some reason our fighters refuse to engage the enemy other than under manual control.

The bomb damage assessment by the Etendard before it too was shot down by MiGs.Only 4 of the 6 runway access points are heavily damaged. One is lightly damaged and one completely untouched. Keflavik NAS remains operational. One MiG-23 and two Su-24 were destroyed on the ground and another 2 Floggers shot down. One SA-6 site was disabled. All this for the cost of 5 Corsair, 4 Crusader and 1 Etendard. A disaster.

TO BE CONTINUED

2 Likes

As the surviving aircraft of the first strike complete recovery on Oriskany, the remaining Corsair are brought from the hangar to the flight deck for the second wave. 3 A-7 armed with CBU-59 and 3 A-7 with Mk-82 Snakeeye. In order to close Keflavik NAS for air operations, the remaining two runway access points need to be destroyed. I am not sure how effective the 500lb Snakeeyes are against flat concrete, but 3 aircraft with 18 bombs each should do some damage. The aircraft armed with cluster bombs are destined to attack the parking spaces. No Crusader escorts are provided this time as they did little good previously and only two are currently ready anyway, which we hold back for fleet defense. A RF-8 Photo-Crusader is added though for post-strike bomb damage assessment. Oriskany proceeds to launch the second wave.

The destroyer USS Sellers in the amphibious group screen makes passive sonar contact with a diesel sub. USS Spruance and USS Harry E. Yarnell launch a Seasprite each to prosecute it.

Meanwhile, USS Dale’s Sea King arrives in the area where a sub has operated an air search radar after almost two hours of flight. With only 10 minutes of flight to bingo, the Sea King inates a sonobuoy search and some minutes later locates the sub. 3 minutes from bingo, the helo drops both its Mk46 and turns for the long flight home. A Whiskey SSR is hit and sunk.

The Seasprites drop sonobuoys and confirm the position of the diesel sub near the amphibious group. As it is actually in range, USS Sellers launches an ASROC at a distance of 9 NM. With the ASROC still underway, one of the Seasprites drops a Mk46 itself and sinks a Soviet Foxtrot SS.

Suddenly, USS Sellers picks up radar signals of two incoming cruise missiles. Sellers engages with SM-1MR at close range but misses.

USS Sellers is struck by a SS-N-9 missile, unfortunately one tipped with a 200kt nuclear warhead. Most of the amphibious group is consumed by the shock wave.

I guess that is the end of the scenario right there. The fact that Sellers was targeted almost immediately after launching an ASROC seems to indicate that was the trigger. Though I have no idea how a submarine could detect and localize the launch of a missile on the surface (the torpedo transported by the ASROC entered the water 9 NM away and cannot be distinguished from a helicopter dropped weapon).

I know it is lame, but I am going to load an autosave from 100 seconds ago…

This time, both SS-N-9 are shot down about 2 NM from their target, the first by USS Sellers with an SM-1MR and the second by USS Farragut with SM-1ER.

More cruise missile are launched, but this time the E-1 Tracer observes the launch. With some lead time, our ships should have an easier time to defend. Two Seasprites are also sent to the location.

With search radars now on, the missiles are detected early and the Leahy-class guided missile cruiser Yarnell starts to engage with multiple SM-1ER. Just for good measure, Farragut joins in with SM-1ER. Multiple SAMs are required but both cruise missiles are shot down.

Almost simultaneously, the second strike is running in on Keflavik NAS. The timing seems to be unfortunate again, as 6 MiGs are directly over the target. The cluster bombs flight is attacked head-on during their bomb run, but the MiG’s cannons miss. But then one of the cluster A-7 is shot down before the drop, two release weapons and are both shot down while pulling off target.

Our forces seem to be bewitched. 3 NM from the target the Snakeye Corsair hit bingo fuel and decided to pull up and RTB! After a manual intervention, the A-7 clumsy maneuver around and continue their attack. Miraculously all 3 drop their bombs, but all are subsequently shot down. Another 6 Corsair lost!

Despite the horrendous losses, the cluster bombs attack was quite effective though. 9 MiG-23, 8 MiG-27 and 9 Su-24 are destroyed on the ground. I made a very grave mistake though and bombed the wrong runway access point. One is still undamaged! This means that for the next attack, we will have to face a horde of MiG-23 again. Arg, this target is hell!

The recon Crusader breaks off its photo run way ahead and returns to the carrier. There is no point in another sacrifice. The only survivor of this strike.

Meanwhile, USS Yarnell takes down another 4 SS-N-9. With 8 missiles spent, this SSGN must be out of ammo now.

More bad news, since the cruise missile attacks, the amphibious group is obviously compromised. A formation of 10 hostile planes is inbound. Oriskany launches 6 Crusader, Clemenceau 4.

Even more bad news. The first Seasprite reaches the launch position of the SSGN and drops it sole Mk46 torpedo, but the weapon is a dud! After some 15 minutes a second Seasprite arrives on scene and sinks a Charlie II with a Mk46.

The enemy air strike is intercepted by 10 Crusader and defeated. 9 MiG-27 and 2 MiG-23M are shot down for the loss of two Crusader. Those MiGs are killers. For some reason, the US Crusaders refuse to engage automatically, requiring me to maneuver them in dogfights by hand. The French Crusaders engage fine and I can’t spot a difference in their doctrine settings.

In two hours Clemenceau’s aircraft will get ready for their first strike, but I have a bad feeling how they will fare against the still active MiGs.

A new Bear D approaches from the north and another cruise missile submarine is detected launching an 8 missile salvo against the amphibious group. A Seasprite is just 20 NM away and is redirected immediately.

Both SM-1ER ships in the amphibious group are successful in defending against this attack.

Two more Bogeys head towards the amphibious group. They are flying low, might be Su-24. Oriskany launches two Crusader to intercept, Clemenceau two more. More bogeys pop-up for a total of 8. Oriskany launches two more Crusader.

A Seasprite reaches the launch position of the last cruise missile attack and detects a sub. Unfortunately its sole Mk46 is again a dud. A second Seasprite rushes in and eventually sinks another Charlie II.

The second Soviet air strike is successfully intercepted an 8 more MiG-27 are shot down, as well as the Bear D to the north.

If our first two air strikes would not have been such failures, all this fleet air defense would not have been necessary. So many things went wrong on this one so far.

TO BE CONTINUED

3 Likes

It is now 6 hours into the scenario and Clemenceau’s aircraft are ready for their first strike. The majority of the carrier’s aircraft will participate in the attack. Since Clemenceau just has two catapults (just like Oriskany), launching a single large wave is not feasible. Until all aircraft are launched, the first would burn too much fuel waiting over the carrier. Therefore we will launch two waves. Up ahead an Entendard IVP photo recon to confirm which targets need to be struck. Then 6 Etendard IVM armed with 4 250kg bombs each to attack the remaining runway access points and hangars if possible. Escort is provided by 4 Crusader, which in turn are supported by an Etendard IVP buddy tanker. The second wave consists to 6 Etendard IVM armed with rocket pods to attack ramp spaces, followed by a final Etendard IVM photo recon to do bomb damage assessment.

The only aircraft that remain back on the carrier or the two Etendard on anti-ship alert armed with the short-range heavy bomb loadout, 4 Crusaders (of which 2 are ready to launch) and the Alize ASW aircraft.

With the first wave of the French strike underway and the second forming up over Clemenceau, the Knox-class frigate USS Lange in Oriskany’s screen makes a submerged sonar contact. The two Sea Kings on nearby dipping sonar duty are sent to track it down, and a Seasprite is launched by USS Voge in addition. The sub is quickly located, identified as Foxtrot SS and sunk by a Mk46 torpedo.

This time the MiG-23 CAPs seem to be away from Keflavik and Clemenceau’s strike apparently approaches undetected. Perhaps this time we are lucky for once?

Over Keflavik, 3 Etendard are shot down in quick succession by Shilka AAA but the other 3 manage to drop their bombs on the remaining runway access point. It’s not quite clear yet before another recon run is made, but the last runway access might have been disabled.

As the 4 surviving Etendards (3 strike + 1 recon) are turning home at low level and maximum speed, 5 MiGs are leaving their CAP stations to the north and head to intercept. The 4 Crusaders maneuver into a blocking position. The French fighters evade the initial salvo of radar guided Soviet missiles and a wild dogfight develops. Since the French Crusader actually maneuver autonomously (the American Crusaders refused to do so), they do a LOT better in air combat. 3 Migs are shot down for the loss of one Crusader and importantly, the remainders of the strike package retreat safely. The remaining MiGs return to Keflavik and for the moment no new aircraft seem to rise from the air base.

Next, the package of 6 Etendard armed with rocket pods is approaching the target. While the Crusaders now set up a patrol over Keflavik, the situation in the air remains calm. A fresh photo recon Etendard IVP overflies Keflavik at medium altitude and provides the latest pictures of parked aircraft. Then the rocket carriers run in at minimum altitude. All aircraft launch their rockets but one more Etendard is shot down by AAA. In return, a respectable 3 MiG-23, 4 MiG-27 and 8 Su-24 are destroyed on the ground. But unfortunately, BDA shows the last runway access point is still only lightly damaged and continues to be in use!

It wasn’t a bad attack by Clemenceau’s air wing. The exchange ratio was quite favorable and I was impressed by the Aeronaval’s Crusaders performance in air combat (versus the appealing performance by the USN). They dodged s large amount of missiles and engaged in successful dogfights. But still, 4 Etendard and one Crusader shot down are hurtful losses. And worst, all efforts to shut down Keflavik NAS have failed so far. What is becoming more likely is that the Soviets are going to run out of aircraft before Keflavik ceases operations. In fact, if the huge efforts on the runway access points would have been spend on destroying hangars and ramps as well, this might have been achieved by now.

As the last strike aircraft retreat, the 3 Crusaders and the recon Etendard keep loitering over the base at high altitude to keep an eye on things as long as they have fuel.

As a matter of fact, exploiting the current lull in Soviet operations, we launch the last two Etendard with the heavy 4*400kg bombs-loadout. Now that they can cruise at high altitude they can reach the target. Two more Crusaders are launched as escort.

The two-ship strike targets 4 hangars and destroys another 4 MiG-23 and 7 Su-24 on the ground. Unfortunately, the Etendard IVP photo recon is shot down by a SAM while trying to monitor the attack. Now, all remaining French aircraft head back to their carrier. As all planes recovered, the remaining 10 Etendard IVM are rearmed with heavy short-range loadouts for their next mission in 6 hours.

Now it is Oriskany’s turn again. 5 of its 6 remaining (sigh) Corsair are ready to launch again. Two with the carriers last 4 Walleye bombs, and 3 armed with 8 Mk-83 each. 4 Crusaders are added for escort. Targets for the Walleyes will be AAA and SAM sites around Keflavik, as this will also be a helicopter landing area for the amphibious assault later. The Mk-83 bombers should take care of the remaining hangars. A photo Crusader is added for BDA.

As Oriskany’s third strike is approach Keflavik (still without any MiG activity in the air) another Bear D comes down the coast of Greenland. Oriskany launches a pair of Crusaders to intercept it.

As the next strike approaches Keflavik, the recce Crusaders spots one of the runway access points has been completely repaired and there are currently two MiG-23 passing it (possibly heading to the runway to intercept our strike). A Walleye is launched immediately, which strikes the taxiway, destroying both MiGs. Is the base now finally shut down too? It dosn’t really matter at this point, as we are cleaning up the remains of the Soviet air power.

The RF-8 reconnoiters more targets and Walleyes are used to destroy a Shilka section and a SA-9 site. One weapon dropped against another Shilka site malfunctions. With the air defenses softened up, the A-7 with Mk-83 run in, striking all remaining hangars and destroying another 4 Su-24. All aircraft retreat without losses.

With this strike, recon still sees one remaining MIG-27 on a parking ramp and I assume there might be up to 4 MiG-23 left in some of the damaged hangars. I think aircraft can now be allocated to prepare the amphibious landing. There are multiple surface-search radar sites along the coast and various ground units in the landing area.

The RF-8 continues to recon the coastal area and is shot at by an SA-6 site near Reykjavik. All missiles are evaded, but this is a target that we need to take out before any helicopter assault can proceed!

Back on Oriskany, the aircraft are armed for the coming missions. Two A-7 are armed with Shrike and CBU to attack the SA-6 site. 3 A-7 are armed with Mk-20 Rockeye to attack ground troops. And the last A-7 is actually already beeing outfitted with 18 Snakeeyes since a while. In two hours it can attack the coastal radar sites. In addition, with the enemy air threat greatly diminished, 6 Crusaders are re-armed with Mk-82 and Bullpup air-ground missiles. 4 Crusaders remain for the fighter mission.

Over the next hours, the first two Crusader armed with air-ground weapons head over the beach and pound several infantry units and air defense sites. A single Corsair armed with 18 Snakeyes makes long round-trip to destroy 3 individual surface-search radar sites along the coast and another Bear D is shot down by Oriskany’s F-8.

6 hours after its previous successful attack, Clemenceau again sends its air wing over the Keflavik area, where troops and light tanks are attacked with AS.30 missiles, 400kg bombs and rockets. Two spare AS.30 are also launched against damaged hangars at the air base, and another two MiG-23 and one MiG-27 are destroyed. Unfortunately, one Entendard falls to a SA-7 MANPADS.

Things are going a lot better now. Soviet air is basically neutralized and we keep preparing the landing areas. The Reykjavik area hasn’t received any strikes yet, but this has to wait until the SA-6 site there is disabled. In 2 hours, Oriskany has its Corsair ready again for this mission.

TO BE CONTINUED

4 Likes

We are about to enter the final stage of the scenario. The Clemenceau group has closed to 100 NM from Iceland and will keep that distance. This is close enough for air operations and leaves some room for defense. The amphibious group is still 150 NM away from the beaches and keeps steaming in.

Also several lead escort ships have turned on active sonar. With the air threat mostly gone and most cruise missiles submarines probably having shot their missiles, it is important to find any quite diesel subs that may be lying in wait closer to the coast.

After an hour, Oriskany is ready to launch its next strike targeted at the Reykijavik area. 2 A-7 armed with Shrike, 3 A-7 armed with Rockeye CBU, 4 Crusaders with Bullpup AGM and Mk-82 and one RF-8 recon Crusader.

The Iron Hand Corsair get shot at by 4 SA-6 SAMs, which all miss, before 4 Shrike ARM can be launched in response. But upon breaking off target, one of the A-7 is shot down by the 5th SAM. After the Shrikes arrive on target, the SAM site seems to have been silenced though.

The aircraft start to attack ground units with cluster bombs from low level and another Corsair is downed by an SA-7.

The strike does some significant damage to the Soviet infantry dug in around Reykjavik. But ugh, another 2 A-7 lost! I think from now on we will limit aircraft to medium altitude bombing and leave the remaining ground troops to naval gunfire by the battleship Iowa. So far we have not detected any artillery or missile sites that could get dangerous to our amphibious ships.

Oriskany is out of Bullpup missiles, so all Crusaders need to be armed for the fighter mission again. The carrier now has only 4 A-7 Corsair left for attack missions.

With the amphibious group still 100 NM from the landing area, message arrives that the LSD USS Plymouth Rock has run out of fuel and lies dead in the water. All other ships still pretty much have fuel left weeks. What the hell? Fortunately we can order the battleship Iowa maneuver close by to pass along some fuel to the LSD.

As the amphibious group slowly enters the Reykjavik bay, USS Spruance, operating in sprint-and-drift ahead of the main body, makes sonar contact with a Goblin at 7 NM. As the contact changes speed from 5 to 10 knots, this is almost definitely a submarine. Spruance responds by launching two ASROC. The first torpedo hits and sink a Foxtrot SS.

Our air operations have ceased for most of the night with the amphibious group steadily closing to the landing area. At dawn, Clemenecau again sends 10 Etendard over the beaches. The mission proves to be highly effective, striking various infantry units with no losses.

As the amphibious group enters the lading area, the first troops are put ashore. With an Etendard IVP providing recon overhead, Iowa starts to engage enemy infantry units with 16-inch gunfire. The amphibious group also launches 6 AH-1J Sea Cobra attack helicopters which discover and engage some additional targets.

The troops go ashore with no causalities and Iceland is back in our hands!

S6

This has again been a fantastic scenario, one of my favorites. I love the old Essex-carrier Oriskany with the Crusader-Corsair air group and also Clemenceau has been a very nice touch.

Just look at the Soviet losses. Kevlafik has been the base for 90 Soviet aircraft, of which only 22 have been shot down in the air, the rest was destroyed on the ground. Thanks to this heavy strikes (even if they were very costly to the carrier’s air groups), the ships were mostly spared from air attack. Only 17 MiG-27 attempted to attack the amphibious group, which could be thwarted. A major attack by 30 Su-24 could probably not have been stopped. The goal to completely shut down Kevlafik proved to be a red carrot hanging a feet away, even though I still think it was a sound strategy. From the first strike on, every attack had the potential to shut down enemy air operations completely. But it was never achieved. The air base was never truly out of action and a lot of resources were wasted to little effect. Ultimately, destroying the aircraft on the ground was winning the battle.

Aircraft losses were substantial, especially to MiG-23M, SA-6 and ZSU-23-4 Shilka AAA. Oriskany’s air wing was decimated and with just 4 A-7 left the carrier is basically unable to continue combat operations. Partially this was to some bad luck. Strikes repeatedly met MiGs over the target in strength (probably they had just taken off to relief CAP) and I have never seen Soviet AA-7 Apex missiles scoring so consistently. Also US Crusaders didn’t want to engage in air-air combat unless steered manually, which was responsible for their abysmal air-air combat record.

The French did quite a bit better. Their Crusaders did very well in air-air combat, engaging aggressive and autonomously and also dodging numerous AA-7 Apex missiles as to be expected. Their strikes certainly also profited by the target being softened by previous strikes. They were not immune to losses though and getting 3 Etendard shot down by Shilkas within seconds was especially painful.

One thing has to be said about the nuclear tipped anti-ship missile which destroyed the amphibious group and therefore would have ended any attempt to retake Iceland right there. This was entirely my own fault. The decision to keep the airborne early warning E-1 Tracer in passive mode in order to not draw out enemy fighters was a tactical mistake, as it meant no early warning of incoming submarine launched missile could be provided. Loading an autosave from 100 seconds earlier rectified this and with the necessary early warning, our Standard-ER ships had no trouble to shoot down a total of 16 incoming nuclear cruise missiles.

4 Likes

Scenario 14 - Needle in a Hay Stack

S2

Another nice ASW scenario. Tensions are running high and a Soviet Hotel-class ballistic missile submarine has been spotted near the Canadian east coast. We are tasked to find and sink the submarine before it can launch a close-range nuclear decapitation strike with almost no warning. Under our command are mostly Canadian forces in the area of Nova Scotia, with 5 destroyers, 8 Sea King from CFB Shearwater near Halifax and 10 Argus ASW patrol planes from CFB Greenwood. In addition we get 8 US Navy P-3B Orion from NAS Argentina on Newfoundland.

The Canadian destroyers are nice, because all except one carry one or two very capable Sea King helicopters.

The Hotel SSBN has been last sighted by a fishing boat 6 hours ago 150 NM south of Newfoundland. It has probably moved south-west to get in range of the major East Coast population centers. Without knowing the exact sub model it is difficult to say at what distance it will attack. Could be 350 NM or 750 NM. So in addition to searching the area round the last sighting, it is probably a good idea to set up a barrier stretching out perpendicular from Nova Scotia.

This is our ASW plan. To the right, around the datum of the last sighting of the Hotel, are 3 Orion patrol areas for a total of 6 aircraft (one on station each). A 30x30 NM box (assuming the sub traveled at 5 knots) and and a 150x150 NM box divided in two (assuming the sub traveled at 10 knots plus some extra). 2 Orion (one ready right now) are configured for surface patrol armed with Maverick missiles. Perhaps there are Soviet tenders or spy trawlers.

Extending from eastern Nova Scotia for 140 NM is a barrier of 3 Argus patrol areas for a total of 9 aircraft (two on station each) with some extra overlap between the stations. the 10th Argus will become a reserve once it gets ready.

Extending near Halifax for 40 NM is a dipping sonar line for the Sea Kings. This doesn’t cover that much in the big picture, but searching larger areas with dipping sonar is ineffective.

The ships currently remain on station as mobile Sea King bases. None except the destroyer HMCS Iroquiois has a sonar that is worth talking about.

After just one hour, one of the Orion makes a lucky hit on A Goblin on its first sonobuoy line. The contact is evasive and difficult to track and after about 15 minutes of maneuvering and laying additional buoys, a Mk46 is dropped on the still unidentified contact. The weapon is dropped too far off though and circles without acquiring anything. The contact is lost again but regained on MAD on a new overflight. A sub after all! A second Mk46 is dropped, which this time is homing. As the targeted sub is throttling up, nearby buoys identify it as Victor II SSN. Not our primary customer for today but still a good prize. A third torpedo is dropped just to make sure, and after being struck twice the sub is sunk.

The sighting of a Whiskey Longbin SSG just 175 NM east of Boston is reported. This sub is armed with nuclear land-attack cruise missiles, so has to be dealt with immediately. Two airborne Argus are redirected, ETA 1 hour. In addition the destroyer HMCS Assiniboine launches its Sea King, but it is also 140 NM away and won’t be there sooner.

A report of another sighting by a fishing boat comes in. This time a Don-class submarine tender south-east of Newfoundland. The ASuW patrol Orion is send to check it out.

This looks like out tender. Upon approaching, the Orion identifies the ship as Kalmar-class ammunition supply ship and attacks with Mavericks. All 4 missiles are launched. The supply ships gets heavily damaged but remains afloat. There is nothing more we can currently do. This wasn’t a Don tender though. Has this been a false classification by the fishing boat or is there still a tender around? The Orion continues to search the area.

In the search box for the Whiskey Longbin off Boston, one of the Argus makes a MAD contact. After turning around and making another MAD sweep, the Argus drops a Mk44 which strikes a target. Now the second Argus joins in, dropping a Mk46. This weapon hits too, sinking a sub.

After some more Orion get ready at NAS Argentina, another P-3 with Maverick is launched which puts two more missiles into the ammunition supply ship, sinking it.

8 hours after scenario start, another Goblin contact is made in the Hotel search area. Surprisingly not by the Orion but by HMCS Iroquios. She launches one of her Sea King and a nearby Orion moves in. The Sea King establishes close contact with its dipping sonar and the Orion sweeps in to drop a B57 nuclear depth charge.

A sub is sunk, but it seems it wasn’t out target Hotel SSBN. Unfortunately the Sea King gets cough by the surface eruption of the nuclear explosion and is also destroyed. That was kind of unnecessary…

A sonobuoy contact is made in the Argus patrol zone, almost at the opposite end of the barrier (over time I have increase the with of the barrier considerably due to great endurance and large sonobuoy capacity of the Argus). Its a false alarm though as the contact turns out to be biologic.

Another Goblin, this time very far out almost at the far edge of the Argus patrol zone. But it turns out to be biologic too. Only 9 hours left, I feel we are running out of time.

Only 6 hours to go, then, finally, another contact in the western Orion patrol area. No friendlies close, shoot first ask questions later. An Orion drops a B57 on the first pass on the unknown contact.

That was the Hotel SSBN! Mission accomplished.

S17

7 Likes

Scenario 15 - Fail Safe

This is it, unlimited nuclear war with the Soviet Union is imminent. We are in command of 18 B-52G Stratofortress on Chrome Dome airborne alert over the Arctic and await strike orders.

EAMs with strike orders are received for all bombers. 3 B-52 each are assigned to two hydro-electric power stations and a nuclear plant on the Kola, and the naval bases of Severomorsk, Severodvinsk and Arkhangelsk.

Each of the 18 bombers is armed with 8 AGM-69A SRAM, a 100 NM ranged mach 4 solid fuel missile with a 200kt warhead, for clearing a path through radar stations, SAM sites and interceptor bases. 80 times the power of the Hiroshima bomb per B-52 just for defense suppression! To actually attack the primary target, each bomber carriers four 1.45 megatons B28 free-fall bombs.

The Soviet Union is heavily defended with interceptors and SAM sites, including nuclear tipped SA-5. Penetration will be flown at low altitude, which will use up a lot of fuel. Therefore the first thing we do is disable the bingo fuel RTB logic for all bombers. There probably wont be much left to return home to anyway.

The bombers descend to sea level before entering the range of Soviet early warning radar sites. 3 groups will penetrate near the Norwegian border into the interior of the Kola peninsula, one group heads straight for Severomorsk and and two groups follow the entrance to the White Sea to Severodvinsk/Arkhangelsk.

The first 4 SRAM are launched against radar sites to open a gap in coverage.

3 good air-bursts, one weapon malfunctions. A follow-up shot malfunctions as well.

ESM gear detects 6 interceptors rising in the Murmansk area. 5 more SRAM are launched against various SAM sites and Kilpyarv air base. Two are shot down by nuclear SA-5 warheads and some malfunction.

A total of 25 SRAM have been fired so far and defenses on the Kola have been thinned out considerably. One bomber group has actually destroyed its primary target, the Upper Tuloma Hydro-Electric Power Station with a SRAM. The flight, down to gravity bombs, is now turning back in order to draw some of the numerous airborne interceptors away from the the bombers that press on further south.

As the bombers push further south, Monchegorsk and Afrikanda interceptor air bases are destroyed by SRAM. But meanwhile the air is filled with interceptors. As long as the bombers stay close to the ground, the Su-9, Su-15 and Yak-28 cannot attack with missiles (and they don’t have guns), but the bombers need to climb in order to employ weapons. Fortunately though the B-52 has tail guns, and multiple interceptors are shot down in short order without losses.

Then the southern-most group is attacked by 4 Su-15 and two B-52 are downed by AA-8 missiles. With them go multiple unused valuable SRAMs.

3 nuclear SA-5 take out half of a SRAM salvo from the north. This SA-5 seems almost impregnable with SRAM. Let’s hope we can run it out of SAMs before we run out of missiles. After shooting 22 SRAM, one missile finally gets through and takes out the SA-5 site near Severomorsk. Now the way should be clear to take out the remaining sites covering the city and attack with bombs. This proves unnecessary though. As a SRAM air-bursts over a nearby SA-3 site, Severomorsk is swept away.

As the bomber group attacking the Kola Nuclear Power Station climbs for their bomb run, they are bounced by Su-15 and a B-52 is shot down. The remaining two bombers drop a B28 each. The target is destroyed, and both bombers suffer some light damage to external systems.

The surviving bomber attacking the Iova Hydro-Electric Power Station also reaches the target and drops two B28, destroying the target.

What remains on the Kola. The northern-most group has just destroyed Kilpyarv air base with B28 bombs, after the base has survived half-a-dozen SRAM air-bursts and kept spewing out Su-15. These 3 bombers now head turn back over the ocean.

The remaining 12 bombers converge on the Severodvinsk/Arkhangelsk area, which is extremely heavily defended with 15 SA-5 battalions and 4 SA-2 sites plus an interceptor base. Ouch!

As expected, a barrage of nuclear tipped SA-5 takes down SRAM after SRAM. But some missiles get through.

The bombers to the left have spent their SRAM, now one of the two northern groups is raining down 24 missiles.

The enemy becomes under pressure and missile interception ranges are getting smaller. Some SAMs detonate so close that they start to take out other SAM sites.

As the second group from the north launches the last remaining 24 SRAM, it is attacked by Su-15 which shoot down 2 bombers. After all SRAM are spent, the target area remains defended by 9 SA-5 and one SA-2 site. Now the bombers need to run in and drop their B28 gravity-bombs on the primary targets.

The bomber that attacks Severodvinsk is about to be hit by a SA-5, but not before it could drop its two B28.

The 3 bombers that attack Arkhangelsk are likewise shot at over the target but by higher intervention, the nuclear SA-5 fails to detonate. 6 B28 are dropped, but failing to get away fast enough, all 3 bombers are consumed together with the city.

With all assigned targets destroyed, we fulfilled our duty. Of the 18 bombers that entered Soviet air space, 8 bombers make it back out and hit the tankers between Spitsbergen and Greenland. After fueling up, the crews are free to head to wherever they wish to spend their remaining days. There probably is not much left to return home to.

If you want to call it like that…

S21

----- THE END -----

8 Likes

Caveman #1 …I always liked that detail…

Great play through @MBot - thanks for it.

So- this is it? That’s the end of the campaign?
It was a great run but the ending makes me feel like watching “The day after” all over again. :confused:
Which is a compliment.

Nice joib @MBot Thank you! :smiley: I guess. :thinking:

3 Likes

Yes, it is a little depressing :slight_smile: There is a little text at the end which describes the outcome. Nothing fancy. It was formatted in a weird way so I didn’t take a screenshot. An appropriate ending for the story line I think.

This is really a fantastic campaign. Not only a great setting and well made scenarios, they were also connected in a believable way. There were even some very cool 70s styled news clips (I wish there were even more of those). Even though ultimately it was just a sequence of independent scenarios, it really felt not like just a scenario pack but like an actual campaign.

@Dimitris I would love to see more official Cold War-era WWIII campaigns for Command. The Soviet perspective or the Pacific side of such a war would be awesome to play.

6 Likes

This is great, I’ll have to try this one. I served on USS Tinosa (SSN-606) at the end of her career. The Command database says it is a 637 Sturgeon class, but it was actually a 594 Permit class.

2 Likes

In that case I am glad that it was Tinosa that survived that mission :slight_smile: