Here’s how I made a mission that is similair to what you seem to want:
Getting started. I gave myself an F-15 with a full compliment of slammers. We’re going to hunt various Red aircraft that will spam randomly, although only one at a time, above the flat plains in the Mozdok area.
My very first action in the editor. I opened the trigger menu. I added a trigger that will fire right away as the mission starts. This trigger will turn flag 1 to a value of 1 (the function of FLAG ON)
What are flags?
Flags are basically the one, single most potent function of the entire editor. Flags are basically a poor man’s version of what would be called variables in other languages of code. Basically, you can store information inside a flag/variable, and allow the code, or in this case, the sim, to act on it. In the most common languages of code, you can store three types of information in a variable.
- A boolean. This means True or False. A variable that should be false will have a flag value of 0. A variable that should be true will have a flag value 1 or any number that is not zero.
- an Integer. An integer is a non decimal number. “1” is an integer, and so are 2,3,4,5 and 6. 123456 is also an integer. 0 is also an integer. -2 is also an integer, but 1.5 is not an integer.
- Strings. Strings are an important feature of real code, but the flags do not support them. So I will not cover them here. They are typically much more complicated than simple booleans and integers. You will most likely have to learn about strings when you decide to pick up scripting (for the Simulator Scripting Engine, wich is DCS’s default scripting engine based on the Lua language. I believe the Mission object oriented scripting enviroment, MOOSE and the Mission Scripting Tool, MiST also support strings)
Fortunatly in DCS, you do not need to define what sort of information is stored in the variable/flag. DCS ‘sorts it out himself’ when the information is requested somewhere else. So if I created another trigger that would ask “Is Flag 1 true or false?” DCS would figure it out and answer “Flag 1 is true”. If I asked DCS “what is the integer of flag 1?” DCS would answer “The integer is 1”.
In DCS, there are 3 major ways to interact with a flag if you consider it a Boolean (true or false) via conditions (the 2nd row in the image)
- FLAG IS TRUE means you are requesting if the flag is TRUE ( checking if the value is not 0)
- FLAG IS FALSE means you are requesting if the flag is FALSE ( checking if the value is 0)
- TIME SINCE FLAG is a pretty cool feature of the DCS editor. It will check if the value does not equal 0 (true), and when it does, it will keep track of the time (in seconds). Once the required amount of time has passed, the condition is met allowing the actual trigger to fire! (provided other conditions have been met as well)
Most of the functions that consider a flag an integer are fairly self explanatory ( FLAG EQUALS, FLAG EQUALS FLAG, FLAG IS MORE, FLAG IS LESS, etc)
Back to our mission!
I created a new trigger, using the pretty cool TIME SINCE FLAG function I talked about. Remember that beforehand, I made a trigger that when the mission starts, flag 1 will get a value of 1. This new trigger I made will look for that flag 1 to become true, then wait 5 seconds and then proceed to turn flag 2 true as well. In normal English: I told the sim to start the game, then wait 5 seconds before proceeding with anything else, I made this as sort of a contigency, making sure everything is loaded in before Continuing.
I think that’s enough info about flags for just now, lets add some things to kill!
In this image, I added a bandit candid. There are two important things to note here. The red arrow points towards the unit’s name. This is the name for this unit in the mission editor, and you can refer to it later. So name it something so you know what it is! The green arrow point towards a function called ‘late activation’. This means that this unit won’t exist in the actual sim until I tell the sim it’s time for this unit to spawn, using the trigger system.
as a bonus I am also showing how to tell the unit that when it reaches its final destination, return to the first waypoint, so it will circle the 4 waypoints indefinitely.
But… we wanted our enemy in a random position at a random altitude right? Like I said before we cannot TRULY do that, but we can emulate it close enough for all purposes. Simply click on the Candid, and copy-paste it around for a bit. (Use CTRL-C to copy, CTRL-V to paste) Make sure to give them all a unique name (I named mine bandit01, bandit02, bandit03 etc) and let’s give them unique routes and altitudes. It may look a little like this. For the example I added 10 possible enemies, but there is no real limit on how many you can add.
That looks like a lot of opponents right? But remember that we told the sim about ‘late activation’? If we start up the sim now, not a single enemy will appear, at all, ever. It’s time for us to dive back into the trigger system. This is the first ‘multi-pronged’ step we’re making, requiring several steps to get the sim to do what we want! Hopefully you can keep track.
To begin with, notice the orange 1 and connected elements. Instead of using the Mission Start or Once types, we’re using the SWITCHED CONDITION type for the first time! This is a ‘reusable’ trigger, one that we can activate an indefinite amount of times, unlike the ONCE trigger wich as the name suggests, can be used only once, or the MISSION START wich only checks once during the mission start (note that if you DO use mission start, and add conditions that are NOT met right at the start, that trigger will NEVER fire! the trigger we made at mission start had no conditions, so it will always work).
Secondly, note the red arrow marked with the numer 2. This trigger will activate when the boolean for flag 2 reads “TRUE”. The first thing this trigger will do is turn the boolean for flag 2 back to FALSE. So if we ever turn flag 2 to TRUE again, the whole mechanism of this trigger will work again.
Lastly, lets look at the juicy stuff for this trigger. The green arrow, marked with the number 3. What this does is give Flag 3 a random integer, that integer should be within the values of 1 and 10. See where this is going? 
We have created a new ONCE trigger.First, look at the conditions. If the integer of flag 3 equals to 1. Then the first Candid will be spawned in, the one flying at angels 15.
Note that there is a handy CLONE function. Simply press the clone button with the correct trigger selected, then increment all the values marked by a red arrow by one. Now the trigger we created 2 images back can choose any random integer between 1 and 10, and the trigger system will spawn a random enemy for us based on that!
So, our mission is complete. It will spawn one random enemy for you to kill. But wouldn’t it be cool that the sim observed your behaviour, and after you killed one, it will spawn someone else for you to kill? Let’s try to do just that. A fairly easy and visual way to accomplish that is by using a trigger zone. An area for DCS to check for bad guys. First, find the trigger zone functionality on the left side of the editor.

Let’s place it somewhere, make it big enough for the enemies to spawn inside of it. Give it a name so you know what it means. You can give it a color if you want.
Ok, that’s that! Back to the trigger system.
There are two good habits I am hoping to teach you by showing you this. Flag 1 was the mission start flag. By telling it to wait 20 seconds after that flag activates, we’re pretty much tell it to slumber for some time until the normal spawn mechanism is done. Otherwise it might spawn one via the regular system, and one via the respawn system. The second habit is, I am Continuing using flag 10. Why flag 10 and not flag 4? No reason… Other than that the flag system has to make sense to only one person… YOU! the mission designer. Imagine if we wanted to add fighter escorts like you described later, would it not be nice if we could use sensible flags like 4,5,6 and 7 instead of having whatever flags come after the respawn systems we’re creating now?
There might be several ways to go at it, but this is the way I made it. Once the slumber time is over. This trigger will start checking if any RED unit is inside the trigger zone. If there is, it will wait. Once that unit is gone because it left the area or you killed it, it will fire flag 2 again, restarting the spawn system we created before! A new random integer is chosen for Flag 3, and a new enemy will appear Flag 11 will fire my contigency system.
Behold my contigency system, and allow me to explain. The respawn system is not really a respawn system, because you can’t really make units respawn without resorting to scripts (this is where those tools come in handy, IMO MiST is great at doing proper respawns). It simply selects another random bandit to spawn in. This means that after the first bandit, there’s a 10% chance an integer is chosen that is already ‘spent’. And after the 2nd enemy, a 20% chance and so on. This contigency is to make sure that even if an integer is chosen that will not work, the system will ‘cycle’ again to make sure a new integer is chosen until a new bandit does really show up.
Let’s put our mission to the test!
In my trusty Eagle. The skies are completely clear while I settle in the cockpit.
Exactly 5 seconds later, Bandit09 spawns in! Let’s go find him and kill him!
For the best shot, center the dot
That one lone slammer wasn’t enough to kill him so…
BRRRRRRRRRRRRRRRRRRRRRRRRRRRRRRRRRRRRRRRRRRRRT
That’s more like it
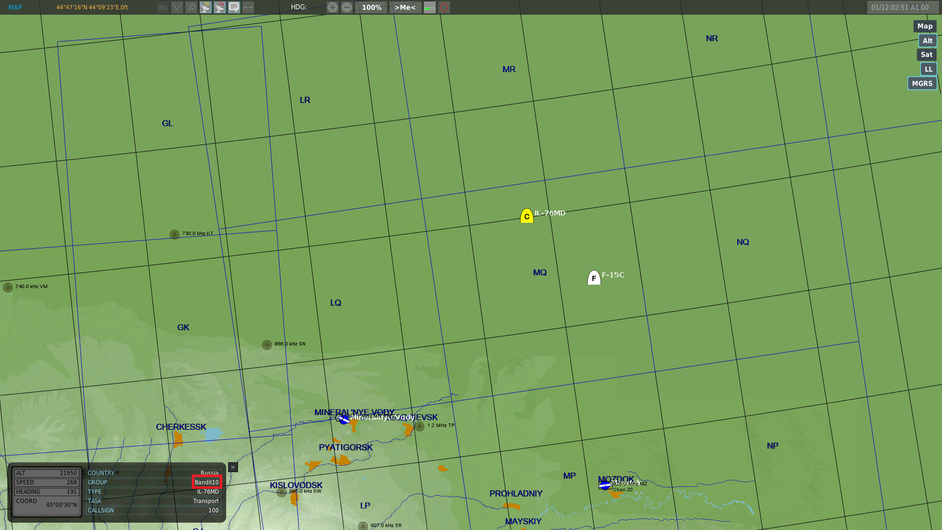
A few seconds after that, Bandit10 shows up! Let’s give him a similair treatment.
And after dealing with that transport as well, Bandit03 shows up!
I hope this proves useful to you. Let me know if you have any questions.