One last contribution from my wife - I’ve got to have good nails for this part ![]()

(I’m going to use that over the capacitors surround for extra safety from the liquid metal, under the IHT)


Ok. That was exciting.
The good news is I am writing this from patient zero!
Here’s the steps I took, to document it for the record (just in case patient zero ever gets a lawyer):
First off, here was my issue. When I stress my PC, like for CPU intensive gaming like flight sims, then my overclock of 4.5 GHz was running too hot. I put it back to defaults of 3.6, with a Turboboost of 3.9 on the single core, but it was (a) still too hot and (b) made me feel sad, because it was slower than I was used to for the last year or so. Here’s a rough temp profile pre-operation:
So the ‘70C+’ spike was the CPUZ plain ‘Stress’ text, to max the CPU cores for 1 minute. It would essentualy just escalate up to about 85C, causing me to stress out.
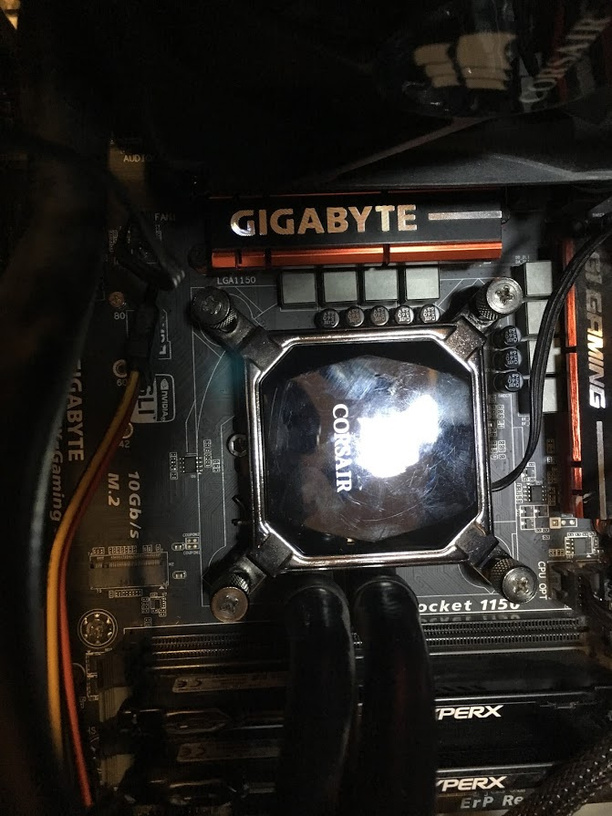
Step 1. Take off the existing cooler. The thermal paste I used last was Arctic Silver 5, and it looks still pretty good here (albeit a bit uneven under the water block when I took it off):
Step 2. Get that puppy prep’d for the op. Here’s the hot boy himself:
Step 3. Off With Their Head! After a quick Isopropyl alcohol 99% rub down refreshing I put it in the Vice of Justice.
Step 4. Looking at it, it seemed wrong. Why would I put all the pressure on those lips sticking out the side. That can’t be right. Using advanced Vulcan logic I managed to figure it out and rotated it to the proper orientation here (flat sides against vice edge):
Step 5. Squeaky Bum Time. I turned the allen key. I turned it some more. Nothing.
I really turned it, like it’s a ‘him or me’ mano a mano fight now. Not budging.
(click).
Ok, something moved. Thank the maker. I think I see and edge come up a bit.
Step 6. The Completely Safe Razor Blade Technique. To cut the glue I edged a blade under a corner, like so:
I still have the vast majority of my fingers, so a win there. Plus if I’m ever lifted for prints then I can just look on the floor for them.
Step 7. The Intel Autopsy. Once some considerable force was used to pry apart the glue on integrated heat panel, I see this:
Hmm. Look at that, the actual chip is as clean as a whistle. The TIM on the IHT is rock hard and more like a plastic resin. I think this stuff was really dried out after all these years.
Step 8. Clean Up and Nails. I removed the bad paste but kept the old glue, as it would act as a guide for me putting this back together, plus I left an outline of the old TIM so I could know the boundary of where to put the new liquid metal. I used an edge of credit card to scrape it, which would come in handy when I need to buy a new computer as well. This might work with VISA or Mastercard, but no guarantees.
I then put a very thin layer of nail varnish on the capacitor pegs on the left of the actual chip (above it in the pic above). I did that because I don’t want the liquid metal squeezing off the chip or IHT and then joining all those circuits up in an hilarious 3 volt explosion. Johnny 5 would not be alive if that happened. I spent a pleasant 15 minutes blowing on my chip to dry my nail vanish. It looks fantastic! ![]()
Step 9. The Terminator 2 Arrives. Using liquid metal is scary, just because even without referring to a valence ions table, I’m pretty sure this stuff conducts electricity. Pouring it over a naked chip sounds bad. I start with the IHT, and use the syringe to put the smallest blob I can on it:
That really really spreads out a lot. I get it so there is no moving liquid, and try to keep the outline of the old TIM, as the chip is not actually symmetrically in the middle of the glued area. I used a ruler to check, being all sciency and whatnot.
Ok, time for a tiny amount on the chip.
This actually spreads out really nicely. I use a fine brush to move the metal around. It felt like painting a small figurine or toy soldier. Fun. I now have a Disco-Intel ™.
Step 10. Reassemble. I didn’t bother getting glue and sticking the IHT and chip back together. The motherboard clamps them pretty tight, and as this was my first time I was just suspecting that (a) it wouldn’t even boot and (b) I’d probably have to do this again and didn’t want to go through that vice bit with better/newer glue.
I put the naked chip back in the motherboard and then place the IHT VERY CAREFULLY on top:
I then locked down the clamp, by keeping a finger firmly on the chip while I pressured the arm down. This bit was fairly risky.
Ok, I was very tempted to use liquid metal on the outside IHT and the water block (I still might actually) but was keen to see if this would actually ever boot up again, so just used a very small amount of artic silver 5 paste and put it back together.
It boots!
It is running cooler!
Time for some experiments, but so far, it is not worse. My hypocritical oath ![]() of “do not so much harm, unless it’s fun and you can get away with it” is working. Will report back later, just now need to finish this 99% alcohol and clean up paste from my fingers.
of “do not so much harm, unless it’s fun and you can get away with it” is working. Will report back later, just now need to finish this 99% alcohol and clean up paste from my fingers.
That was an excellent season opener to The Computer Torturist - Man Over Machine… I can’t wait for Episode 2! (Will there be a hack saw???)
For the temperatures, so far so good. I ran DCS and X-Plane, and it was comfy at 40C, so that’s about a 20C delta on games (with no overclock).
For a stress test I can get it to 65C, which is pretty normal.

Now to try overclocking again to see if this helps.
A mild 4.3 GHz overclock. Not good. ![]()

Hmm, I might do the outside bits now, but no magic miracle cure as yet.
If I recall correctly, such complex circuits tend to cook themselves to death. A degraded circuit produces more heat, which damages an adjacent one, which produces more heat…and so on.
My old gaming laptop’s GPU died by going from playing FSX to overheating with Microsoft Word.
I sense waterboarding in that chip’s future.
I suppose the good news is that I have got it stable with the turboboost of 3.9 GHz now, so offspring alpha looks like she may be getting a better PC, at least as long as it lasts.
Is it too soon to welcome you to the i9-9900k club? Maybe I should convene with @BeachAV8R. Congrats on the upgrade!
I’ve been trying. Did I need to post hockey footage in VR at 120 FPS? Is that what is will take??
Hmm. Not sure. Prices in CDN. I can claim the GST tax etc.
The ‘It would take a year to all arrive’ list PCPartPicker Part List
All from one shop combos: https://ca.pcpartpicker.com/list/yPcKvn/by_merchant/
| Type | Item | Price |
|---|---|---|
| CPU | Intel - Core i9-9900K 3.6 GHz 8-Core Processor | $647.99 @ Mike’s Computer Shop |
| CPU Cooler | Noctua - NH-D15S 82.52 CFM CPU Cooler | $99.95 @ Amazon Canada |
| Motherboard | Gigabyte - Z390 AORUS ELITE ATX LGA1151 Motherboard | $218.00 @ Powertop |
| Memory | G.Skill - Trident Z 32 GB (2 x 16 GB) DDR4-3200 Memory | $336.99 @ Newegg Canada |
| Video Card | Gigabyte - GeForce RTX 2080 8 GB GAMING OC Video Card | $949.00 @ Canada Computers |
| Prices include shipping, taxes, rebates, and discounts | ||
| Total (before mail-in rebates) | $2271.93 | |
| Mail-in rebates | -$20.00 | |
| Total | $2251.93 | |
| Generated by PCPartPicker 2019-05-13 20:56 EDT-0400 |
Curious about the Noctua, as my Corsair block is getting really old now, so want to try something different this time and heard good things.
Not really super intensively care about the motherboard (I don’t need wifi etc) or the memory, but 3200 should be ok.
To be budget friendly, recycle your old GPU for now. The RAM and i9 will give you a buff anyway, not as much as a 2080 I know - but having something working is a lot more fun!
![]()
If I hunt around for deals, and source all just from newegg, I can get to this:
| Type | Item | Price |
|---|---|---|
| CPU | Intel - Core i9-9900K 3.6 GHz 8-Core Processor | $649.99 @ Newegg Canada |
| CPU Cooler | Noctua - NH-D15S 82.52 CFM CPU Cooler | $137.99 @ Newegg Canada |
| Motherboard | Gigabyte - Z390 AORUS ELITE ATX LGA1151 Motherboard | $237.69 @ Newegg Canada |
| Memory | G.Skill - Ripjaws V Series 32 GB (2 x 16 GB) DDR4-3200 Memory | $234.99 @ Newegg Canada |
| Video Card | Gigabyte - GeForce RTX 2080 8 GB GAMING OC Video Card | $969.99 @ Newegg Canada |
| Prices include shipping, taxes, rebates, and discounts | ||
| Total | $2230.65 | |
| Generated by PCPartPicker 2019-05-13 21:24 EDT-0400 |
Not too bad.
Or ya know… $1260.66 without the GPU. ![]()
Then save up again and go right to the 2080ti!
The thinking there is that my daughter gets an upgrade, in that she’ll have the i5/4690K, 16GB and the 1070 together to make a more balanced set.
I’d treat the 2080 as a tweener card, as don’t like the extra Ti value. I am a bit worried that the 2080 only has 8GB though, as I see that @BeachAV8R on his benchmarks is seeing lots of VRAM use in high resolution VR. It’s hard to tell if that’s active usage or just stuff occupying his GPU RAM at the time. For the price the 2080 really should have 11GB or so, but otherwise it’s just a nice sort of 1080Ti level card for a bit cheaper.
It really should have the extra memory. 8gb is what I have on the 1070ti. Marketing wise, that doesn’t make much sense.
I guess a double up-cycle on the GPU.
daughter → old build → new build
is highly impractical. Especially if anything older than the 10XX series is involved.
We had a thread around here about credit cards…haha. Just want ya flying again man - we were building a squadron like system without the ham-fisted seriousness!
Of course, I could now delid the i9! lol