Beyond the pre tensioning, spring tension is very close to linear.
Well, the goal here is to bring the pedals into equilibrium around center. So, yes, when the pedals are centered, the spings cancel eachother out.
Then, as you push one pedal, one spring is pulled, and the other is shortened. The pulled spring, increases in tension, and the shortened spring decreases in tension.
many thx guys! I like you like it
it was big project for me, I am glad it is (almost) complete.
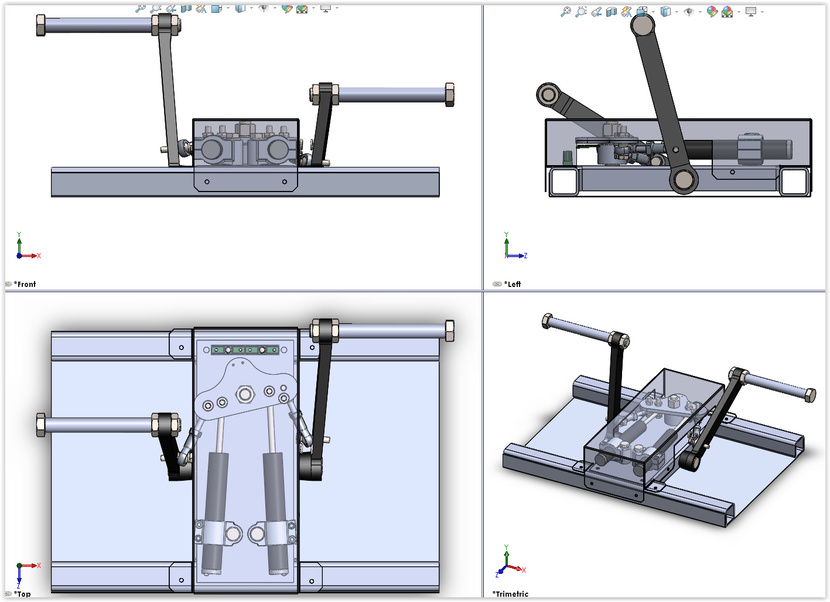
The general design was inspired by VKB T-Ruders but lot of parts were prototyped.
Good thing about prototyping is that you will find many different usages for various parts.
That was the case also with the aluminum plate which is rotated by the two threaded rods. In the end it served also as the base for the springs.
The primary purpose of the springs is to generate load - originaly, without the springs, the travel of the pedals was too light thanks to the ball bearings.
Secondary the springs brings the pedals into equilibrium, as already mentioned. But they are only slightly pre-tensioned so the centering force is not so strong. The pedals rests usualy slightly displaced and not in perfect center position.
This is OK as also IRL on the ground there are no big forces in the ruder pedals (talking about small GA planes). And after pilot checks the controls (before engine start) he will center intentionaly the pedals. To have the ruder pedals properly centered on the ground is very important especialy in the helicopters
FFFFFFFFFFFFFFFFFFFF@@@@@@@@@@@@@@@RRRRRRRRRKKkk…(so much time wasted)
Hi
The almight snark suggested i have a look here and see if i could get some assistance with my endeavours to fix my pedals and/or with me building my new ones, please keep in mind I’ve been tinkering with several ideas and coming up with stuff off my own bat…only to find that you guys are way ahead of me.
granted my efforts arent as ‘shiny’ as some of the others, but they are functional and its distrubing how similar the designs are (particularly Nevo - get out of my head sir! )
I’ve also been tossing up using bearings (or not)
my design is not flattering, but i intend for it to be pretty rugged (bomb-proof)
and simplistic enough and from readily available off the shelf products with minimum of manufacture required.
what I actually came here for is to see if anyone has a line on the little cog gears used on the analogue potentimeters (relax - I’m wanting to use a halls angle sensor (looks like a pot) but need to source gears to allow to drive the halls sensor)
anyone with any information / assistance would be greatly appreciated
I’ll save you the hazzle of cogs. Use a TLE5010 sensor and a magnet on the axis. Much easier!
You need a Teensy2 micro controller that you program with the MMJoy2 software. It’s a lot easier than it sounds, and help is right here
Hey Troll
thanks for the hot tip
will look into the [TLE5010] sensor
Im already using ‘teensy’-esque Pro-Micro controllers with MMjoy2
not teensy, but they work a treat (only $30 for 5 )
i was looking at the halls sensors (like pots) to swap out in the base of an old TM F22 pro joystick I am refurbishing to bring into the 21st century…I had an old FLCS and got the F22 of a mate, I never realised it was an all metal base and gimbal until i pulled it apart and found the gorgeous metal assembly I needed.
I have machined a shaft to replace the plastic one and made it to fit a cyclic shaft i mad (from an old vintage metal bed head, it had the seat/crutch curve already bent into it)
Hey Troll
I have some of the shift registers already
just curious on the TLE5010 sensor link that you sent, what is the small board the sensor is plugged into, which is then daisy chained into the shift register cards…?
(is it just a different type of micro-controller card?)
Hey (Mr) Snark
many thanks sir
I’m not sure where/when, butsome time back I saw the VKB pedals and the design must have stuck with me
but I kept looking at the huey pedals and the bicycle crank shafts stuck in my head for the uprights
Ive been tinkering on and off with this design and several other projects (joystick/cyclic as well as a new collective) but havent progressed much on these for a while
im finally getting sick of the flight link pedals and want to get these going, plus I have been experimenting iwth the pro-micro cards and MMjoy, almost got to a point where Im good to go.
It was actually quite wierd seeing all these designs and some of the features that I have been thinking about but not investigated much into, being already implemented on the stunning designs here.
As stated, I felt a bit gutted that my designs weren’t so unique and a little creeped out how Nevo had put together something I had (almost completely identical )considered (other than the spring ‘bell cranks’)
but then simplified the design so that others could copy it, more the boxy Land Rover 110 look than a Range Rover Discovery finish
but its all good, at least I havent gotten to the halls sensor yet and managed to be corrected in time…
Hello Gentlemen
I thought I’d share my build document
my build, made possible by your kinds selves
hopefully it might help someone starting out or inspire them with a design of their own
Winter months are close so I will be DIYing more again soon I gues.
Will have to revisite little my pedals - better electronics and the dampers from what I saw on your build.
There are some minor thing missing, which I am in the process of tweeking (hence the draft watermark)
Small bolts/nyloc nuts 5&6mm gauge and tapping the the he nut spacers for the TLE5010 sensor etc.
The link will remain the same I’ll just post when I’ve updated it