Fold-away simpit - early thoughts

Spirited from @Troll’s ever so amazing Simbox (and also having, ahem, domestic factors of similar ilk), I’ve been half-heartedly drafting up sketches of a foldaway simpit for the home office.

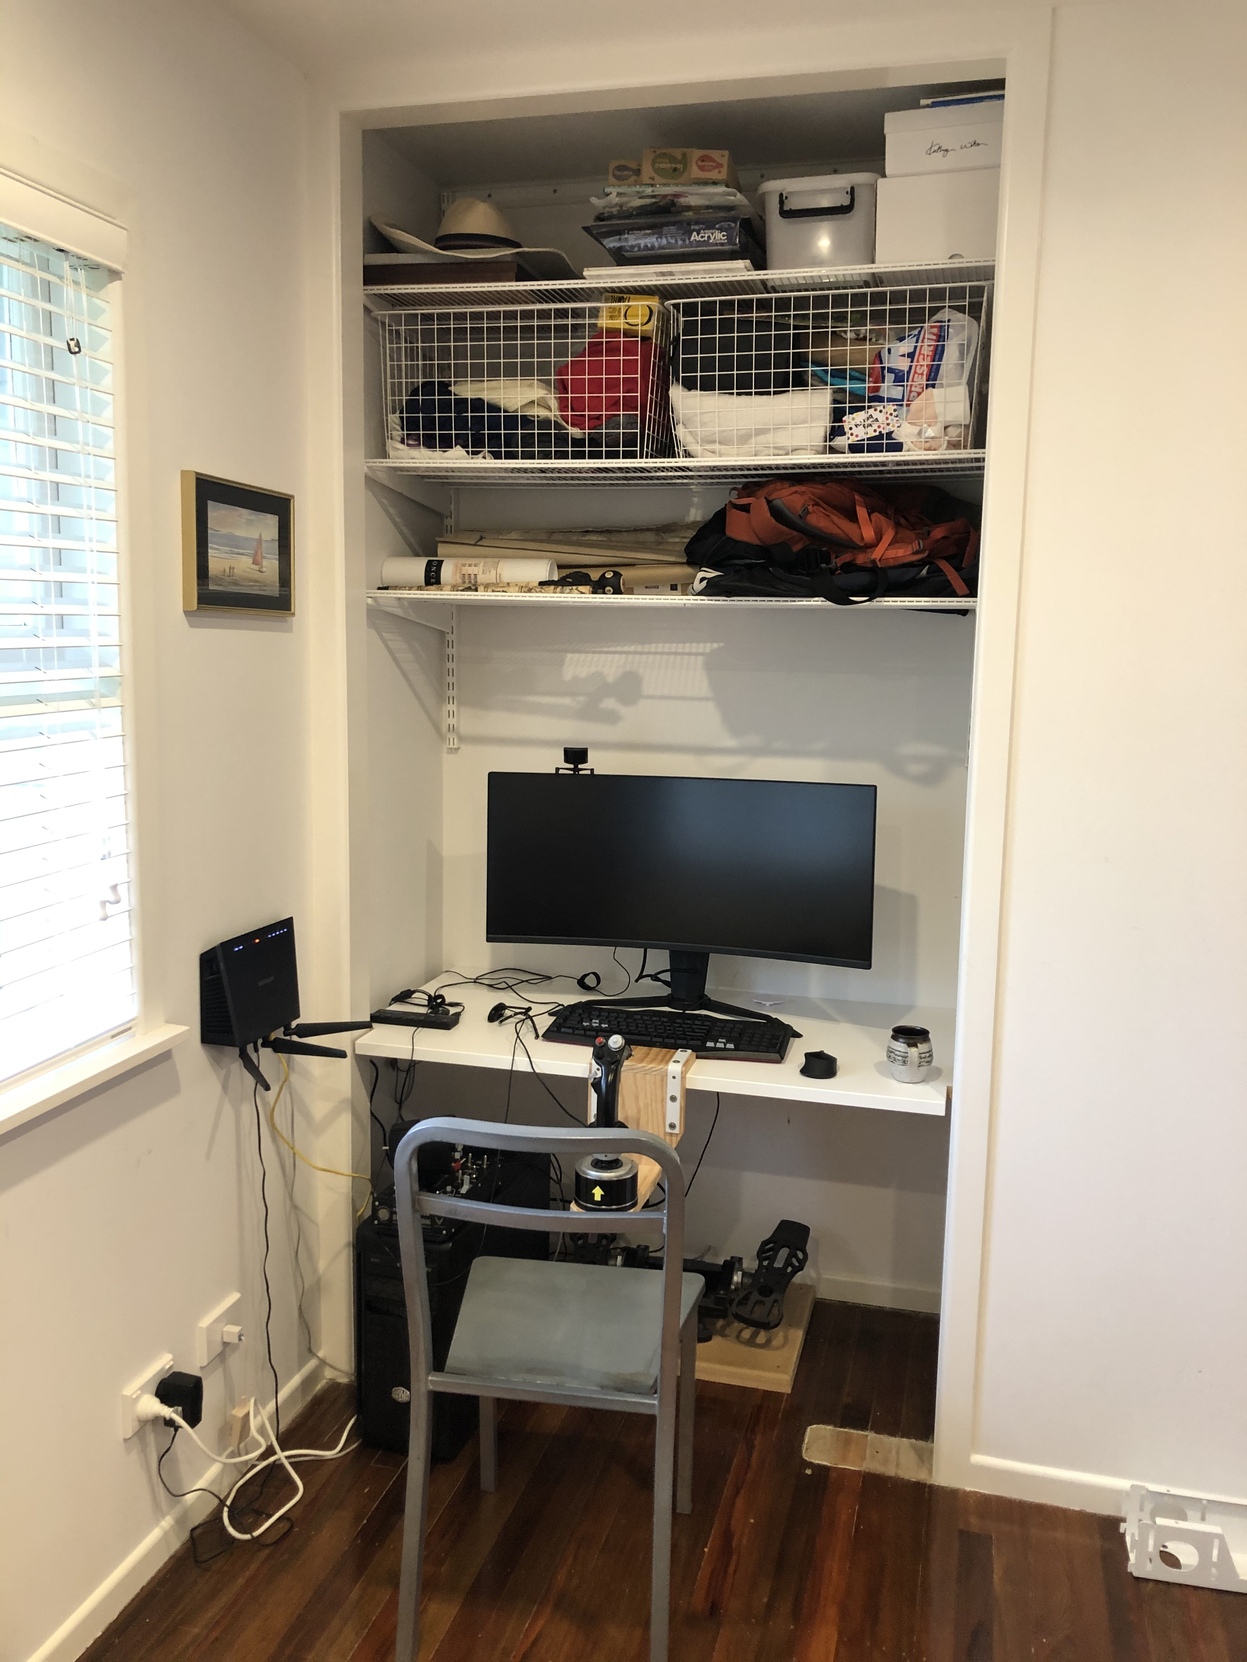
There’s a wee corner in the office, which currently houses a small bookshelf. There’s a built-in wardrobe on the other side of the wall, which creates a “nook” 1000mm wide by 600mm deep:


(sorry about the mess)

I’m currently trying to come up with a feasible plan for the space, and something like this comes to mind:

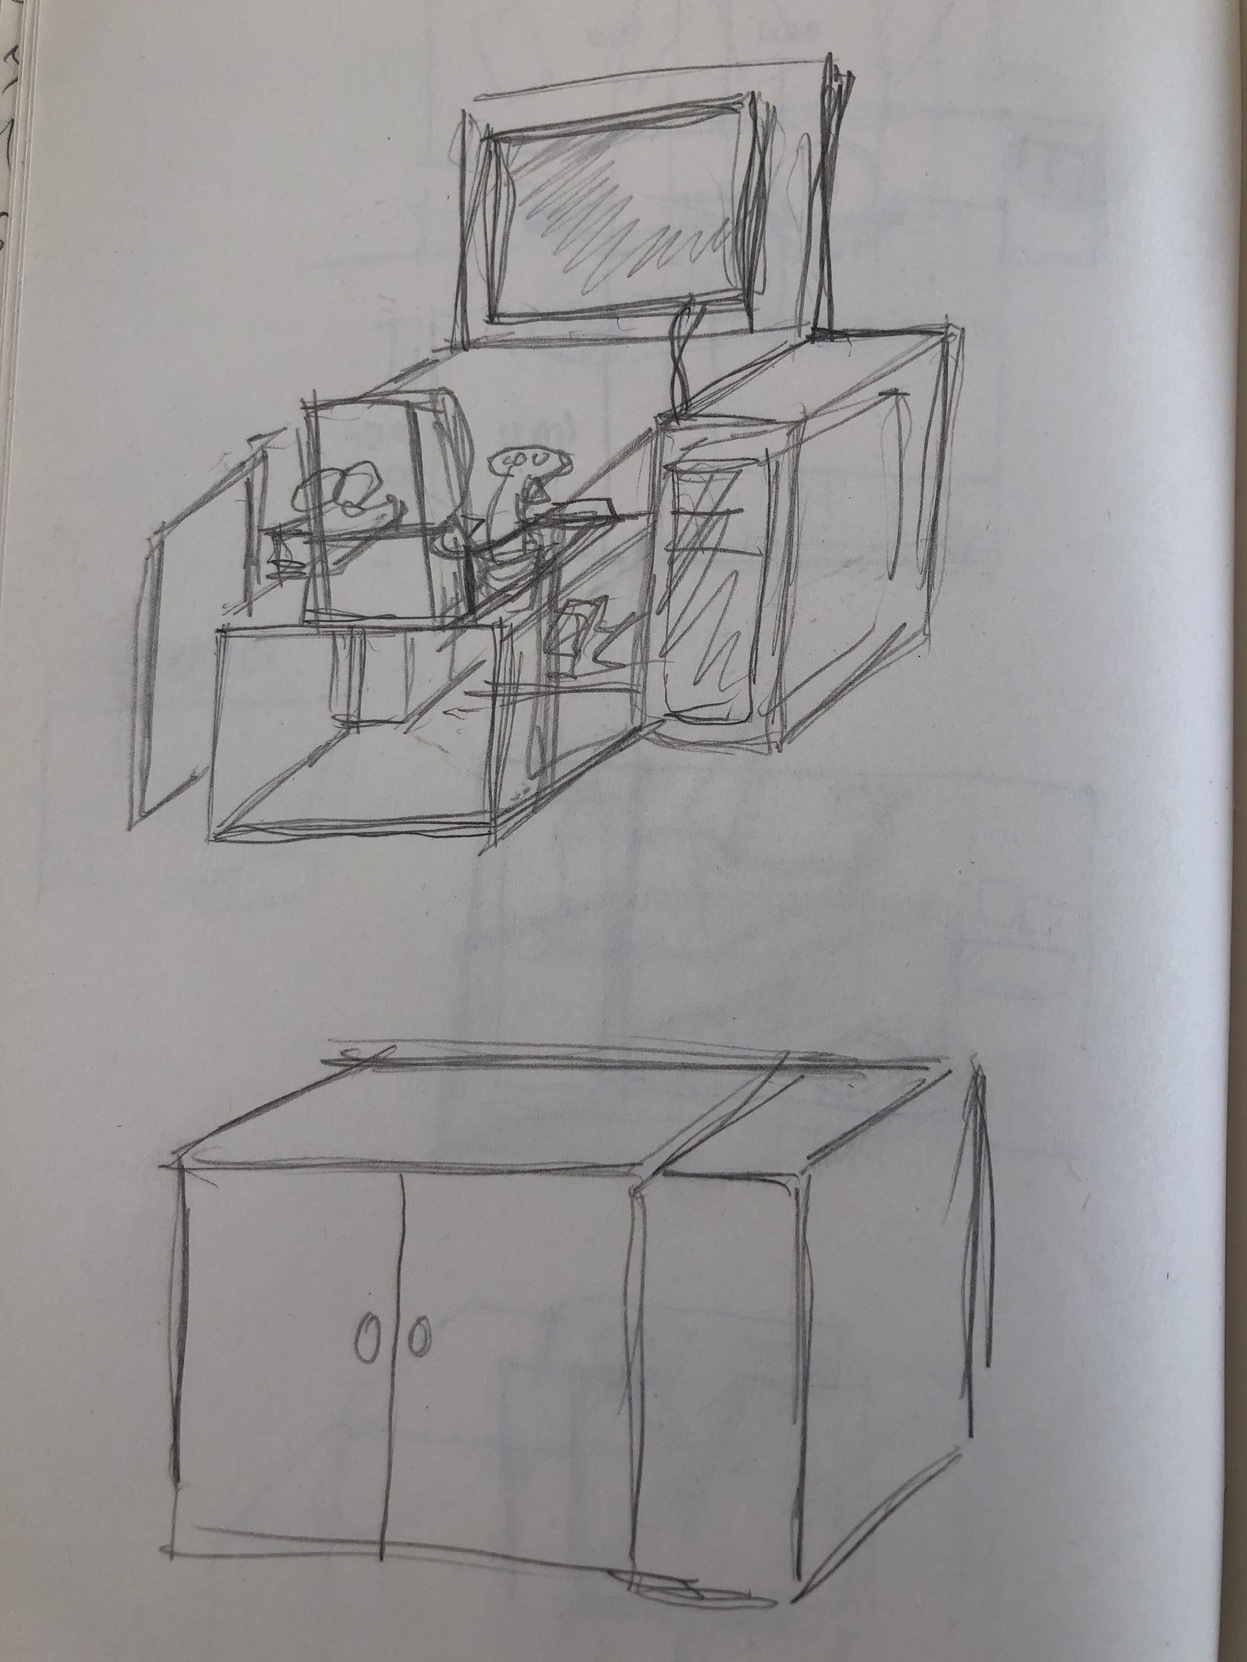
Basically I’m thinking about an aluminium extrusion frame with veneered MDF “cladding” to make the item “furniture-like” when folded away.

The dimensions in terms of width seem to work - I can have just under 300mm in width on the right side for a mid-tower and 700mm for the cavity that houses the cockpit itself, i.e. pedals and a seat with HOTAS that pulls out when in use. You should just be able to fit a 32" screen under the folding lid - otherwise if that gets too complicated, I can always just wall-mount the screen, that wouldn’t be too bad visually.

The biggest challenge is the depth for the seating position. I only have 600mm of depth to play with - @troll’s setup is 1500mm long, however my Crosswinds move horizontally i.e. your sitting position is more upright, so I probably need a little less. I’ll need to do some more measuring to see if the concept is feasible. Ideally you’d pull out the seat assembly and have some adjustable slots to lock it in to the rest of the pit so you can push the pedals without pushing the seat back.

The seat base could look something like this:

Aluminium extrusion base with a bit of extrusion sticking out at the front to set up the HOTAS (initially a TMWH base with an extension, later down the line one of the higher-end bases, probably). The cavity should have enough space on the side to put a plate for the throttle on the left side and a small mouse pad on the right side.

Anyway, early days but I figured I might as well start recording this here and get your valuable thoughts!

12 Likes

How much room do you ave in your yard?

Just kidding.

One thing to think about is how VR has really changed things. I was well on my way to building a pit-like area in my man cave but ended up with a very un-pit-like area once I realized that with VR, you really do not need a pit, you just need the controllers properly placed. My flight sim area is much more austere than it has ever been…OK, not having to have a gazillion game CD/DVDs around is part of it.

Another thing to think about is what are you flying? If just DCS then a “fighter pit” is definitely the way to go…unless you are doing DCS helos. But if you are doing. a civ flight sim (XP, P3D, etc.) as well as DCS then you probably want something a bit more flexible - swap in/out yokes and throttle quads for HOTAS.

Taking a look at the photo…have you thought about something that folds down from the wall. I’ve see beds (called a “Murphy bed” in North America) and ironing boards that do open up that way.

4 Likes

Beat me too it but that was what came to my mind too.

Wheels

1 Like

Good thinking!

I like the way you think - I do need an extra garage for simming, why didn’t I think of that! I shall present this idea to the board right away! One moment!

Okay - new garage not an option. Next plan! :sweat_smile: :crazy_face:

You are right - unfortunately, in my circumstances, both having a pit in the garage and going VR both loop back to the same things: needing to be at least a little bit present at home and being able to do short sessions that may end abruptly. VR in particular gets strong opposition - I hope to eventually win this argument, but in the meantime, “happy wife happy life” applies and I think my next immersion step is a ~30-32" screen, maybe with a curve to it.

You raise a valid point. At the moment, I don’t have a range of controllers, so I fly everything with the TMWH HOTAS combo…including my beloved DCS helos.

It would be good to have a design that can accept a collective / yoke / throttle quad in the future without having to amend the core structure.

Having a space for a collective on the left side of the seat doesn’t look too hard.

Yokes / quadrants will need a bit more thinking, as they’d probably require an extruder crossbar in front of the seat, which in the current sketch design would prevent the seat being pushed in for the stowaway position.

I actually thought @chipwich’s rally setup was pretty neat, though - not foldaway in the same way, but tidy. Might give some thought to an open extruder bar design like that also, see what seems best.

2 Likes

A little bit of time has passed and the plan has changed a little bit. With another little one on the way, the current office / guest bedroom is going to become another baby room.

The agreed solution is for the home office / sim pit to move into the built-in wardrobe in the new baby room, so we can still occasionally use it.

I’ll put a sliding door with a child-proof latch in, so the “office” will hide away when not in use (we redid the walls a few years back and expanded the wardrobes but I haven’t got the new doors made).

This sets out the requirements of the space quite clearly, which makes the design process simpler in a way. The requirements are:

• The wardrobe sliding door has to be able to close when not in use
• The office has to be dual purpose, i.e. the sim gear must be stowable and the desk must become a work-from-home space at a moment’s notice

So far, I’ve rearranged the shelves above and fitted the old desk top in – the desk is 1200mm x 600mm so I needed to cut little slots on each side to fit it in the doorframe (the wardrobe is 520mm deep with about 100mm extra due to the depth of the doorway), but it works. I’ve attached the desk with steel L-brackets to maximise the space underneath. Yesterday I plugged everything in without worrying about cable management etc. to test out the screen and look for dead pixels etc. but the plan is to tidy things up quite a bit:

The next step is easy enough – I’ll wall-hang the screen to maximise desk space. I got a TV-mount, which should be quite good because it extends out, so I can optimise the distance between my seating position and the screen:

From here, the plan is a bit less clear. The plain metal dining chair isn’t really comfortable for simming, so that needs to be sorted out. Also, while stable, the heavy MDF base for my Crosswinds isn’t really fit for purpose for the “easy conversion to office” I need to achieve.

In terms of the chair, the key issue is that it has to fit under the desk when the sliding door closes. Surprisingly, I haven’t found any off-the-shelf office chairs in NZ with this option: you do have ones that ‘nest’, i.e. the chair seat flips up for storage, but very few options for a folding backrest. I was thinking about modifying a chair or making one out of aluminium extruder etc. but I think I’ve found a better, mostly off-the-shelf, solution: boat chairs!

I need to go check out the shop, confirm the dimensions not shown in the diagram and sit on one but it looks like it could solve multiple problems – fits under the desk, comes with padding and a hard plastic seat bottom to attach things to.

This is the gas spring-adjustable pedestal you can buy – if you want, you can also attach a swivel between this and the chair, but I think it’s better to have a solid, non-spinning chair for simming. Together the two cost NZ$255, i.e. US$163 – not too shabby, considering a good office chair can easily set you back NZ$400-500 or more.

Here’s the sketch for a base made out of aluminium extrusion, because the round base is obviously not enough on its own, and also an extrusion base should lend itself well for clip-on HOTAS mounts (think Monstertech except attach to the chair rather than the table):

One of the things I haven’t worked out is the new base for the Crosswinds. I’m thinking aluminium extrusion, but the design is yet to be decided. Ideally, I’d come up with a way to quick-attach the pedals base to the chair base at the right distance, so you’re pushing against your body weight when using the pedals. I think the pedals will stow away under the desk, hanging on the side wall of the wardrobe, so the design has to fit that space.

3 Likes

For a collective, provided you don’t want to simulate the throttle twist (which most helicopters is only for startup and shutdown), an old joystick with centering springs removed works well. Mount the base at around a 30-45 degree angle, and add an extension to get more nuanced control. Using some felt weather stripping in a plywood frame creates both friction to hold the collective, as well as a track to keep in riding the correct axis. Total time if you have the supplies can be less than an hour for a rough but functional model.