As a Real™ Aerospace Engineer (BS Aerospace Engineering, Embry-Riddle Aeronatucal University, Prescott), I am absolutely thrilled about the increase in “realistic” space simulations. My go-to for a space-sim fix is currently the Kerbal Space Program, which should be no surprise to those familiar with the simulation genre. The game is an awesome combination of mostly-accurate physics, self-deprecating humor, explosions, and pretty screenshots, all wrapped in an extremely accessible interface.

For today’s AAR, I wanted to share a mission I love to fly over and over again: Kerbostationary orbit. Not only is the scenery at KSO great, but the mission is very straightforward to plan and very easy to execute. I can frequently predict the amount of fuel I’ll use over the course mission to within one liter, even with many different ship types.
The Kerbostationary mission is simple - achieve an orbit such that the spacecraft’s ground position as projected on Kerbin is stationary. This is accomplished by achieving an orbital altitude in an equatorial orbit where the angular rotation of the spacecraft matches the rotation rate of Kerbin. what? A stationary orbit makes it like the planet is standing perfectly still as you orbit about it, which is pretty cool. It’s also quite the accomplishment of orbital mechanical dexterity.
In Real Life™, stationary orbits are used around Earth for communications and research satellites, but in KSP, they’re used for pretty screenshots. And for science!
The mission is simple to calculate: Kerbostationary Orbit occurs at a orbital distance of 3,468.751 km, which is 2,868.751 km altitude above the surface of Kerbin. Altitude is handy to know in KSP, since the sim reports all heights in altitude, not distance from the orbital focus. For clarity, I’ll refer to orbital altitudes instead of orbital distances for the rest of this article, but if you’re doing the math at home, be sure you’re using the correct numbers when you switch back and forth!
For the purposes of science (and to make smaller, more controlled burns), I’ve broken this mission up into several parts:
- Ascent from Kerbin to a 100km parking orbit
- Transfer to a 250km orbit
- Transfer to a 500km orbit
- Transfer to Kerbostationary orbit
- Re-entry
It is possible to go straight to KSO from the 100km parking orbit, or even ascent, but I like this staggered approach for a number of reasons
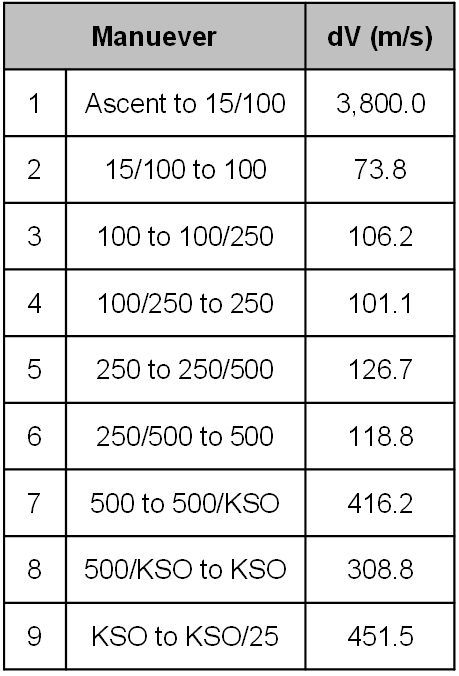
We haven’t even strapped in yet, and I’m already going to throw in a complicaiton: to ensure the ascent stage returns to Kerbin instead of clogging up my space lanes, I’ll plan on staging my orbiting vehicle from the lifting stack while I’m in an orbit with an apoapse (farthest distance from the orbital focus) of 100 km and a periapse (closest distance to the orbiting focus) of 15 km. Since I’m breaking my ascent up into two different phases, and each orbit transfer consists of two separate burns (transfer insertion and then circularize), this results in a total of 9 maneuvers (full maneuver table is below).
The first maneuver, ascent from Kerbin through the atmosphere to a 15km/100km periapse/apopase orbit, is very difficult to plan precisely. In KSP versions prior to 1.0, I had great success using 4,700 m/s a rule of thumb for the delta velocity required to achieve 100 km orbit from launch, but the new aerodynamics updates have changed this assumption. Although the actual requirement is heavily dependent on individual characteristics of the ship (drag, velocity profile, etc.), a better rule of thumb is more like 3,800 m/s. I’m still experimenting to find a value that works for me, and I suggest you do the same, but it’s not an awful idea to plan for 3,800 m/s and update future plans as you learn more.
Doing the maths, I come up with the required delta velocity for each maneuver here:
Note: If folks want, I can go more into depth into how I arrive at these numbers (and how you can, too!) in a follow-up article, but for this AAR, I’m just going to wave my hands. “You don’t need to see my orbital mechanics analysis.”
One of the real joys of KSP is the infinite possible ways there are to combine rocket parts and still make a successful mission. Obviously, Maneuver #1 can be executed by any number of ascent stages, combinations of solid and liquid fuel systems (depending on how feel about MOAR BOOSTERS), but I’m going to plan on Maneuvers #2 through #9 being performed by one single stage. This requires that stage to be able to deliver a total of 1,703 m/s of delta velocity, which isn’t too much of a stretch for the default parts in KSP.
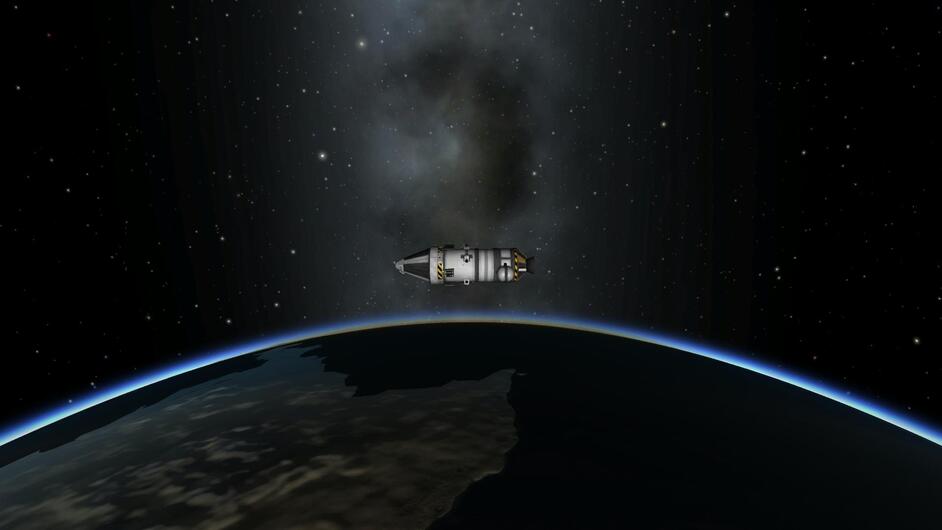
Just like the details of the mission planning, I’ll likewise skip over the intricacies of my vehicle design, but here is the Kerbplorer 2000, a ship I designed and built exclusively for the Kerbostationary mission.

This single-crewed re-entry and service module combination with a total delta velocity of about 2,000 m/s is a great workhorse for demonstrating the joys of space flight. It was specifically designed for the Kerbostationary mission, as you’ll see by the end of this mission.
Given this vehicle and the mission plan above, I also calculate the fuel used from each maneuver, and the total fuel remaining, so that I have sometime to check as I execute the mission and can determine whether or not I have enough fuel to complete the mission. On larger missions, with more complexity and uncertainty, I like to plan “rescue holding patterns”, where a stricken ship can safely park if I think I’m going to run out of fuel. Checklists like this one help me figure out whether or not I can pass one of these zones, or if it’s time to call home and start rationing the Pringles and Tang.
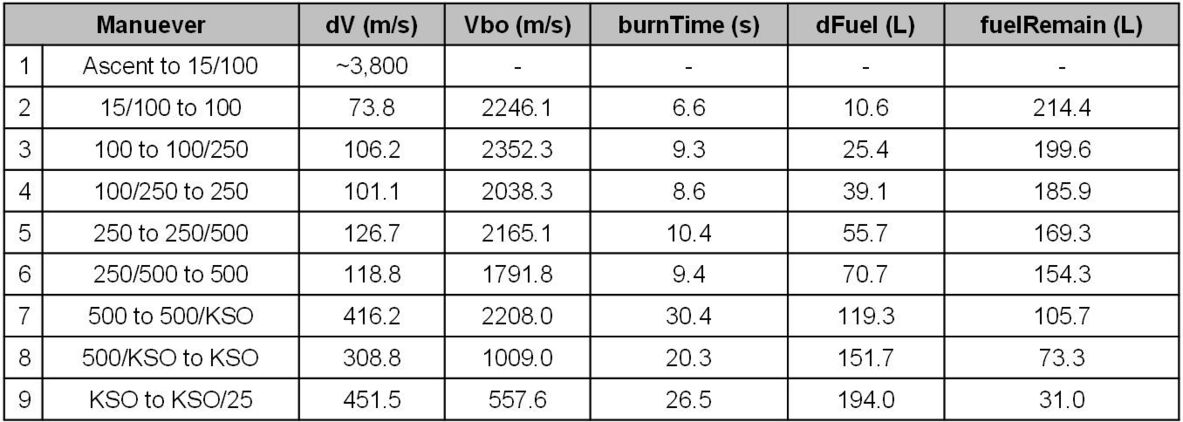
On this “mission card”, I also include, for reference, the ideal velocity at burnout and the burn time for each of the maneuvers. This enables me to better plan when to start my burn, and helps me prevent burning for too long, or helps me recognize when something is amiss.
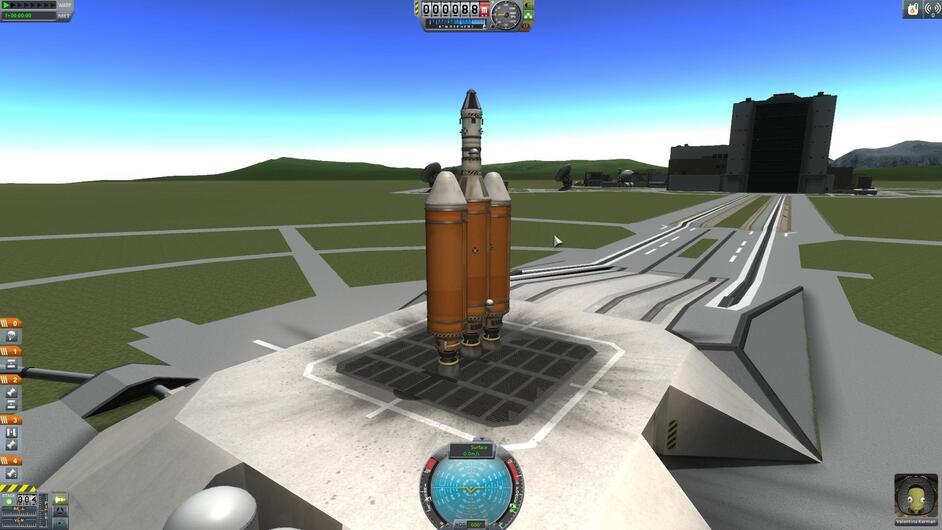
As with all things, setting up a launch in KSP is as easy as clicking the launch button (jealous, Space X?), although I’d still love to see a crawler/transporter animation. In the shot above, the the Kerbplorer sits on top of an over-designed launch stage, built with the old 4,700 m/s delta velocity requirement from pre KSP 1.0. The three orange Rockomax 64 tanks are staged in a sequential order rather than the fancier asparagus, but there’s still plenty of juice to get the Kerbplorer setup in a parking orbit around Kerbin. There’s a reaction control system (RCS) onboard, as well, to help with attitude control up in the thinner atmosphere, but with only 120 units of monopropellant. I only expect to need RCS for the final phase of the ascent stage’s life. I’ve also chosen to put Valentina in the cockpit, my first flight with the new Kerbal.

Liftoff! The two Mainsail engines have more than enough combined thrust to power the 133.9 ton launch stack against Kerbin’s mighty gravitational pull, and Valentina squeals in delight at the 2g leap up off the pad. As soon as I’ve confirmed stable liftoff, I roll the stack to align my pitch control axis with the desired trajectory of 90 degrees. This convention makes trajectory control easier for me and, I like to think, gives my Kerbals a more comfortable ride with g’s pushing them into their seat, instead of sideways or feeling like they’re getting pulled out the command pod windows.

To reduce the amount of energy shed off as drag, I pull the throttles back as the stack approaches 100 m/s velocity. Faster is not necessarily better in atmosphere where energy is shed as a function of atmospheric density and velocity squared. Some of the fancier tools use a metric call “atmospheric efficiency”, which I’m currently skeptical of how it’s being used, but the principle is sound: faster does not equal better.

I begin my pitchover much earlier than in pre KSP 1.0 missions, due to the increased fidelity of the aerodynamic and atmospheric models. I don’t have a specific pitchover schedule worked out just yet but at about 2,000 m altitude I start bumping down in pitch to nudge the velocity vector towards the horizon. While in surface mode, the angle between where your nose is pointed and your velocity vector on the navigation ball is exactly equal to your vehicle’s angle of attack. Since drag is proportional to angle of attack, I try keep that angle as low as a I reasonably can, while still nudging the velocity over. Again, no hard numbers to follow, but I generally move my attitude pipper to the edge of velocity marker and then let the velocity vector catch up before I bump it up again.

I continue to make gentle, incremental changes in pitch and slowly creep up the throttle as I get up into thinner atmosphere. The optimum ascent trajectory through an atmosphere is based on the actual vehicle’s aerodynamic performance, and requires an integrated simulation solution to figure out, but there is a very wide range of trajectories that actually work - no need to try to get it perfect. I’m still refining my preferred method, and do not have precise numbers here, but for this mission I was shooting for a 60 degrees flight path angle and 450 m/s velocity at 15 km altitude.
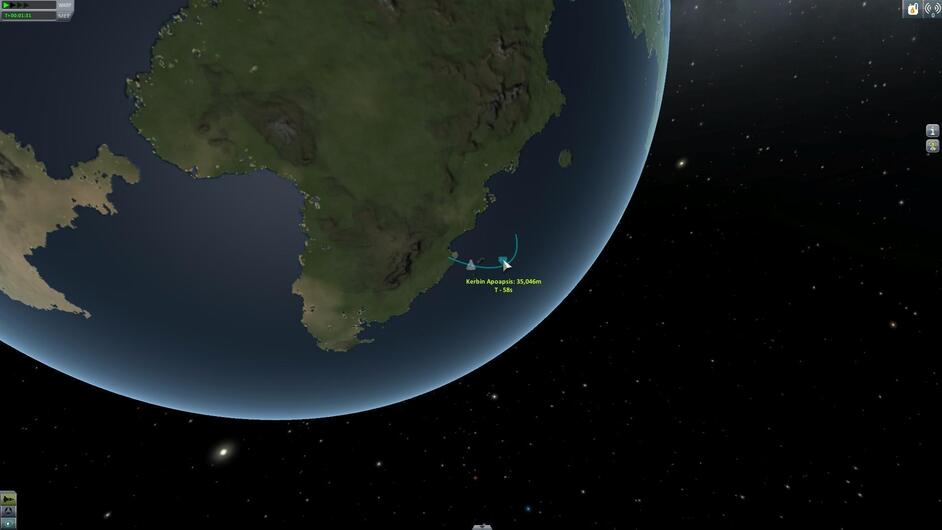
Once I get to 60 degrees flight path angle, I switch to the map view to see how my trajectory is shaping up. Those of you with mods that show your predicated apoapse altitude on the vehicle screen are giggling to yourselves right now, and for good reason! This is a critical bit of information to have while executing the ascent portion of the mission and it’s distracting to switch between views to get it. I’m warming up to Kerbal Engineer Redux http://www.curse.com/ksp-mods/kerbal/222685-kerbal-engineer-redux, but still enjoy my vanilla KSP experience.
I mentioned this earlier, but it’s important so I’ll note it again: the value given for apoapse in this view is the predicted ALTITUDE at apopase, not orbital distance. Orbital mechanics equations typically use the orbital distance of a body from the orbital focus, which would be the center of Kerbin in this case. If you’ve got your Bates/Mueller/White book cracked open, remember to add the celestial body’s radius (600km for Kerbin) to these values to get the right value for your equations.
There are two very important pieces of information in the map/orbital display - the predicted apoapse altitude, which I’m looking to get to 100 km, and the time to apoapse. During ascent, the time to apoapse is likely changing - increasing or decreasing depending on what you’re doing at the time, but, in general, a large time to apoapse will translate to a long coast time once the desired apoapse height is reached, so you don’t want it going too far, or you’re going to end up having to cut your engines and start burning again later, which can decrease efficiency.
Of course, with the infinite possibilities in KSP, there are certainly ship or mission designs where a burn/coast/burn profile is actually desired, but I’m shooting for max efficiency, so I use my throttle to control the time to apoapse, while I use pitch to control the rate of change of my apoapse height. Again, no hard numbers, but around 1 minute seems to be a decent lead time on apoapse, and, per the mission, I’m shooting for an apoapse of 100 km…
The net result is a trajectory that culminates in a relatively shallow flight path angle and very gentle thrust for the last section of the ascent, but there’s no need to rush. Besides, I think a smooth transition from ascent to circular orbit is just plain sexy.

I haven’t reached that stage of the mission just yet, however. Once the booster stages are empty, I jettison them - the remaining tank and engine has more than enough delta velocity to complete the ascent stage. I’ve set the staging so that my central engine activates as well, and I also enable the RCS at this point. The gimbaled motion of the Mainsail engine gives it great attitude control while at full thrust, but the low power setting at this phase in the flight can make attitude control difficult.

Now it’s a matter of monitoring the apoapse height, time to apoase, and orbital velocity, and providing minute changes to pitch and throttle to achieve the desired endgame. Math tells me that the orbital velocity at 100km altitude above Kerbin is 2246.1 m/s. I’ve got quite a bit to go, but I need to ensure my apoapse is where I want it once I reach that velocity, so fractional tweaks in pitch are needed to reach and then maintain that 100km apopase prediciton.
As I briefly described earlier, I stop the circularizing burn short of fullly circularized for a seemingly silly reason - I want to ensure my lower ascent stage goes back to Kerbin instead of staying up in space, clogging up the space lanes and cluttering my map display. While KSP gives you the ability to delete unwanted junk and debris from orbits, I try to design and execute my missions to minimize orbital debris to begin with. For this mission, I’ve planned to separate the Kerbplorer from the ascent stage when I reach a 15km/100km elliptical orbit (15km periapse, 100km apopase). This will ensure the spent lower stage returns to the surface of Kerbin, but reduces the total delta velocity needed from the Kerbplorer stage to continue the mission. For this maneuver, I’ve calculated a total delta velocity requirement of 73.8 m/s, which will consume 10.6L of liquid fuel (plus the appropriate amount of oxizder).
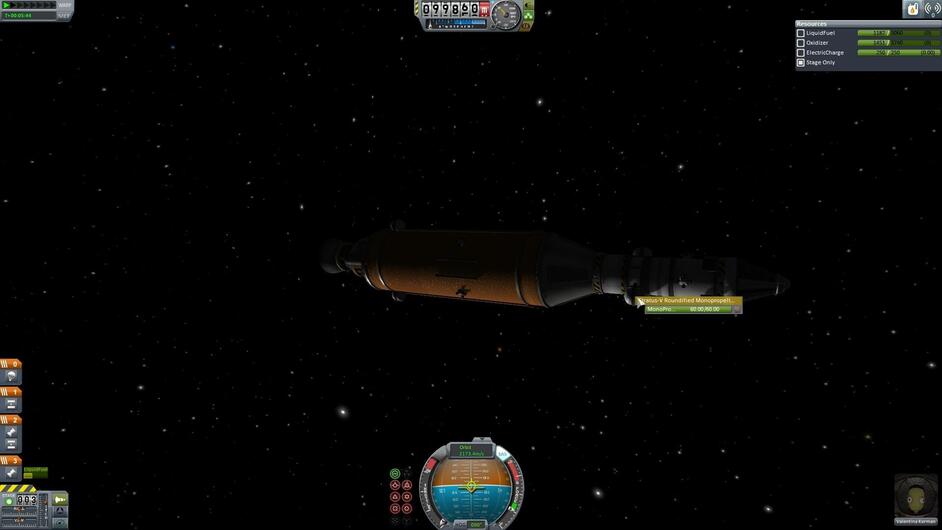
Before staging, I do a quick check of the upper stage and ensure all the fuel and monopropellant tanks are topped off, batteries have sufficient charge, solar panels are deployed and producing power, etc. Anal retentive, I know, but the prevents embarrassing separation issues. Alternatively, pressing F5 before a risky maneuver quicksaves a snapshot of the game status which can be restored by pressing (and holding down!) the F9 key - a handy habit to learn!
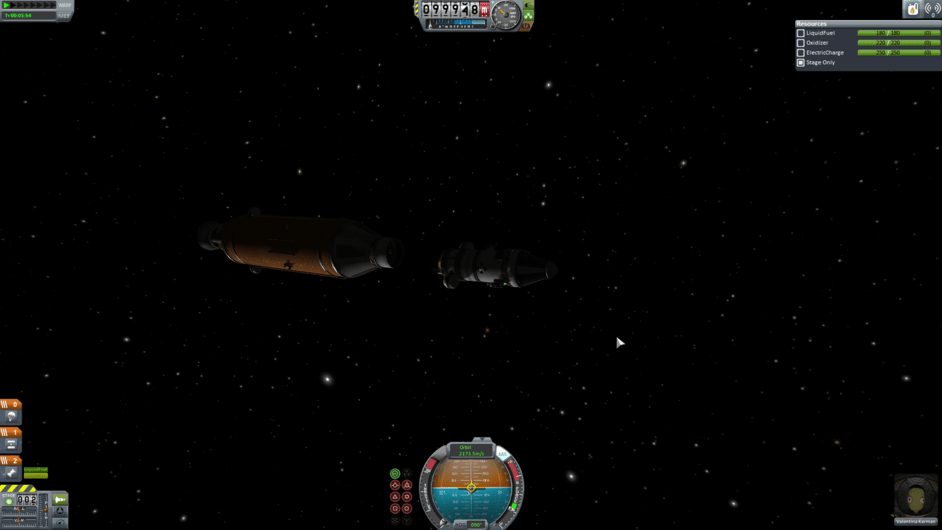
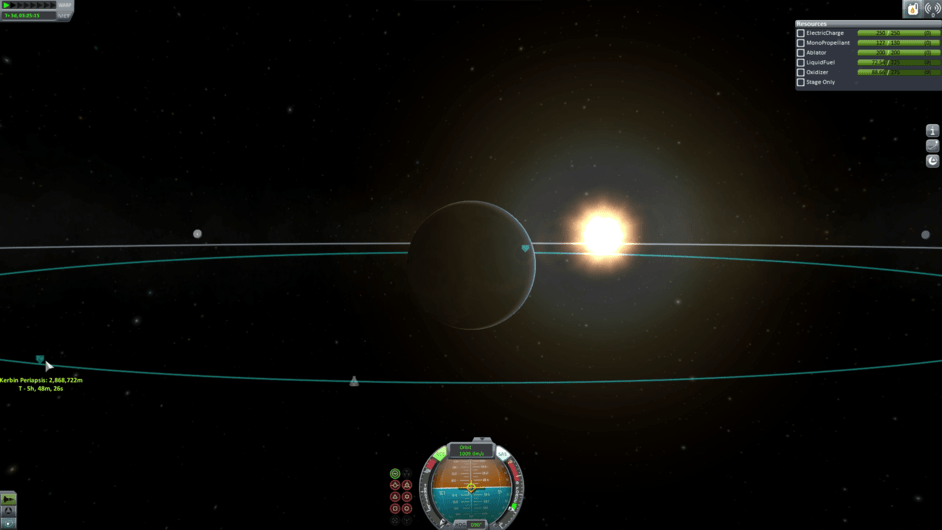
A successfully separation marks the end of Maneuver #1. With the Kerbplorer 2000’s LV-909 “Terrirer” high-specific-impulse liquid fuel engine activated, it’s now time to execute Maneuver #2 and circularize this orbit before Valentia passes apoapse and starts decaying back to an earlier-than-planned re-entry orbit. Luckily, the circularizing orbit maneuver burn will be short, 6.6 seconds, so there’s no real risk of re-entry unless I really screw this up.

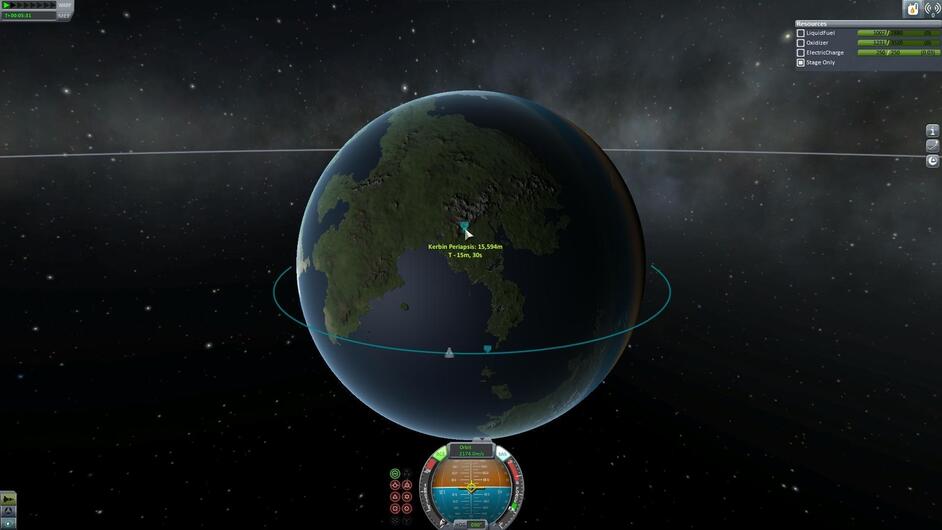
Textbook! I’ve used almost precisely the fuel I predicted (the display resolution rounds to the nearest liter and it shows I used 10L of fuel compared to the10.6 I predicted), and while the orbit isn’t quite as perfect as it could be, both the apoapse and peripase are within 500m of the desired altitude.
Periapse
Apoapse