Project Left Seat

Welp, the arrival of MSFS has finally pushed me to get into gear with the evolution of my simpit, which currently Is an obutto Revolution setup for a combination of combat style center-stick, left throttle / Mouse and KB gaming. The problem with the Revolution though, is that it’s center ‘spine’ is not ideal for mounting a yoke too, as it sits too high relative the seat (and at 5’8”, I’m not the tallest guy on the block, but not short either). Plus, I don’t want to have to deal with a small project every time I go from combat to civil (ie yoke based) simming, with assembling/disassembling the rig.

This wish to expand my sim setup also comes at a time where COVID has my wife working from home a lot (she’s a teacher), and she’d like a more dedicated desk to work from.

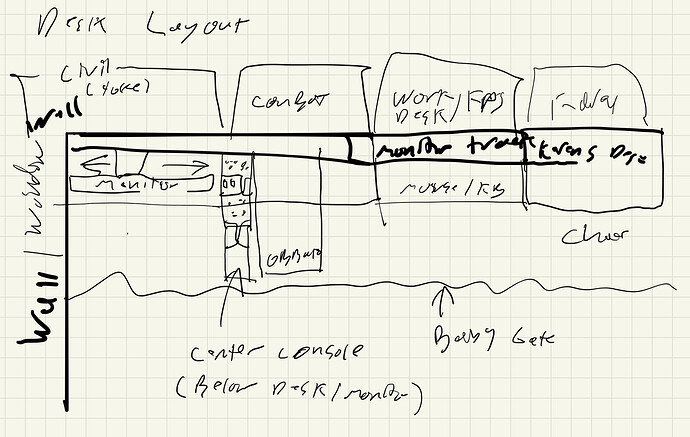
So, the idea I have is that most, or all, of the wall my Obutto sits against (About 14 feet) will be turned into one long wall mounted desk. The layout would be like this:

Since modern science still hasn’t found a way to decipher my hand writing, I’ll explain. From left to right, there will be the “Civilian/Heavy” sim desk, with a yoke and rudder pedals. To it’s immediate right will be a centralized shared throttle module (more on that later). Right of that is the obutto with center mounted stick. Moving down the line will be a work station/ general mouse and keyboard gaming area. Finally, we come to my wifes work area, which will be ‘isolated’ from the other sations in that she has her own laptop.

A keystone feature here will be a rail system that allows my 32’ 4K monitor to slide between the three work stations. Still mulling about best way to do that, but I have some ideas will expand upon in a dedicated post later on).

Another feature I alluded to earlier, is the shared centralized throttle-and-systems (working title), which will house a throttle quad (hoping to snag a honeycomb, like everyone else on the planet, apparently), my WH throttle, and assorted to-be-built-over-time button boxes and knobs and bits. It will also likely be a place for the mouse to go when in civilian mode, and the keyboard when it civ or combat modes. This allows for classic civilian style “throttles on the right” when at civ position, and to keep hotas on the left for combat. It also allows either mode to share axis and buttons, so for example, in BoX I’ll use the WH as primary throttles, but then use the quad for additional axis (rad, cowl flaps, mixture, etc.). The Central module will also be the ‘nexus’ of flight control USB connections, and have a read-to-access switched/powered USB hub “bus” so I can actively enable/disable relevant controllers as needed.

Another ‘feature’ of this setup overall, is that it allows my toddler aged daughter to be a ‘co pilot’ in either mode, and occupy the other seat and be a ‘helper’ by pressing the buttons daddy tells her to. Except the shiny red on, don’t touch that one. OK, touch that one, but only once. Ok, knock yourself out, press it as much as you want princess…

Budget is about $1k all in, inclusive of the Honeycomb gear, so it’ll be a tight squeeze, but possiblly workable as I have a decent amount of scrap wood laying around, and all the woodworking tools I should need (router, table and miter saws). Most expensive will likely be the several sheets of plywood needed. Might stretch to 1.2k, as the central unit might be framed in 80/20 AU for future mod-ability.

More to come as I work through things, but one question I do have right now: can any recommend a good “Obutto style” seat (just the seat portion) that doesn’t break the bank (figure $200 ish shipped or less)?
5 Likes

Nice! Reminded me of stray “Sim Thoughts” I’ve had, if I had the time to build it…

For the space-conscious flight simmer I present the “Sim Control ‘Cube’”. Not a button-box (well, sure it is) but 3 (or 4!) side consoles in one!. Yeah, not rocket surgery to assemble just a lot of time; wiring it would be a Bear:
[Revised - labeled the first one incorrectly :smile: ]


Viewed end-on of course

Turn around (literally!) your left and right (and even front) consoles with a twist of the cube!

Ok, back to work…

2 Likes

Snagged a HC yoke today! A seller named “Gulf Coast Avionics” had them on sale via Amazon, and apparently, in stock. Now just need to get a pre-order in for the Quad…

Debating material I’ll make the Desk itself out of. Thinking I could go with two 3/4” hardwood plywood sheets laminated (glued) together. Wife and I were debating something fancier, as it can be a nicer fixture of the room, and even found a local guy that does wood slabs on cheap (green/un dried, so we’d need to kiln the slabs for a while). He did also have some 1x6 black walnut from ‘his guy’ for the same price per board foot as pine at Home depot! So we loaded up on some of that (cuz you don’t walk away from cheap black walnut. You just don’t), but I’m thinking it might not be thick enough. Hmm…

As far as supports, Will use piping, similar to this setup:

Figure that gives a nice industrial look to things, which hopefully will square a bit better with the Obutto and flight sim hardware.

1 Like

Yeah, I had a similar idea but as a giant ‘lazy susan’ in our basement, but ultimately figured that would have been just too much in terms of space needed. It’s amazing how much space these things can start to take up!

A picture of my current Obutto based “dad kennel”, and associated area where I’ll be placing the sim desk:


Regarding the Obutto. The revolution simply isn’t ideal, as it’s ‘spine’ and “pedal’ cage take up way more room than is justified for flight simming. There is a ton of space from the wall (better part of a foot) that it doesn’t need:

Also, I like to have the 4K monitor height set so that my eyes intersect it at about a third way up the screen from the bottom. In most flight sims this more or less puts the gauge panel and windscreen in roughly the same place as they’d be IRL relative to eyeline. . The top of the ‘spine’ make that tricky, especially when trying to get it under a desk, as it’s often right where I want the montir to be, and doesn’t really offer any service to me except being the mounting point for the “wings” that are the revos desktop. PRO TIP: If shopping an Obutto: 1. Don’t, there are too many options out there now. 2. Buy the Ozone; it’s simpler design lends itself to greater flexibility.

Anyway,
Fortunately, the monitor sits where about my wife wants to put the desk height anyway, about 28”. She wants it lower for proper posture with Mouse/KB. Works well for monitor height.

But, to get the Obutto under there I’ll need to remove the front pedal cage, and remount the seat and seat base onto a sheet of plywood that connects it to the pedals instead. As a plus, If I then mount that to rolling/lockable casters, this will allow me to slide the entire assembly between combat and civ modes. More ‘small project’ setup to change between modes than I want, but gets me up and running without the having to buy another seat right now, and can build that later on.

Got a new toy to help build the desk that will support my other toys:
image

Makes a nice long work surface when combined with matching saw horse.

image

Edit: bot sure why photos are upside down/sideways, they look fine on my phone. Will fiddle with that later.

1 Like

Ah, OK. I already wondered if you are from Australia. :smiley:

Sawdust time!

1 Like

Coming together. I couldn’t fit 12’ boards in my car, so Im ‘sistering’ them using wood glue, with pocket screws making a mechanical clamp till the glue dries:

1 Like

And look what the brown truck happend to drop off as I was sawdusting!

1 Like

Yeah, I found the Honeycomb Alpha yoke at the same place (Gulf Coast) last weekend, ordered it and it arrived yesterday. Had a busy couple days so only got about 30 minutes in on it so far. Looking forward to the 3 day weekend to give it a good workout! Enjoy yours when it arrives!

Dusting off this thread as I finally was able to move the project forward after several months.

First, went another direction with the built in desk, as the 2x4 slab desk was too large and unwieldy to be serviceable. Went with 3/4” plywood covered with wooden floor planks left over from the previous home owners upgrade to one of our bathrooms:

SO far has been sturdy enough.

Then decided to fall back from the more ambitious plan for a side-by-side pit for now, owing to cost and space, and use the obuttos seat and rear frame set on a wooden platform to match the height of the desk. This also allowed me to reuse the control mounts bolted to the obutto frame, vs having to reengineer that setup from 80x20.

2 Likes

The rig is now back to “up” status, as confirmed by her “crew chief”!

The Honeycomb setup works well, and so far everything seems to checkout. Good to be back-in the-saddle.

Also, really nice having a ‘real’ desk again; going to be far easier to mount things. Added height also helps with ingress/egress.

6 Likes