Saitek X-55 Rhino HOTAS Quick Look & Set-up
By @fearlessfrog - January 18, 2015
Originally published at: Articles - Mudspike Forums

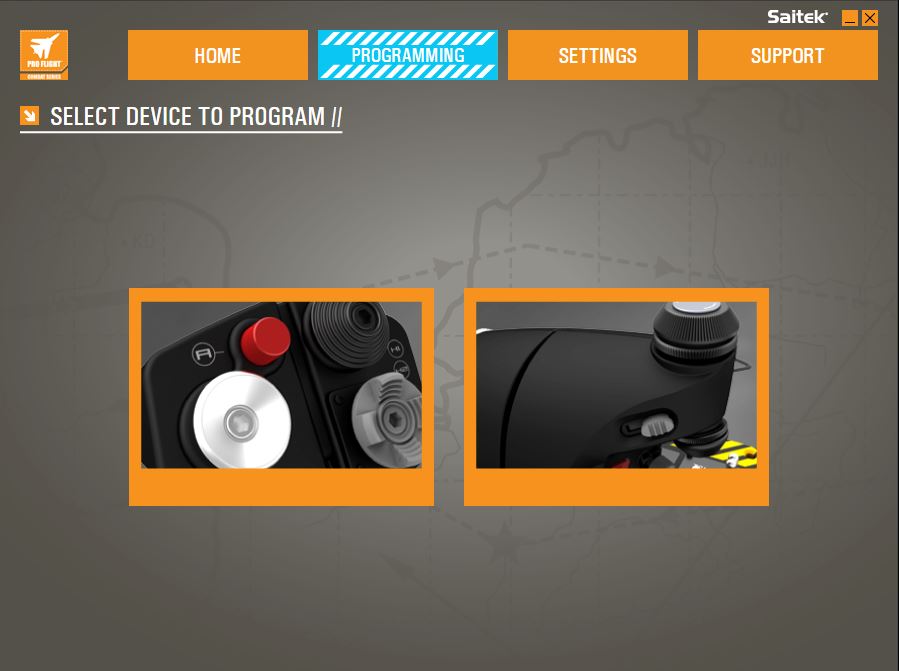
Today we take a quick look at a new piece of hardware, the Saitek X-55 Rhino, plus walk through some common set-up steps and tips for using it with flight sims.
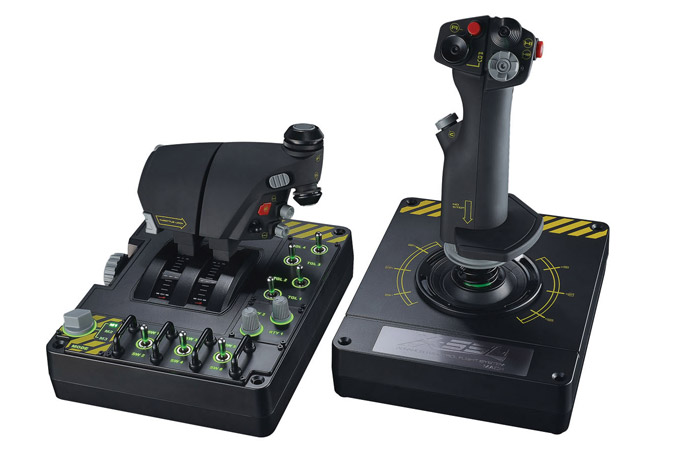
The Saitek X-55 Rhino is a reasonably priced HOTAS setup. A ‘H.O.T.A.S’ (Hands on Throttle and Stick) is just like it sounds, a joystick unit and a separate dual throttles unit. For around $200 it provides a big step up from a single stick and fills a needed niche in flight-sim hardware by price. It has more buttons than Canadians have apologies and does the job nicely. On the sliding scale of ‘feeling like a chump at a desk trying to look like an actual fighter pilot’, it rates about a ‘7’. Saitek’s product info page can be found below, and surprisingly they describe it in fairly positive terms (I especially enjoyed the term ‘Military-grade Flight Sim Precision’, with the caveat that they may mean the Armed Forces of Sesame Street):
http://www.saitek.com/uk/prod/x55.html

To quickly lurch into a car analogy, (dammit Frog, third paragraph and the car analogy already? Mudspike Editor) it’s not the Ford Pinto of the stick word, nor is it the twitchy or costly Mustang GT 500, but it’s still better than one of those pretend SUVs that just suck gas and explode on roads with anything more than ‘large gravel’. It’s a compromise between chicken-pecking around on a keyboard while you plummet into the ground and getting a second mortgage and/or ‘trial separation’ for something more chunkier and beefy, like the Thrustmaster Warthog.
I quite like it, always keeping the cost in mind. It has a convenient twist rudder control (many of its purchasers will be moving up from cheap sticks and not have pedals), interchangeable springs for tensions (you will get pinged in the face the first time you change one) and feels ‘substantial’ – not ‘Forever substantial’ but certainly ‘get through this calendar year substantial’. There are plenty of stick and throttle buttons, switches, rotaries and nipples to make you feel inadequate in a times of stress, although some of them are not exactly easy to reach in a rush.
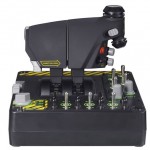
The switches on the throttle nestle right under your hand, and it feels like a rabid card trick gone right when you toggle one without looking at your hands. The mouse nipple is loose (the jokes are writing themselves) which can make slewing feel awkward and inaccurate sometimes. The coolie hat (the lower 4-way grey blob next to the red button on the throttle) is a wee bit too small, and with large hands the chances of hitting ‘left’ rather than ‘up’ are about 5/4 outside odds. The stick’s CMS toggle looks like a CMS toggle, but is actually a big grey dumb click button. In some ways this may be the real down-side with this HOTAS, in that sometimes it feels like it is meant to be looking more impressive than actually work impressively.
Having said that, it still all represents great value and complaining of too many switches that don’t operate like a device three times its cost seems churlish. It takes some getting used to, but works well.
A big part of the X-55’s success will be new Elite Dangerous and Star Citizen players bashing down doors to get a better control set-up, as less face it, $200 is nothing when you are happy to buy a $2000 spaceship-that-is-so-not-real-it’s-not-been-even-made-yet DLC.(*1). Thank you, to our silver foil-suited wearing brethren!
Set-up Steps & Tips
In terms of how to set it up, it’s quite an adventure and the documentation beyond ‘make it press a key’ is quite sparse. Hopefully this set-up guide will cover some of the more sim-orientated scenarios.
The initial decision when setting up is if to use the ‘profile programming’ that comes with the device as a software/driver app or just bind those buttons in each individual flight sim. So, that would be like ‘Make a X-55 HUD DCS A10C Profile’ (or go download one online and then try to memorize it) or just configure inside of, say, DCS World, ‘Button_278’ to be ‘Release 3 Chaff at Rakish Angle’.
The disadvantage of the latter is that it can be a pain to manage these profiles as sims update versions, so sometimes it is better to just ‘program the stick’ as that’s (apart from the ‘axis’, more on these later) it’s really just pushing pretend keyboard keys for you. Another advantage of programming the stick rather than setting up the sim, is that some sims won’t recognize ‘Button_312’, but will always recognize a key. Also, in programming via HUD you can ‘name’ each command, and then shuffle them around as needed, plus in the case of the DCS range, a lot of the common keys are the same, so it saves time doing it on the HOTAS programming side.
With this sort of set-up I tend to veer towards setting up my own config, as the brain contortions to try to remember someone else’s favorite layout are often harder than just going through the pain of adding them bit by bit myself. If at a complete loss on how to set it up, my general rule of thumb in a flight sim is to take a look at how the real aircraft had mapped things on the real-life physical stick/throttle and do my best to emulate it with what I have. Even though Saitek’s injection-moulder guy had ‘military-grade’ on his mind, the actual military for these flight controls have a pretty good vested interest in making the layouts decent to use, so go copy them.
The most common issue so far in terms of X-55 use in the wild seems to be ‘ghost buttons’ being pressed. I have not personally experienced this issue, and it looks related to either the amount of power the units use (a powered USB hub is recommended, especially if you do not have a decent USB3 compatible motherboard with a solid PSU) or some issues with compatibility with Teamspeak chat clients. Mad Catz Tech support is collecting a knowledgebase of solutions to check here:
http://support.madcatz.com/Knowledgebase/List/Index/176
The Saitek ‘HUD’ programming software seems similar to the X52’s software. It’s not ‘crack the enigma, Alan’ hard to do, but it’s certainly not ‘hurt yourself ice-skating’ easy either. It has a certain way of dealing with the world that only its mother could relate to, and the bulk of this article will hopefully explain away some of the mysteries.
Setting up an Axis
Setting up an axis (as in an analog stick movement mapped to roll the aircraft rather than a simple button press) is something to go do in the actual sim you want to play rather than Saitek’s programming software, as there is no trickery here. You usually just go into the sim’s own control options and wiggle appropriately (the stick or throttle, not you, but whatever floats your boat).
It’s usually a good idea to clear any defaults while doing this, especially as the throttle isn’t mapped as a ‘Slider Z’ as a lot of sticks with on-board throttles do, but (as the throttle is a completely separate USB device with the X-55) using the Joystick-X (left throttle) and Joystick-Y (right throttle) assignments. It is a slight pain that the throttle and stick appear as two separate devices, especially as most flight-sims won’t expect it, but it’s about as irritating as, say, getting to the end of a too small bag of chips – not really the end of the world; just a melancholic pause for thought of the big ‘why?’ of it all (with the answer in both cases being ‘money’).
One nice aspect of the HUD software is that you can set-up some curves and deadzones, although I personally find I need them to be different in each sim, so do it on that side. The DCS MiG21bis and the ARMA 3 Helos really are nicer birds to fly with specific curves set of each aircraft rather than a common curve for all.
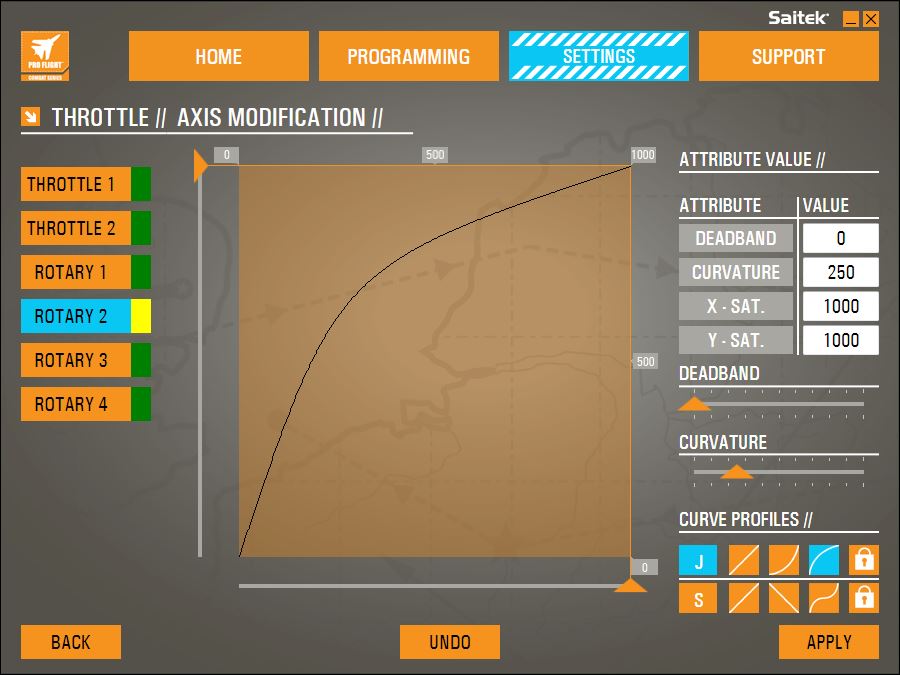
In this part of the software, you can also disable the stick twist rudder if you have pedals and lean around the room like a loon when excited. Just click the ‘lock’ icon on the curve profiles for the rudder axis.
Press a key. The Any Key.
So here we can either configure the HOTAS to simply press a key for us. So rather than go into FSX and click into the controls section, and then wiggle the thing we want to happen, we can simply find our switch or axis and make it press the ‘G’ key for us. It is here that the HUD software excels, in that if that’s all you have to do then it is simple. Press the control, see it light up in the graphic in the software, and then click into the white box. Here we can see a whole bunch of key commands set-up.

As you can see, each time you do this, HUD asks you to ‘name the command’, and that after a while this initially tiresome chore becomes useful. You can change your mind and then remap ‘General – Landing Gear’ to something else, just by selecting another control and choosing that command from the list. Neat.
One tip for using the software is that you must remember to to ‘send the profile to the device’ each time you make a change. This involves using the small toolbar shown above, with the tiny ‘target’ icon (appropriately enough) being the thing to have to hit if you want to send down the profile to the devices. The small ‘gears’ icon next to it provides a nice way to test the commands, as it shows what commands get generated as you man-handle the controls.
One common task that isn’t explained well is the common concept of holding down a modifier like SHIFT or LEFT-CONTROL when doing a keyboard command. Luckily there is an ‘Advanced Command..’ sequence we can do. Hovering over a control assignment white block, you’ll see a small grey rectangle on the top right – that will open up a menu. ‘New Advanced Commands..’ allow us to control the various order, delay and releasing of keys.

The one main trick with the above dialog box is that once you have named the command (‘Example Command’ in the above) you click into the box marked ‘Press’ and then hold down your key (in this example ‘M’). Now, without letting go of that key, you mouse click into the next box down and then (still keep that key held, I’m watching you!) click into the third ‘Release’ box. Now you can let go of the key (I bet you didn’t think this was a work-out eh? Take a minute to get your breath back).
If you now click onto those keys symbols (aim for where it show 0.000 numbers) and you can do things like delete accidental ones, and also bring up a right mouse button menu. It’s essentially a keyboard macro controller. Now you can set delays, order and also ‘Quantize Time’. Oooh. The latter isn’t Stephen Hawking’s new indigestible book, but a way just to set regular time gaps (or no gaps at all) and was obviously too tempting a term for the HUD programming programmers to not use.
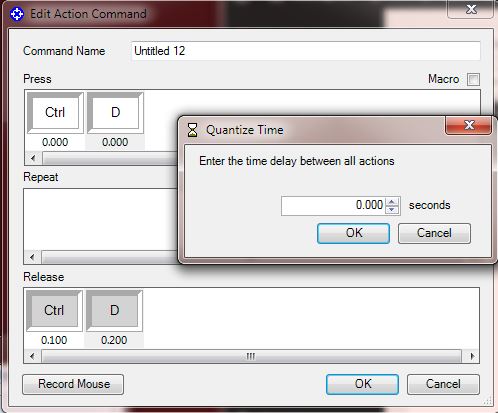
In the above example you can see we have ‘Ctrl’ and ‘D’ down, and then released fairly quickly afterwards.
The only other refinement in this dialog is that the middle section ‘Repeat’ can be used to hold down a key rather than just press and then release it the once. If you bind the key ‘Space’ to your stick’s main trigger then you’ll be saddened when you find a single and solitary bullet gets fired. By using the above ‘Advanced Command’ and selecting that key down in the ‘Repeat’ section, then it’ll keep the key held down for as long as the trigger is held.
Switches and Toggles But No Brakes
The odd thing about the switches is that they are not on/off toggles, but three-way buttons, so that gear down is the switch toggled downwards, and gear up is the switch toggled upwards, but that the switch rests in the middle ‘not pressing anything’ state. This does make it easy to program and use for keyboard commands, but obviously isn’t how many switches work in real-life. Especially ironic is that the one switch I wouldn’t mind work like this (the throttle’s speed brake push switch) doesn’t have this three-way state, while in reality they often do in real life. There is a small rocker switch on the left throttle that can be used instead, but I did find it particularly teasing that the one control called ‘speed brake’ couldn’t often be used as one.
Rotaries & Sliders As Keys
Many sims didn’t expect people to have this many analog rotaries at their disposal, and that once the main flight controls are mapped out it seems a shame to waste them. A couple of neat tricks for the rest of the analog controls is to make them map to keypresses. For that we have two ways, ‘Directional Axis’ and ‘Bands’.
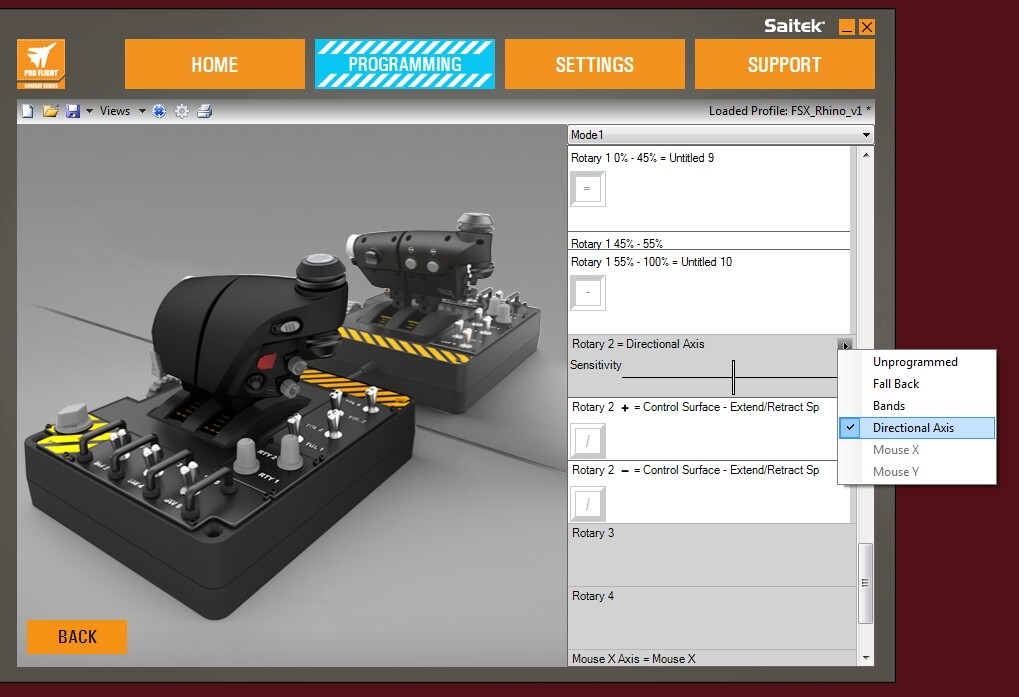
Here was can see a Directional Axis in use. Unlike the switches, the analog assignments show a different menu, with the ‘Unprogrammed’ used to disable it entirely, and the ‘Fall Back’ been used just to pass it on the sim you are running (e.g. Slider_Z etc). The ‘Rotary 2’ in the image above has been set to press the ‘/’ key if the dial is moved. You can do things like control how much movement will trigger a key, and can have two keys mapped to the directions you want to move in. It usually works ‘adequately’ but I still need to play with it some more and rarely use it.
The next (and potentially more useful) option is the ‘Bands’ setting:

Here we can see that the top rotary (highlighted in orange) will press the ‘=’ key if the dial is in the lower 45% of its range area, do nothing if centered (they have a nice notch, so easy to tell when so) and then press ‘-‘ when in the 55% to 100% range. You can map advanced commands as well as simple key presses here. The ‘Edit Bands’ button toggles a mode where you drag the bands around, plus create new ones too – allowing you to set lots of very complicated key presses using a simple rotation, and useful for modelling a real-life cockpit switch.
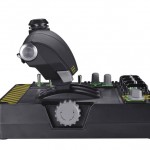
Modes
Finally, let’s take a look at the ‘modes’. In the throttle pictures you can see a grey rotatory switch on the bottom left of the unit. This points to and lights up the three modes of M1, M2 and uncontroversially M3. These modes act as ‘global shift keys’ for your entire profile, and are a nice analogy for switching inputs when in a different aircraft mode, such as A-A vs A-G. Here you can see the HUD’s software show the modes view, and how you can create even more mappings before collapsing in exhaustion.

The mode switch itself can also be bound as a control if you don’t want to do this, so is a useful dial in itself. The X-52 had more of these modes, but given how many we already have to configure on the X-55, I think three is enough.
Summary
The Saitek X-55 HOTAS is a good value control set-up. You get a nice set-up without having spend too much, and is an upgrade from simpler sticks, that really does help immersion.
The set-up software is powerful but a little opaque in how to use it, so hopefully this Mudspike ‘Quick Look’ gets you started. If you have any other tips and tricks then do please let us know.
Footnotes:
(*1) Not hating, as I too have spent unresonable hours pretending to deliver Lavian Brandy in Elite:Dangerous, and crouching under my Aurora starter-ship looking at the plumbing in Star Citizen, all the while wondering if I would be better-looking driving a $5000 captial ship. Hopefully these plastic sticks won’t gather dusk, and that people also go on to discover some nice flight sims too. The more the merrier!