Nice one mate. School should know better than to let kids out when steel beasts is on.
Here’s some shots from my perspective (V31)
![]()
We had previously bumped into a fleeing civvie car, so when V31, creeping into our overwatch position way up in the north, getting ready to watch the roads east, saw a dark shape on the road to our left, at first I thought it was another car or civvie truck. Nope, it was a T90, spearhead of a CRP.
![]()
My second callsign only survived because Tango 1-1 was able to hit him in the flank as he was about to kill my retreating ASLAV. Thanks 1-1! This apparently prompted the enemy to take the southern route, allowing D u k e’s FO team to coordinate multiple ICM fires onto their approach routes
![]()
Then later, as I probed east to make contact with the T90 company passing down our right flank, I bumped right into the enemy at close range - they were already crossing the ridgeline protecting our flank and heading for a handy re-entrant. Two close-range surprises in one night. Luckily the skipper, as well as Tango 1-2 are able to hit them as the head down the slope
![]()
I contribute some paint scratches, trying to damage their optics with my 25mm
![]()
But after one T90 passes by, a second survivor notices my mosquito bites and turns to deal with me - time to retreat again
![]()
Dismounted Javelin team from V31D gets some kills before their vehicle is destroyed just before they can rearm
![]()
Viewed from V31D’s dismounted FO team (D u k e) the ICM barrages are beautiful
![]()
Tango 1-1 callsign helping to blunt the enemy thrust
And a couple of bonuses:
![]()
Nice vignette of ASLAV with Moon…
![]()
A red T90, eager to slot a fleeing Unimog, doesn’t notice the range isn’t clear and scores a friendly hit.
1 Like
Servus,
tonight:

cheers
Duke
Hi guys,
I promised my comrade @Major Duck from Kanium VU to make an AAR from the last sunday mission and here we are.
The name of the mission is “Wietzendorf”, if you want to play have fun:
Wietzendorf.zip (2.8 MB)
I was the fire control officer/ forward observer of our “Kampfgruppe”.
Here you can see all participants:

The red forces are scripted, but this time we had a human player (Hedgehog) on the the red side (a very busy one).
The leader of our “Kampfgruppe” was @Abaddon.
His orders:
FRAGO for KG Abaddon
Situation
a. Enemy
Enemy Battalion sized force consisting of recce and AT-units has taken up positions around the town of WIETZENDORF. It is estimated that they are currently resting and refueling to be ready to continue the attack towards WEST as soon as possible. We have identified T-72s, BMP-2s and BRDMs in the area. Enemy positions at WIETZENDORF is unknown.
b. Friendly
Our KampfGruppe is lacking ammo and fuel. We have been attached with HQ CSS elements for rearming as soon as possible.
J Coy is holding SUROIDE, contact with enemy recon element.
K Coy is holding MARBOSTEL, no enemy contact in the last 12 hours.
R2 recon platoon has established OPs on the roads leading EAST of WIETZENDORF, no enemy contact in the last 6 hours.
Mission
Attack to destroy enemy forces in WIETZENDORF.
Execution
a. Intent:
Phase 1:
- Rearm at AA
- Contact J Coy and conduct passage of lines
- Recon Route Berlin and NAIs 1-3
- Attack to PL ONE in company column
Phase 2: - Attack and clear enemies in WIETZENDORF with 4 platoons, seize OBJ1.
- Attack to PL TWO in company line, seize OBJ2.
- Recon NAI 4
- One platoon as reserve and flank guard.
Phase 3: - Establish hasty defence around the area of REDDINGEN and defeat enemy attacks from the EAST.
- Prepare to conduct a relief of defensive positions with follow-on forces.
- Recon NAI 5
- One platoon as reserve.
b. Key tasks:
1) Attack along ROUTE BERLIN
2) Destroy enemy forces in WIETZENDORF
3) Establish defensive positions around REDDINGEN, oriented East
4) BPT conduct a relief of defensive positions with follow-on forces
c. Task Organization:
A66, A65, P1 (CMD Sec)
R1 (Recon plt)
A1 (Tank platoon)
A2 (Tank platoon)
A3 (Tank platoon)
B1 (Mech inf platoon)
B2 (Mech inf platoon)
A4 (CSS)
H1 (CSS)
Tasks to subordinates
R1:
Move to checkpoint R1. Prepare to recon enemy strength, composition, positions and heading at Route Berlin and NAIs 1-5.
A3:
Rearm at AA. Prepare to attack on point along Route Berlin to PL ONE.
A1:
Rearm at AA. Prepare to move behind P1 to PL ONE.
B1:
Rearm at AA. Prepare to move behind A1 to PL ONE.
A2:
Rearm at AA. Prepare to move behind B1 to PL ONE.
B2:
Rearm at AA. Prepare to move behind A2 to PL ONE.
A4:
Rearm KG at AA. Prepare to move behind A65 to PL ONE.
H1:
Rearm KG at AA. Prepare to move along route Berlin towards OBJ2.
Command and control
- R1, A66 and P1 will move to make contact with J66 immediately and coordinate the passage of lines (latest enemy intel, position of friendly forces and obstacles, intent of KG passage etc.). R1 starts recce from CP R1 on CO order.
- At the sametime, A65 will lead the rearming of KG units to atleast 75% ammo status.
- R1 move forward to second NAI on CO order. Focus movement east side of WIETZENDORF.
- At Phase 2 A66 will move with A1+B1, A65 will move with A2+B2.
- Prepare for enemy flank attacks along Flank Axis 1 and 2 at all times.
- If R1 identifies enemy positions north of PL1 the KG will attack with two platoons bounding along Route Berlin.
-Attack at WIETZENDORF will be paced so that one team attacks and the second team supports.
Questions?

These were my tasks:
- Plan the use of indirect fires with these guidelines:
- Phase 1: Priority is for Romeo units
- Phase 2: Priority is in supporting the main attack and indirect fires must be able to support both attacking teams at the same time. If Romeo reports enemy units moving from the East indirect fires must be able to isolate the objective area.
- Phase 3: Priority is in defeating massed enemy formations and engaging them in the deep.
- Otherwise you have free hands to plan the use of fires.
I like the last sentence.![]()
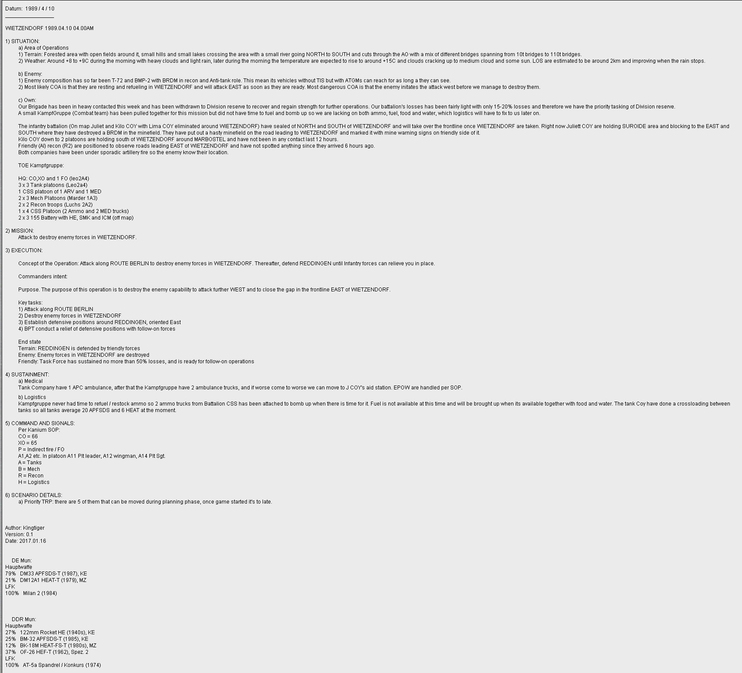
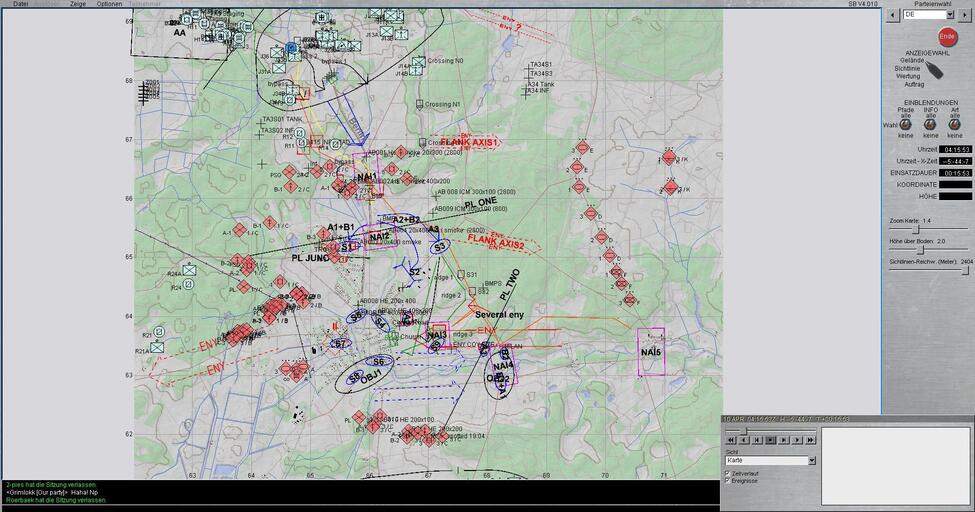
Our recon guys developed this plan:

Abaddon approved this plan with these additionals:
“Looking good.
Remember to check those bridges at NAI1 and 2 and report their condition to me. Prepare also to screen our left flank with a section if after NAI4 you have low casualties.”
But lets start. You can see KG "Abaddon" in the top left corner. In the planning phase I prepared my fire plan. After mission start I wanted to execute some fire missions, till the recce guys needed me. If you call arty fire, it needs 2:47 minutes till its active. You can repeat a mission and it will take 40 seconds. Thats why I wanted to shoot as much as I can, before I had to support the recce guys.
After mission start my job was to move with my boss to the OC of J COY to exchange informations, signals etc… I prepared a route for my M113 and executed my fire plan.


After our visit by OC of J COY we moved to our starting position, our recce guys moved out and the rest of the party was resupplying.


Our recce guys were equipped with Luchs vehicles.

My counterpart on the red side fired some arty missions too.

I marked his missions with red lines and reported to all callsigns to avoid these areas (remember! 40 seconds to repeat!)

Our recce units came under fire by an enemy BMP-2 and lost 2 callsigns. The observers dismounted and used their vehicles as cover.


The other section moved back and gave a short SITREP.


Now there dismounts started to observe NAI1 and the Luchs section bypassed NAI1 to the west.

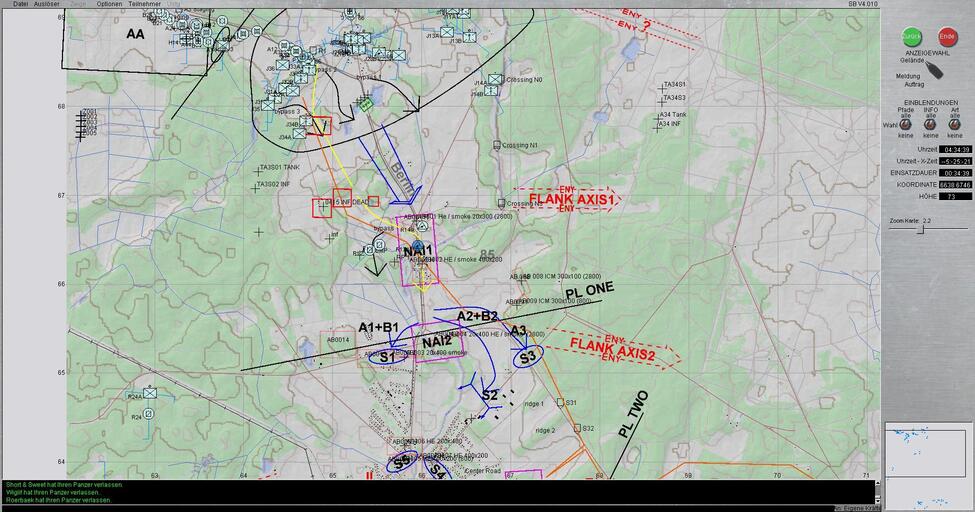
They got their revenge against a BMP-2 and got control over NAI1.


In the mean time our heavys were resupplied and started their attack.

They found some more BMPs and moved forward very quickly to the south and reached PL ONE.


But no break, the KG “Abaddon” was rolling.


Our A3 platoon made a raid to NAI3 to block enemys to the east.
Our recce guy in R11 spotted an enemy reinforced tank company moving to NAI3.
A3 requested an arty mission and I prepared a smoke screen north and south of ridge 3, but you see the splash time is 2:47 minutes. I used smoke, because we were fighting against T-72s and BMP-2s and these vehicles have no TIS.


During the mean time A3 had to use their own smoke and they started to engage the enemy.


A2 was supporting north of ridge 3, but one callsign had no luck and got a fuel leak.

I was still on PL ONE and found some enemy dismounts, time for some cal.50 action.


But I stopped to engage these dismounts and moved forward to hold contact with my boss.

I was moving forward and our Grenadiers were in position and dismounted their MILAN teams.


The requested smoke screen was active now.


It was a very intensivly fire fight, but A3, A2 and our XO stopped the enemy counterattack.

Unfortunatly @Grimlokks Leopard2A4 got a blue and blue. Looks like our XO needs some lessons in tank detection.
But these things are happen and @Grimlokk did his best and took out some enemy tanks and IFVs with his damaged tank.


But this time no happy end. Hedgehog fired an arty mission and took out this Leopard.

My job in this situation was to repeat the smoke missions to maintain the smoke screen.

A1 started to move from OBJ1 to OBJ2 and our XO on a suicide mission in OBJ2.


Abaddon gave the orders to attack OBJ2 and I fired some smoke screens eastwards.


OBJ2 is taken and our “Kampfgruppe” went in battle positions to defend the area.


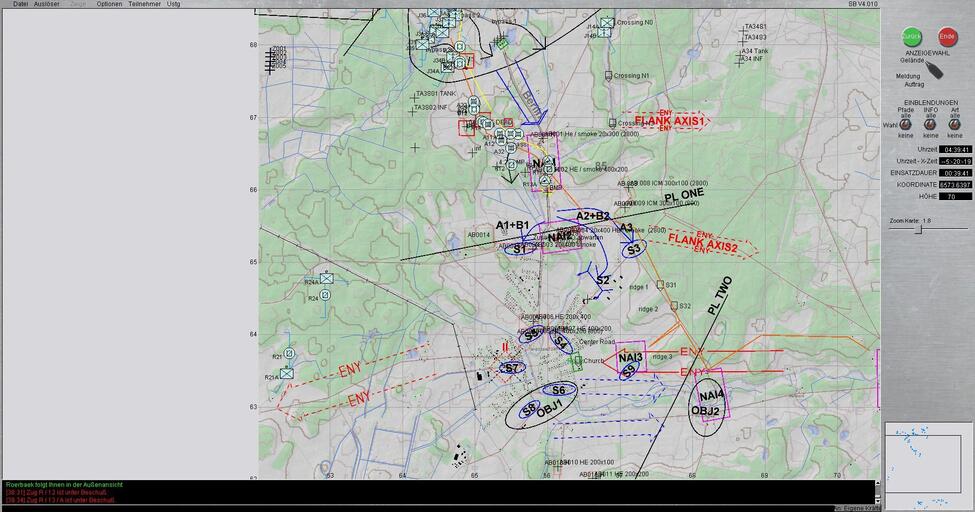
I was following and here you can see the result of A3s work.

The job was done.


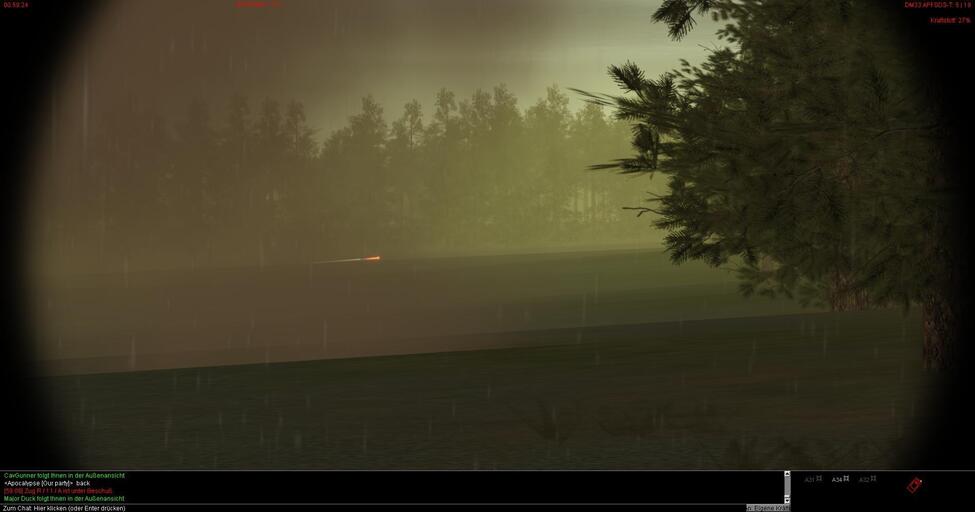
Here are a time lapse of the mission with all units.


Here you can see my livestream:
The video from @Mirzayev:

All in all a very good evening.
If you want to join, today is the weekly Kanium Steelbeasts session (05 MAR 17, at 19:00 UTC)
more informations about the mission tonight:
http://www.steelbeasts.com/topic/11349-sunday-5th-of-marts-kampfgruppe-wolf-recce-battle-by-swordsmandk-short-and-sweet-major-duck/
No game for me this sunday (nightshift) but next thursday I have a ride with BG ANZAC.
see you
cheers
Duke
4 Likes
Duke,
Another great write up - Hope eSim is noticing your role as “Marketing Guy” ![]()
1 Like
Hi guys,
back on track with BG ANZAC again this thursday.
As I told you, the guys playing around with an attack mission.


Here you an find an AAR from a past game:
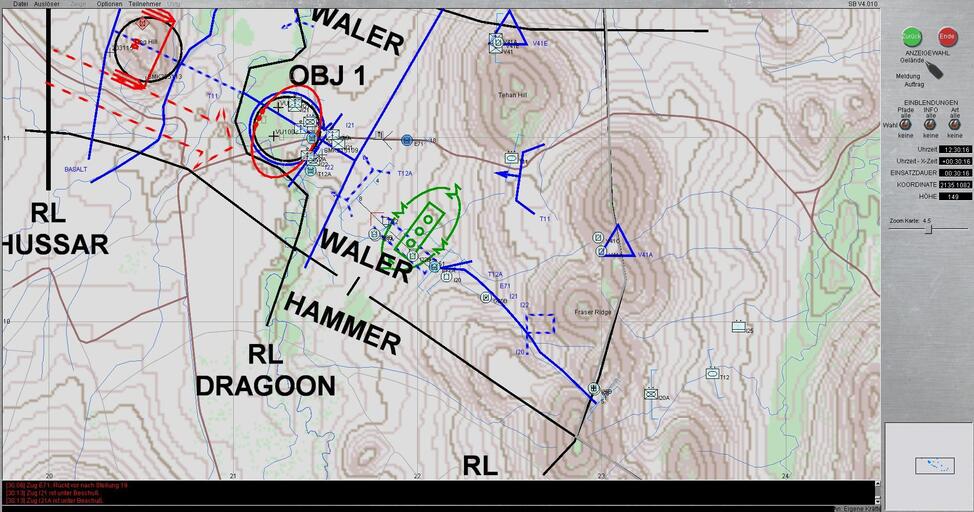
This time @Panzer_Leader came up with this plan:

Tasks to subordinate units:
V41A
Establish covert mounted OP at GR 231 104. Identify enemy units in OBJ 1 (use ‘Shift’ + ‘Ctrl’ (Lase)). Return fire only.
Establish covert dismounted OP with Javelin team at GR 225 116. Identify enemy units north-side of OBJ 2 (use ‘Shift’ + ‘Ctrl’ (Lase)).
Destroy identified enemy units once T11 commences firing.
When I21 and I22 firm on RL DRAGOON, consolidate at OP V41E and proceed to Support By Fire (SBF) position on RL DRAGOON. Be prepared to support assault and clearance of north-side of OBJ 2 by I21 or I22.
T11
Assault to Attack By Fire (ABF) position and suppress OBJ 1 with direct fires. Priority of targets: T-80, BTR-80, Armoured Engineering Vehicle, bunkers, infantry.
Over watch T12A and E71 during conduct of minefield breach and I21 and I22 during assault and clearance of OBJ 1.
Advance via south side of OBJ 1 to RL DRAGOON. Be prepared to assault and clear south-side of OBJ 2 on order to BASALT.
T12A
Assault to checkpoint 51 and commence breach of minefield.
After successful breach proceed to SBF position and suppress OBJ 1 with direct fires. Priority of targets: T-80, BTR-80, Armoured Engineering Vehicle, bunkers, infantry.
Allow I21 to pass through for assault on OBJ 1. When I21 and I22 commence assault on OBJ 1, follow and provide intimate support. Clear any local barriers obstructing advance of assault force.
E71
Breach Force commander.
Follow 500 metres behind T12A to checkpoint 51.
Proof breach made by T12A and position a vehicle at entry and exit to breach vicinity checkpoints 51 and 52.
Upon proof of breach, confirm success and GR of breach entry to OC.
Guide and coordinate traffic through breach.
I21 / I22
When T12A reaches checkpoint 52, assault to checkpoint 51.
When E71 confirms breach proofed, proceed through breach in order I21, I22.
Proceed to GRANITE. I21 north of centre and I22 south of centre.
On order, assault and clear OBJ 1 to RL DRAGOON. T12A will provide intimate support and clear any local barriers obstructing advance.
Consolidate on RL DRAGOON.
Be prepared for I21 or I22 to assault and clear north-side of OBJ 2 to BASALT. V41 will provide support by fire.
T12
Combat Team reserve.
Be prepared to reinforce T11 or T12A on order.
I28
Be prepared to recover and repair any immobilised or damaged vehicles.
Be prepared to recover any immobilised vehicles from minefield, including breach.
I was in charge of the T12A and the engineer section again.
During the planning phase I made some routes and waypoints for my units.

Because the space in a M113 is limited with all the grunts and stuff, I openend the hatches and let some guys watch out.


During I was waiting for my signal to move out, the Cav guys moved to their observation positions and our FO prepared
some smoke missions to cover the breach. The Cav guys spotted the first enemys too, one T-80 some BTRs and an engineer vehicle.


After the smoke screen was active, @Jumo and his T11 was moving in position and fired the first rounds to the enemy.

They did a good job. I got my order to start and moved out, along my prepared routes.
Because I prepared everything in the planning phase, I had some time to look around in the Gunner position.


Nothing to gun this time, the smoke screen was still active and I started my breach with one M1A2. I hold one back in reserve.


Here you can see my prepared plan for the breaching operation.


Hot work.


The breach was finished and now I had to mark the breach line with some flags. For this I used my M113.


Time to gave a SITREP and to wait for the first platoon. During the meantime I over watched with one M1A2 and prepared a second breach line with the second M1A2.


The company started the attack and I21 was the first callsign at the breach line.


Last time everything went well, but this time one driver was not following the flags and hit a mine.


God dammit…
He was blocking the exit of the minefield. So I sent one of my M1A2s back to hock him and gave my CO a SITREP.


After a couple of minutes, the M113 was hooked and out of the exit area.

I parked the M113AS4 and he dismounted the Grunts and started to repair his left track.

Now I22 arrived and started to move through. One of the driver thought," ok what the guys from 1 PLT can do, I can do too.", and bummmmmmm.


No casualties this time too, only damaged tracks.
In the meantime I21 moved in line formation and I moved one M1A2 behind. We spotted a lot of barb wire. The idea was to open the wire with the plows.


With one M113 I checked the size of the minefield and the main road, but found no more mines.
Good for T11, so they can use the main road to move forward.

I21 and I22 were in position and started to attack with their Grunts in front. I opened the wire for the M113s…


… and parked my tank in an prepared battle position, ready for new tasks.

I21 reported an enemy soldier in one of the bunkers and I started to search for him.

Give up dude the war is over for you. But he wanted not surrender.


In the meantime our ARV, Medic and Maintenance crews worked hard to fix the tracks on our M113AS4s.


Our CO pushed I21 to attack OBJ 2. We knew there was minimum one BRDM2-AT in position.
He survived several Arty strikes but not the meeting with I21C.


So all OBJ were taken. In the depth of the battlefield we spotted another Bunker line and T11 sent some HEAT rounds.
The AI commander of I20 saw some imaginary enemies or maybe he wanted to wake up some guys in T11.

V41A, the Cav guys, waiting for new orders, and the company is ready to attack further on.


The job was done and the mission accomplished.
After the mission we had a debrief, but I had to leave. You know my son came from school and as always, he was hungry.
A good activity and it was nice to have Shaun (@TAC197) back in the saddle after a couple of weeks of absence.
If you want to play Steelbeasts Multiplayer check this Thread:
see you on the battlefield

Duke RAAC(v)
1 Like
Servus guys,
last friday we had a 6h mission. I was commanding a BG LION and we had to delay an enemy reinforced MechInf Rgt.
Here a video from my left guard, a section of 2 Marders.
great stuff and well played with a lot of luck:

cheers
Duke
2 Likes