Here we have Black&Decker on the cheap end, and DeWalt up the tree some - but they are both owned by Stanley. The batteries are also the same form factor, same connection etc… so check em out in store when you can or find who owns the brand you have and what else they own. You may find a match in another brand somewhere!
2 Likes
What, every 2? years the batteries change.
I like DeWalt, but got an inexpensive Ryobi folding table saw and a Craftsman drill press as my latest tool purchases. Happy with both - straight cuts and holes.
1 Like
Ya it’s a bit stupid.
Ryobi though - they kept the same connection from their older 18V system. I could go buy brand new lithium batteries from them and use them in my dad’s 15 year old Ryobi Hammer-Drill. I give them a big props for that.
I have DeWalt myself, as working at a hardware store we had a string of thefts before things got properly locked up, and during a warehouse cleanup some of the leftovers were going out for clearance and my boss gave me first dibs. I got an 18V impact driver with battery and charger for $50 (it was originally a kit with two batteries and a drill as well), as well as a second kit for $50 with two batteries and a charger (the drill was stolen out of that one). So three batteries, two chargers and an impact driver for $100CAD. Couldn’t pass that up!
If I had to get a full set now, I’d go Ryobi.
1 Like
I may have been shoe shopping last night…ordered this plunge router:
https://www.makita.co.nz/products/model/M3601M
Lots of different routers in the market but I’ve used the trades quality version of this Makita, the RPO900K, before (did the bench top with one) and it was good, so getting the hobbyist version of that seemed sensible.
The farther in law has a little trim router I can borrow for the smallest detailing, so this is a mid-size option. It has a 6.35mm (1/4 inch) collet rather than the full half-inch one, but it should do most jobs nicely.
1 Like


Buenos noches!
1 Like
A somewhat unplanned, opportunistic addition to the shed…a friend’s father moved outside city and was getting rid of double ups (he now has a semi-commercial size shed with cabinet saws and all kinds of things) so I picked up a half-inch router and a multi-purpose table:


It’s pretty neat, 1980’s era but works well. I installed my corded circular saw to it, as I tend to use the little cordless one more hand-held. Works as a docking saw when upright, flip it over and move the top and it becomes a table saw. Comes with a router table, too - haven’t tested that yet due to lack of time.
5 Likes
The house project is now at the stage where the roof is held up with temporary props and the old framing is coming out.
It’s rimu, and mostly heart wood too (the hardest stuff from the middle of the trunk). Rimu is a beautiful native hardwood tree, and you can mostly only buy rimu lumber recycled.
I’m saving it all and will make a big proud dining table out of it as a nod to the history of the house.

8 Likes
nice pickup, i spent many hours using a Mk3 with the old man when i was a young fella, always something to build, they can be a bit fiddly to set up, but once theyre squared up, they are very handy.
also not quite as nice features as the 2000 series, but still does the job.
creates lost of dust though, be prepared for constant cleanup
1 Like
@gadget Yup that’s exactly how I’d describe it too - you can basically make just about any cut but it takes a while to configure and get all the axis straight.
I’m enjoying using it but eventually I’d like to get a proper table saw and build a nice router table with dust collection etc.
All good fun, though! I don’t get to spend nearly enough time in the garage ![]()
i have recently completed a large woodworking bench to house all my benchtop tools.
it has taken quite a bit of time to assemble all the tools, & scrap wood/seconds to complete
even then its still cost me a couple hundred $$$ in hardware bibs & bobs
when everything is housed it provides a large flat benchtop with PARF holes (done with a jig)

the mitre saw & planer thicknesser pivots are recessed lower than the 4 end fliptops
this is to allow the machines work surface to be flush with the benchtop when in use.
so i had to build some insert sections for when the machines are stowed

currently i have a bench grinder & drill press at one end,
the mitre saw & planer/thicknesser in the middle (obviously)
& the other end i currently only have a belt sander & an oscillating bobbin sander
with one fliptop still vacant (holding out of a bandsaw…
the oscillating bobbin sander is on a drawer the slides out mounted directly underneath the belt/disc sander, there is just enough room house them both & for them to move out to their operational points
(i dont have a scroll saw as illustrated here),
I’ll take some photos of the real thing next sunny day we have, I have to wheel it out of my garage to use it, the driveway is on a slight angle & this beast is heavy.
dimensions are bigger than suitable for a work bench
it has to be to accomodate all the tools mounted in it
its also a little higher than it should be (optimally) as the drill press needs to be able to clear the bottom & the weight of the bench dictated i use larger wheels (normally pushing ■■■■ uphill - literally, to get this back inside at quittin’ time)
9 Likes
Nice!
I’ve been wanting to build something similar too…
Awesome, love it! Pics please
Woodworking Bench photos (long)
ok @bearhedge, here you go
apols for delay, we had a fwe days of inclement weather & RL shi-ite keeps getting in the way… SNAFU
originally i had planned the design to utilise some cheap plywood non-structural plywood,
figured i could glue them together to make reasonably sturdy frame, but then a mate pulled down a small mezanine office in his warehouse & i grabbed all the frame lumber to repurpose it. (score!)
all the plywood is also sourced from same bloke, where a local technical training institute relocated to new facilities & had lots of heavy machinery delivered in large pallet boxed up with 19mm ply (score again!) lots of it was damaged or delaminating at the edges, but trimming off the crap still left me with some substantial pieces to play with, i ended up with almost a metric tonne of lumber & plywood sheets, I actually had to upgrade the wheels on my lumber cart twice to cope with the weight.
so the bench itself is BIG, ergonomically its a “fail” because of the sheer dimensions i required of it to fit all my benchtop tools in. Its also very heavy & Im looking at gettting one of those battery powered trailer dollies to stick on one end so that i dont have to literaslly bust a gut getting it back in the garage.
I can manage it at the moment, but can see the day in the not too distant future where i either cannot or give myself a hernia trying…
flat top bench mode, everything folded away. all tools stowed
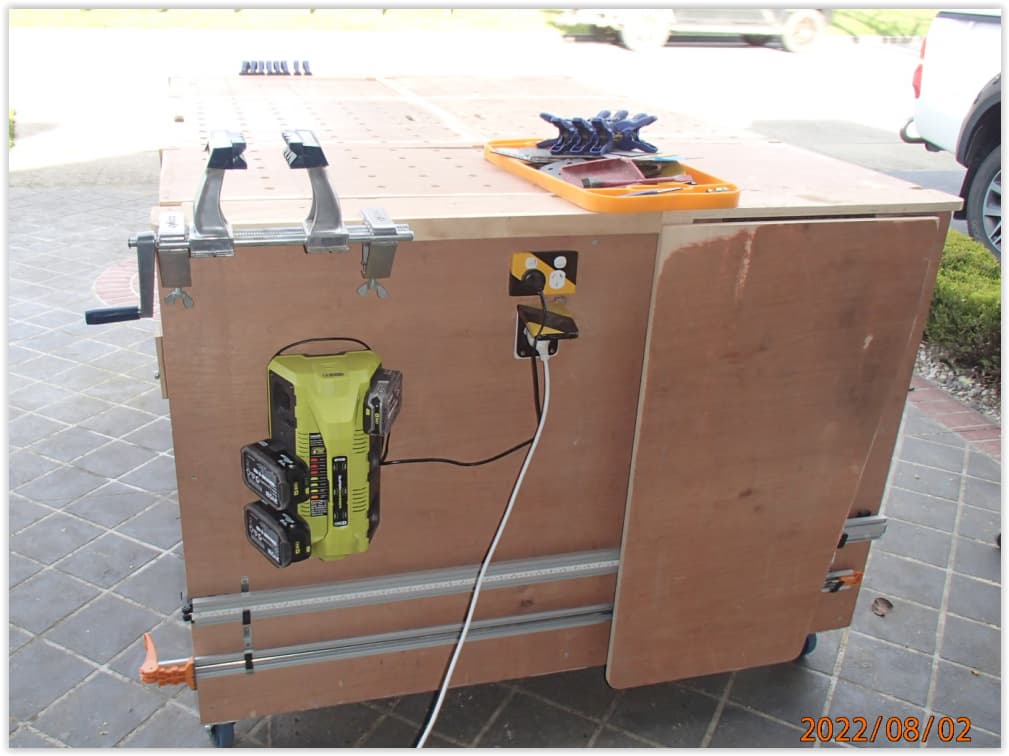
note: the vice grips the edge of the top & can be removed it it gets in the way
at the opposite end the clamps will probably end up on a small piece of wood for the purpose to remove them potentially obstructing, also the little silicon trays are a good thing, you tend to get accustomed to working on a single ‘pivot station’ & keeping everything on a large tray or offcut so that you can pick everything up & relocate it if you require access to the tool underneath where you’re working
note the power inlet, once this is plugged in, all tools in the bench are now live as well as the additional power outlets at each end (inside & underneath).

all of the fliptop stations are wired similarly as pictured.
this was the most painful part of the whole assembly, as i had to juggle & stagger the pieces just right in order to get them in place & functional.
lots of storage underneath, i am still determining the best option for this hence i havent arranged the trays into a static holder, as im not sure of the dimensions for the last remaining tool to be placed.

here you can also see the variation in height of the centre pivot stations & the insert sections to provide a smooth top

plenty of space for storage here especially under the belt/disc sander which is probably where the organiser tray shelfs will reside eventually
you can see the oscillating belt/bobbin sander, i could put it on a fliptop as all the components fit in the base which i find quite handy, so opted to leave it upright & tweeked the positioning of the bench grinder to accommodate both tools
simple lockuing mechanism for when the tools are upright so that they dont suddenly ‘move’ on you whilst being operated
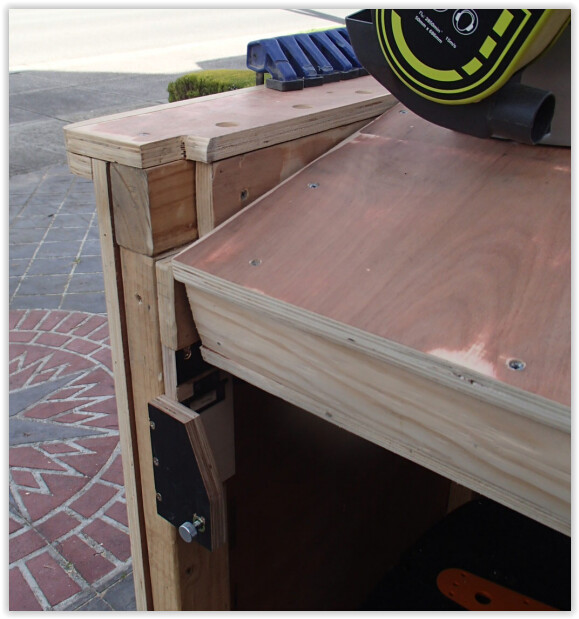
spring loaded pin & chipboard insert in the leg.

once its fully vertical the fliptop is held snug & the locking pins springs into locked position so that it cannot fall out… .that would be bad.

now for the fun part, all the tools opened (except the missing one)

mitre saw extension allows for longer pieces to be handled easier & had to also consider which tools would be located where, so that if i need to use multiple tools at the same time it wouldnt put me at a disadvantage & be constantly flipping over tools/packing up , only to have to do it all again.

blank is currently intended/reserved for a bandsaw, most likely & its doubtful that i would be using the mitre saw then the band saw in unison, however mitre saw + belt sander, or bandsaw + belt sander - very probable.
the planer thicknesser in operating position

note the pivot base is lower than required & I’ve had to pack spacers underneath it (same for the mitre saw)

this is due to the fact that these are not my optimal machines & should they die prematurely & i have to replace them - i made sure that the pivot centres would allow for the ones I want Santa to bring…
(dewalt planer/thicknesser with a spiral cutter…(yummy)

& bosch compound glide saw…engineering pr0n,…)

woof!
Because the centre pivots are recessed lower than the benchtop I could capitalise on this & put different locking mechanisms for when the 2 centre machines are operating.

simple, cheap & effective.
the metal end…
I placed the drill press & the bench grinder at the same end so that if im working on anything metallic, I wouldn’t have to do laps around this enormous bench

note the foot pedal cutoff, for the drill press - handy, because the table i made for the press is pretty much in your face in its current config, but its kind of unavoidable

I cannot lower the bench because the drill press only just fits
note the plastic bag to cover the motor… lots of crap will go straight into it otherwise.
putting it away at the end of the day… everything is on wheels so - it’s a big game of tetris…

tool caddy on the left, top of lumber cart just visible behind it.
offcut bins on a trolley, with the folding table saw behind that, the garden tool trolley
behind all of which is the bench, beside the bench behind the garden tools is the laser cutter,
& behind the bench in the bowels… is the CNC router & my DIY dust collection unit.
one of these days I’ll get around to making a little walk around video & put in all the links to other YT videos that inspired my design.
there are some beautiful benches out there, that are finished superbly, but Im more interested in function over fashion, as long as it does the job, & can cut straight - i could care less what it looks like
end of the day this entire bench is made from recovered/scrap wood.
dont forget the site supervisor…

cheers
8 Likes
Epic! Thanks for the tour! ![]()
I like the way you’ve gone about it, very smart.
I believe you may need an electric dolly though, that thing is a monster! Haha. But so much functionality - and bench space when the machines are stowed. Well done.
it took a good 6+ months of pottering about designing in CAD
(solidworks initially , then again in fusion 360 when my license expired)
then changing from plywood sheet frame to pine.lumber…
as i thought about things & tweeked the design over such an extended periods, I had plenty of opportunity to identify most of the gotchas.
even still once the frame was built I started to realise just how big it was (scale is often deceptive on the screen) & i had to keep myself in check, only allowing the smallest of margins between edges of machine extremeties & edge of fliptops etc. & some common denominators of the largest machine dimension determining overall widths/lengths/heights…
It was a relief after so long to actually start building it & now that its built it gets a flogging, one of these days i might even paint it…
I was initially thinking of doing a Ryobi Nation colour scheme, but Im not a mad ryobi fanboy, simply purchased what i could afford/justify.
Im retired & this is all hobby based. So as much as I might have preferred other “colour” tools (makita, milwaukee, dewalt, bosch) - I just couldn’t afford it.
2 Likes
I’m going to need to go through all this over time, haha. I really like how you’ve successfully made a fold-away workshop that looks like it doesn’t take a whole evening to get out and start cutting.
That’s my issue in my current garage: I can make most cuts - rip, cross, route grooves etc. but setting up takes a long time.
Do you mostly use the bench outside or do you have some dust extraction in the workshop?
As you say - if it cuts straight, what does it matter. I’ve definitely gone the cheap route with a lot of my tools, especially when I buy them for the first time. Some of the cheap brand tools have been just great, other ones not so much, but then you can justify an upgrade on replacement.
I like using second hand tools and Ozito cheapies as the learner tools that I can abuse with gay abandon - it’s also useful to find out for $50 how often I use a tool rather than sinking $500 on something only to find it ends up being a “hangar queen” on the shelf in practice.
Im a country boy now living in suburban Melbourne, dbl garage (no room for a shed) ![]()
so i’m living the nightmare, although i no longer need to be close to the city for work, the wife & kids are ingrained into easy access & reluctant to allow me to return to my beloved greenery of east gippsland…
I have not choice really but to move the bench outside to use it, just no room to get around it.
I’ve also got one of those pop up marquie shelter things for hot/rainy days so that if i really need to i can continue to work, but i need to put some concrete anchor bolts in the driveway to tie it down to so that i dont have to keep setting up counter-weights/tie-down points.
i had a few cheapies as well, ozito mostly, as they broke i have replaced them mostly with ryobi as i became more invested in that 18V battery system, still have some corded tools too though that just do the job, so dont care what colour/flavour they are, they work.
had the ozito plunge/track saw but it failed me, i couldnt get the blade bolt to loosen to change the blade, so took it back & got a refund, now ryobi have just released a 18v plunge track saw in the US (home depot only), but i cannot get hold of one here. that would do me, i dont need to spend AUD$1K on a track saw, i think the ryobi works out ~AUD$540
ironically ryobi used to have a corded plunge track saw, i think it was in south africa, in the old blue/green colour that they used to do, & it was the exact same thing as the ozito one that i purchased, saw one on YT & recognised every feature about it, just in different colour scheme.
1 Like