![]()
1 Like
So we have undertaken the first mission. Probably a bit dicey politically wise, but a local government has imposed sanctions against one of the major houses businesses. So we are to send a message against the local government.


Its a lush hilly terrain, the kind I like. Moving forward, whats this ? A lovely hill for me to hide behind. Me in cover and Sensor locking anything that comes for me. Again this is a 1.5 Skull mission, not expecting anything too difficult.

Moving into cover with the target facility in the background, 4 enemy contacts appear on scope. Its straight to my trusty plan A and a sensor lock is thrown onto the closest enemy. Its an easy shot from behind cover for my missile boat. The enemy is a spider. The volley won’t kill it, but it will be softened quite a bit.


The spider doesn’t like what is happening and darts off behind cover. But a second mech comes into view. Its a locust. Then remaining in defilade, and taking advantage of the forest and movement evasive bonuses. Its a rolling right tactic to bring one by one each of my mechs into line with the locust.


The locust heavily damaged is knocked to the floor.

Re-enforcements arrive in the guise of a Panther. Its not a huge mech, but does carry a PPC and can have a heavy hit. It is in trouble though as 4v1 is never great odds. In the mean time the bases defences have opened up on us. Damage is light though as our defilade position hides us from all but the bases missiles.

The prone Locust has already lost its right arm and its left torso is down to structure only. I target this hoping to destroy the torso and hence have the arm attached to it separate as well. This destroys the mech and the focus is not on the panther which misses wildly with its PPC
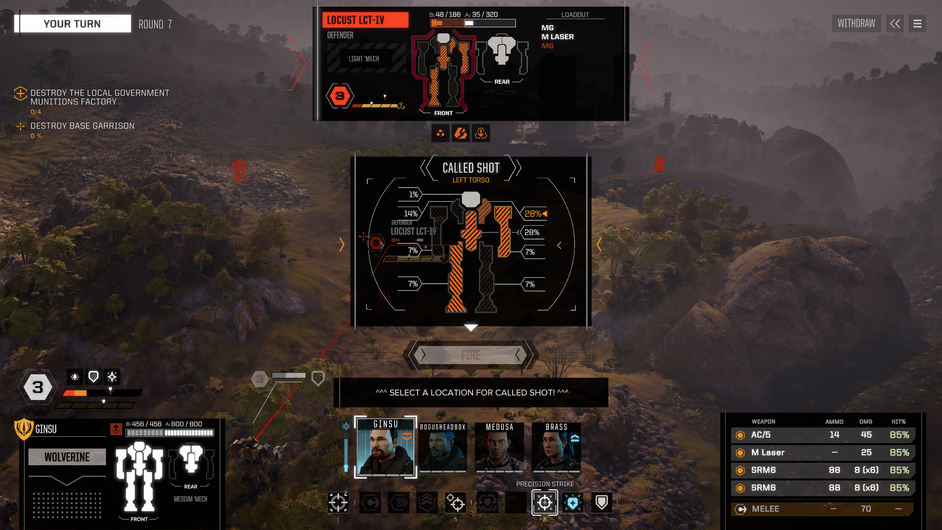

Its time to bring in the HUNCHBACK laser variant that we built from our last skirmish. He has a lot of firepower and I am amazed that the heat build up is acceptable in this climate. Not the best percentages on the weapon but most hit home. Poor panther.

Meanwhile one of my Mechwarriors Brass, detects heavy damage to the panthers left torso. Calls up a precision strike to hopefully take it out. Its a catastrophic hit with a chain reaction of explosions buffeting around inside the mech. Its dies a violent death.


The spider we first engaged that ran away tentatively comes back into view doing what it can. Its only scratches but my next mech has some nice shots lined up.

Again my missile boat sees an opening and calls a precision strike of its own.


Another handy perk to train in is multiple shot. you can target more than one item and send pain in multiple directions. Here my mech splits his weapons between the two remaining mechs, killing one and damaging another. A second mech does the same, but instead targets a turret as well. Both turret and last remaining enemy mech fall.


Now its just a case of mopping up the target buildings staying clear of the turrets. I could kill the turrets, but I don’t want to risk wounds to my pilots.


From the battle you can see the heat churning from one of my mechs


The battle is won and here are the spoils.

And the salvage. I went for the Panther chassis and PPC. Panther because I already have two and with this last salvage I can make a new panther. The PPC, well, who doesn’t love PPC’s ?


Looking at the mission board, a 2.5 Skull contract has appeared and covering travel costs.

So another question. Should I stay here with these easy missions or depart to the new system with the 2.5 skull mission? I can sell the panther and a locust I have sitting in storage to more than cover the monthly wages to get there.

4 Likes
Now I feel like my opinions are taken a bit too seriously but… what I’d do is
IF
the 2.5 skulls missions will not disappear
THEN
complete all the small missions available, build XP for pilots and cement your reputation.
Earnings does not just come in Cash…
ELSE
go for the money…
Thanks for this thread and the responses here, fun read.
Question from a non-player: When you make your drop to the operation area, do you get to pick your drop location, choosing advantageous terrain features? Or is the drop point more like a preset position?
This has been where my mind has been going. Thinking of it as a computer representation of the miniatures game is making more sense.
Is that something that can happen in the middle of a move? I was under the assumption that when you got to cover you couldn’t do the sensor lock. Granted I am finished mission 3 last night and don’t have a mech with that capability yet ![]()
Also, before mission three I was able to roam around the ship (not really roam in a 3d sense) and talk to the finance guy and the lead engineer and they pointed out a lot of the stupid questions I was asking. So the ‘tutorial’ (question/answer text) goes beyond mission 2, and it would have been nice to know most of that before those missions ![]()
I have not gotten to select a drop point yet … but I am only 3 missions in so I might be crazy.
@fridge is right. @adlabs6 You don’t get to choose your drop location. Not that I have found anyway. But you are not dropped in view of enemy so have freedom to position.
Yes. You can move and then sensor lock as long as you don’t sprint. Hence the benefit of a light mech with excellent movement. Sensor lock takes place instead of firing weapons.
There is a perk you can train that allows you to fire first then move. That would be excellent for hit and hide tactics.
@komemiute The missions do fade, but I am unsure of the time line of when they do.
2 Likes
FTFY
3 Likes
The backer beta manual goes over a couple of concepts. That might help new players.
2 Likes
Couple of questions:
- Is there anyway to see my income for the month? In the finance area I can see what my expenses are but I can’t see what I have brought in for the month.
- If I buy a mech, is that included in the monthly expenses report?
- Ammo - where can I see on my mechs what their current ammo load is? I assume I have to reload them at some point

- Also - current contract. Where can I review the details of the current contract before I launch - in case, say, I forgot to pay attention to the climate in the area I am fighting.
Answer 4: When you ‘Launch Mission’, you go to a screen where you configure your lance and there is a spot at the top to review the mission. Seems a little late to be swapping out guns though.
1 Like
Hi fridge,
- Unfortunately no. As far as I am aware the finance page only lists your projected expenses. Any extra purchases or money gained from contracts have to be “mentally” attributed to your costs.
- no, for reasons above.
- Ammo is automatically restocked at the end of the mission, provided your ammo bin has not been destroyed. I believe restocking of ammo and mech upkeep is part of your projected monthly costs.
- Good question. Looks like you answered it, I didn’t know about that one.
Bogusheadbox’s Marauders update…
after careful consultation it was decided to finish the remaining contracts on Herotitus. The second mission went without a hitch but the 3rd caused some troubles. It was again on a destroy convoy mission. Maybe I need to change my tactics.
In any event the mission was completed with 2 mechs needing repairs. It was the injuries to one of my very experienced pilots which was crippiling. 57 days in med bay will see that person out of the next two campaigns. Indeed even my character suffered an injury. Warning again against the dangers of running your lead character.
But onto some good news. At the end of my campaign on Herotitus, there were two 2.5 “skull” missions available at the same system. Both offered transport costs too ! So again another good decision to finish the campaign.
My Argo status page showing the downtime for mechs and personnel.

Leaving Herotitus and enroute to Weldry for a bit more of a challenge.


Again whilst in transit I am hit with another monthly bill. Its getting higher.

I still have 32 days before medusa is available for battle again.

Here is something I have not shown before. Its my reputation with the major houses.

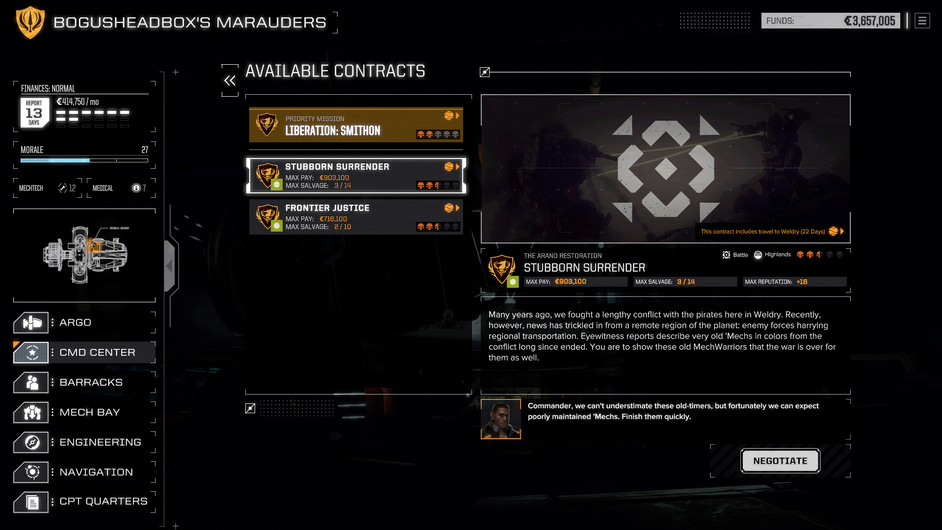
At the end of the day the campaign Herotitus did not really net me a profit. I have come away with a few small mechs which I can sell to offset the deficit. However upon visiting the MRB (mercenary review board) at Weldry, there are some very nice missions on offer even a 3 “Skull” if I dare. Lets get past this 2.5 mission to see what damage and problems occur after. The original 2.5 “skull” mission is not showing on the list as I accepted it to get my free travel to Weldry

1 Like

1 Like
Here’s an AAR of Mission #4 of my campaign.
Next up for me are one of these:

I think that the top one is a story mission and I am realizing that the little world icon represents a mission requiring travel.
2 Likes
Never enough AAR! So I applaud @Fridge!

3 Likes
Will El Comandante be in control of TWO lances?

@Fridge and everyone else. Update just release for Battletech (on GOG anyway)
2 Likes
2.5 “skull” combat mission. Find Pirate leader and destroy - simple enough.
Preparing for this drop, I am expecting mechs from light up to my weight or heavier. The environment is frozen tundra which favours energy builds.
Expecting much more difficulty this time, I am going to take it slow and not blindly blunder in. I am torn between taking 2 missile boats or 1. As the environment is frozen, I have decided to ditch the second missile boat and go for the hunchback with its 8 medium lasers


Again looking for good cover or vantage points my mechs move forward, slowly this time, to try and detect what we are dealing with. There is a huge ridge running parallel to the lance’s direction of travel. As well there are some outcrops of hill in front. The area is covered in forest which will provide a cover bonus as well. “Move to here and scan.” is the order.
Instantly we gain two contacts. A vehicle and a mech on the other side of the large ridge.

I seem to be in a good spot. The vehicle looks as the closest target. I want to take this out as quickly as possible so focus can be put onto the enemy mech. I hunker most of my lance down behind the outcrop and send a sensor lock to the vehicle. Its now revealed and it looks quite beastly.

Without delay, my missile boat throws all it can into the air. There are some good hits, but an eyebrow is raised at how well the tank has taken the hits.

Then a new contact, forward left. Another mech. He instantly sensor locks one of my mechs from behind cover. Missiles are coming from everywhere now and the armour is stripping away nicely on my mech that has been targeted. In addition to this more vehicles come into view.
Assessing the situation, I can tell this fight can go either way. At the moment, playing the sensor lock game, the enemy is winning as it has more missiles at his disposal (maybe I should have brought the second missile boat). I need to change tactics. Sitting here doing what I am doing is not enough.
To compound the situation the mech to the right has done what i didn’t want to do and move down the other side of the ridge towards my right flank. So if i stay here i will be pummelled by indirect fire front, front left. Direct fire front left and a flanking manoeuver to the right. Meanwhile my mech is taking a pounding and i need it to give some punishment back. Here i am noticing much better tactics from the enemy.
Two options come to mind. I can divide the lance into 2 sections. 2 go right around the outcrop to deal with the mech and tanks. The other two go left into a 2v1 against the 65 tonner which i am now facing. Or i just take the missiles on the chin and push all mechs hard left and head for the most dangerous item, the 65 tonne mech.
Talking to General Grievous aka @near_blind on teamspeak, he advises that generally its best tactically wise to stick together. And so i accept the advice. Our defilade position is left behind for an assault attack on the 65 tonne mech.
Two of my mechs break cover and unload all they can into the now identified thunderbolt

As the rest of my lance comes round and unloads, the cheeky thunderbolt having ben hit quite hard slinks back behind cover to evade. A very good move on his part. As he hides, i am once again sensor locked - the same mech as before and the tanks open up with their missiles.
I can’t really chase down the Thunderbolt at this range who is now nicely under the ridge, so attention is thrown back at the tanks. I can’t waste weaponry for a sensor lock and the call is made to continue the left bounding roll around the outcrop to engage the tanks. Luckily for me, the left bound tactic is keeping the flanking mech to the right out of line of site.

As my attention is diverted the thunderbolt rises again, this time with murder in his eyes. Its an “oh crap” moment and all mechs swing round. This guy need to go pronto.


Its a hard exchange and the hunchback steps up for additional firepower. 8 medium lasers ripping at the thunderbolt. At the bottom of the picture you can just make out one of my mechs has suffered a critical hit to an ammo box. Its my missile boat. The ammo box explodes taking the left torso and arm off in a ball of flames. The missile launchers were also in this location and are toast as well.
Ignoring the tanks, who are still ripping at us, we hunker down on the thunderbolt. His center torso is dwindling and all that can do precision strikes to this area. Its a stoke of luck. He has an ammo explosion of his own that tears down into his center torso taking it out of action. If this didn’t happen, this portion of the fight would have been a lot worse.

I try to pull my damaged mech far from the front in a hope the enemy will stop targeting it.

From here we charge forward to the tanks. Shooting from range may take a while with hefty tanks like these so stomping is the best course of action. But shoot while your moving to engage to soften them up. As the last of the tanks fall, the flanking mech pops into view. A spider. He throws his little weight around and i want to take him out as soon as possible. Another mech contact has appeared. Is this the boss mech i am after?

The hunchback again proves its worth and has no trouble with heat in this terrain. Hitting hard, the spider just really couldn’t take 8 well placed beams of medium laser.

With the immediate threat taken care of and the other enemy on the far side of the ridge. A sensor lock is thrown on him to see what we have. Its a Jagermech in the 65 tonne class. he is good at long range and i am glad he was too far away to join the skirmish earlier. I pummel him with some missiles from my own heavy mech (as my missile boat cannot). He quickly crests the ridge and hits hard.

I forgot to take lots of screenshots here as i was so involved with the battle. it was a protracted battle and he soaked up the damage well. But in the end he could not survive 1 vs 3.5 mechs and finally fell.

This was a hard match. I paid the price on this one. A badly damaged mech, an injured pilot. Enemy tactics here were very solid. If the thunderbolts ammo explosion didn’t happen, i could still have been fighting it when the Jagermech crested the ridge. So a bit of luck was involved here.
So the spoils of war, my earnings from the engagement.

I opted for the jagermech chassis as my one and only priority choice and this is the remainder i received.

Back aboard the Argo we can see that Ginsu will be in med bay for a staggering 51 days. I still have 31 days left on Medusa from the previous campaign. If i want to continue here, i will have to run my newbie with low stats and my actual “bogusheadbox” character to field a full lance. Unless i recruit another MechWarrior.

In the mechbay we can see my Centurion’s damage. The left torso and left arm need to be fully replaced. Not cheap. In addition to that all ammo boxes and weaponry in this area need to be replaced as well. (a LRM 15 + LRM 10 + LRM ammo box were lost here) I have since moved the ammo box from this location to the leg so if there is an ammo explosion it wont take the launchers out.

A hefty bill for repairs eating into my profit. Plus a 10 day downtime to effect the repairs.

At the end of the day, the battle was good fun. However the balance sheet is screaming blue murder. Whilst the reward for the mission was just under 500,000 credits. The repair bill has eaten a quarter of that as well as costs for possibly needing to hire another pilot.
As i won’t be undertaking any more missions here this campaign will give me a substantial loss
1 Like