Beyond Visual Range (BVR) Strategies and Catalog

I’m trying to get less bad at air combat, as I’ve traditionally just tried to move mud. It’s going ok, even if @Wes’s next of kin got a letter or two the other night (sorry again about the pitbull’s :blush:).

In air combat I’m doing ok, as in merged and and within the < 10nm or so. What I was interested in was exploring a few of the typical strategies around BVR in a group of a couple of people, typically within DCS and the (for me) blue jets.

Note: There’s some really good info in here - Sim vs Reality Tactics so this is more about ‘cataloging’ and giving names to the various approaches.

So I’m at the stage where working with another pilot or two, there seems to be some obvious things to try. What I am lacking is the proper ‘names’ for these techniques (plus more of them). Here’s what I mean:

  1. Initial. Here we start off about 100nm apart:

  1. We get closer, no shots off as yet. Lead gets STT Locked.

  1. Whoever gets locked goes ‘cold’ and extends away at full burner. The other brackets right abeam 90.

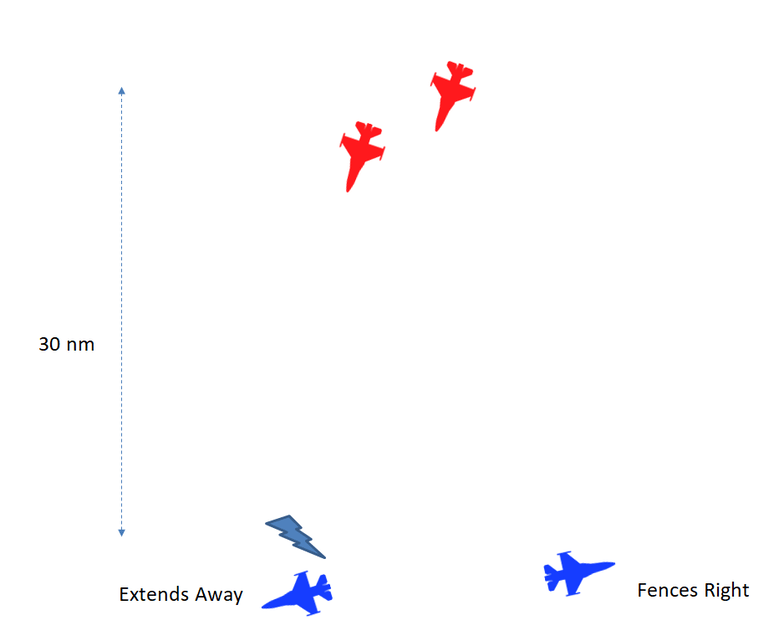
  1. Once the bracketed for 20 seconds or so, turns in hot and shoots.

So that example is not because it is good, just more an example that (1) I want to give that thing a ‘name’, so we can quickly refer and use it and (2) I want lots more of these, with names and sequences I can practice. There are lots of ‘Art of the Kill’ BFM and ACM things, but a lot less unclassified BVR techniques. If such a thing exists then I’m keen to see it, i.e. videos or pdfs in this topic.

PS If useful to anyone, here’s the two graphics I just put down quickly in google slides and positioned, feel free to right-mouse and download:

4 Likes

There’s a potential problem with this piece, in that both red aircraft are probably targeting both blue aircraft, not just one. That’s typical for the AI as they split themselves up to attack independent targets, which is why the blue aircraft should do the same. This can potentially be changed if one blue aircraft is hanging back and is directed to target the closest pursuer.

1 Like

So for ‘The Drag’ to work, it would be worth splitting up, say 10 nm across, and the wingman keeps high and back (say 10nm) and then the moment the lead turns to go cold on the lock, the wingman turns right, tries to ‘notch’ the two inbound bad guys, counts to 20, turns back in? Would that work?

Also, should have said, for a lot of these I’m picturing (heh) getting info from the SA and an AWACs, so these sort of examples are based on info got from more than just own sensors. (I know that’s not realistic, I’m just limiting things to make it easier to discuss).

You’ll need more than 10nmi of separation; basically, you’re working as the bait in this case, with the other being the shooter. You need to make extra sure that the one blue aircraft is what red wants and the only real way to do that is to have a lot of separation – probably more than 30nmi. For the drag to work, the bait also has to have a very good idea of where they are, what their opponents are doing, and what the shooter(s) are doing. This is important to give the shooters a good solution and to watch for any unexpected motions by the opponents, which might give the bait an opportunity to turn around and become the shooter. Think of it like a high tech Thach Weave.

It’s probably not a good idea for an engagement like this where you have parity, since all aircraft can do independent targeting.

1 Like

Interesting…

So is the best strategy in a 2 vs 2 like this to each pick a target (the lead would say 'taking the one on the left, nearest for example) and then the wingman targets the other one? (is this a truism/rule, by the way, in that it should be assumed if the lead is on the right and the wing on the left that they would pick the targets on ‘their side’ - albeit with some verbal confirmation from the lead I guess?)

Once missile have been fired then do both crank the same way?

So in the above, if the reds are generally coming to the left, then is it best to crank right within the radar’s azimuth range to keep a lock until it is active? So you always ‘crank away’ as the objective is to maintain distance while still keeping a lock?

Yes, that results in the most success in my experience. My take is it doesn’t much matter who targets what, just so as long as someone has their own target, though it’s generally a good idea to have the targets assigned to who is closer. Crank direction and all that doesn’t much matter, just that one cranks (and reduces throttle plus begins a slow dive).

The idea is to get a shot off first so the other guy has to go defensive. Much the same as whoever sees the other first has won half the battle, the sooner you can get a missile out, the sooner your target has to react to you versus you reacting to him. If he does nothing, he catches a missile to the face; if he goes defensive, you can now turn back and pursue him. The same is true of his wingman, whom yours should be pursuing as well. The beauty of this is you don’t need to get a kill at this phase, you just need to make it a 2vs1.

1 Like

Just a thought, if he locks you and you know where he is, can he actually shoot you? Otherwise, why go cold?

More in-depth, can he kill you from that range before you go cold?

1 Like

So what you have described frog is essentially the basic element of a 2 ship intercept where you are intending to go to the merge. What this is called is a notch press.

The spiked fighter in this case should notch first, see if he can break the lock, so that he can pitch back in, if not then exit. If you space yourselves out to either side of the bandit its called a bracket. Key notes are you can also bracket in altitude, not just azimuth, most radars have a lot more trouble showing an altitude split than an azimuth split. Most radars in DCS have alot of trouble seeing more than 10,000 feet of altitude separation when bandits are 10 miles away.

In reference to if you are all targeting each other and everybody is going out at the same time this gets into the two different realms of Active missile tactics, offensive or going to the merge tactics, and defensive or launch and leave.

With Offensive (notch press/bracket) it is assumed that for your mission success you have to flow through the bandits, thus you cannot turn around. So to ensure that the first thing to understand is the relationship between First Launch Opportunity (FLO) and F-Pole (range between you and the bandit at timeout) and A-Pole (range between you and the bandit when your missile is active). If you are using sparrows, then F-pole is all that applies.

Basically whoever shoots first (has FLO) will F-pole first, which means that the opponent has to honor their longer shot range by defending. Having a realistic expectation of what a longer ranged shot in DCS will do is key here, taking a 30 mile shot with an AIM-120 has a pretty good chance of intercepting a bandit, if he continues hot(pointed at you). If he turns more than 50-60 degrees I’d expect it to be defeated. So you take that into account.

F-Pole range is generally half of your launch range if you crank. (shoot at 30NM, missile should F-Pole at 15) This is where you assess and build extra shots in.

For example, your 2v2 scenario at the top, assuming everybody sorts (no one is double targetted) and blue side has AMRAAM’s, Red side has Sparrows or R-27ER’s. Then Blue will shoot first at 30NM. Lets say red plans on shooting at 20NM.

Using the rule of thumb above, if blue cranks, and red doesnt and drives straight, then blue has a pretty good chance at killing red when they are 15NM away, and even if spiked were never in any danger from the R27ER’s because they werent going to timeout until the range between red and blue was 10NM.

Say red realizes they have been shot at, and start maneuvering. Your shots may be defeated, but they have had to maneuver enough, more than likely to break their own radar lock, now their shots are also defeated, and you have your radars pointed at them, and they don’t. You are going to be able to target and shoot them before they come back around the corner, your missiles will timeout first, rinse and repeat until they die. The trick here is not losing track of where they go as they maneuver.

You should ideally crank the same way because it maximizes mutual support. Where all of these tactics generally fall apart is that nobody knows where anybody else friendly is, and it devolves rapidly into separate 1v1’s.

7 Likes

6 Likes

I normally wouldn’t, as I’m trying to have the height, speed and missile type to have the first launch opportunity in this case, as in, I wouldn’t normally turn here, so this wasn’t a great example. :slight_smile: I think all I am trying to do with this is really expand my ‘playbook’ of options, and like @Franze pointed out, in this red/blue 2 vs 2 with blue having FLO then we usually press on. Basically I was trying to think of playbook scenarios where one drags away and the other part of the element gets an advantage from it.

Good stuff. A ‘notch press’ - thanks!

Will try the altitude split for sure, as that’s something I often get wrong on my end of locking even the DCS AI up, as in, I lose them on a rapid scan when they change altitude, as I’m poor on the elevation radar changes and something I need to consciously practice. When closing fast I tend to underestimate the range decreasing and the ‘bottom of the cone’ being where it is. If I lose something coming in hot it does tend to be because I react too slow with an elevation change.

The procedure for this I want to improve on for myself is keeping the counts more in my head on when my 120 will go active and when should I turn back in. I see the active countdown, and I see the ‘lost’ if they break my lock, but I haven’t got a good mental model of what I should be doing other than cranking and waiting for it to go active. I need to visualize the A-Pole I guess.

Put another way, when it works it works great, but when they defeat my missile, and I see that, then I need to more quickly think ‘ok, I’m 15NM cranking from them, should I turn back in or not?’ and try to get that stage of the engagement more of a procedure in my head.

We’re at the stage where an element of hornets with 120C’s can sort ok, get high/fast for FLO, use the F-Pole but some indecision of the A-Pole factor for taking the second shot or keeping defensive.

So the bit I am keen on learning more about (and thanks to @Wes for the term here) is that I’m trying to increase the playbook with BVR options with a team of human players. It might be the case that FLO with a Notch Press is more or less it, but the idea of even more devious things to try sounds really interesting.

I’m curious around Launch and Leave. Is it essentially getting FLO, cranking, using the A-Pole and then withdrawing back quickly (even before confirming the kill), and repeating? As in, if I don’t want an Offensive merge, then this sounds like a good idea. In a lot of our engagements in Hollo Point and Hollo Point North, we’re the aggressors rather than defenders, so we usually have the option to withdrawn to a line and repeat the procedure and using our FLO. Does that sound right?

In DCS the missile countdowns are fairly meaningless in US jets, I havent seen them match what is actually going on all that well, so I use ranges more than anything else.

A-Pole usually happens about 2/3rds the distance from you to your target, with active off the rail happening at 8 or so miles.
So if you shoot at 30, and crank, expect it to be active at 20, and then go out.

Its a pretty simple yes/no decision honestly, try and boil it down to the essential question, am I 2 v 1 pressing inside of 15 miles on this guy right now?

If you are, sweet! Both people continue hot and if one was showing a spike, then he notches and exits, the other continues and kills.

If you are not there are a couple of options you still have available to you. First and foremost, if the situation is not good abort.

If you have plenty of missiles, and its still 2 v 2, consider shooting again, and continuing, you still have a few miles before you have to notch/abort, and you can then give them another opportunity to die even if you both abort (go out) before your missiles kill them, since you should still be able to get them to A-pole.

From there just game through a couple of scenarios and remember that 2 v 1 means 2 v 1 when you need to respond, and when you are merging with the bandit, IE if the bandits wingman has turned around, and is cold 10 miles away from his flight lead, you are 2 v 1 vs the flight lead, since the wingman can’t effectively help out.

Finally as you are pressing inside 10 miles, these rules of thumb start to break down. The key thing to remember is give him every opportunity to die before you have to turn with him.

3 Likes

You’ve pretty much got it for launch and leave, think with launch and leave, range is your weapon, and the missiles allow you to keep range. If you are defending something, and they run out of fuel because they continually turn around when you shoot at them, it doesn’t matter if you kill any of them, you still win cause they didn’t get to the target.

Shoot at long range, turn around immediately at A-pole, and let the amraams sort em out from there while you maintain range, altitude and airspeed. use the picture or bogeydope call, and/or datalink to get an idea of what is left behind you, then pitch back around the corner and do it again. Try and get as many leafs of this as you can before the range collapses (inside 15 miles or so) and you now either have to commit to the merge, or you run cold and have a friendly element shoot them off your 6 (delouse).

The advanced version of this is to use the launch and leave, to try and force an opportunity to then go offensive to the merge.

For example, where this works well is if you are outnumbered. Say you are 2 v 4 instead of 2 v 2. You cant really expect to kill more than 2 by the time you will have to abort, so how do you deal with this?

Do a single leaf of launch and leave, and see if it makes the two you shot at maneuver enough (or die) so that you can then continue to the merge against the two that you didn’t shoot at.
Just keep thinking, how can I turn whatever scenario I am in right now into a 2 v 1 in my favor before one of us is forced to defend, and you can find opportunities to flow between the two tactics naturally as opportunities present themselves.

5 Likes

Thanks klars - great stuff.

Yup. Thanks!

For those that haven’t played it, here is a brief/rough map description of A2A in Offensive Posture from Red to Blue:

Kutaisi Airfield - Red, Rear Launch Area for Su-27s (Requires penetration of Red Airspace approaching Senaki).

Senaki Airfield - Red, Main launch Point for MiG-29s (Requires penetration of Red SAM Coverage Zone our Past it’s “front line”.

Red SA-11 Network, Coverage Extends up to the River South of Gali.

Gali - Contested Area

Sukhumi - Blue, Launch Point for Mirages (Requires Blue Airspace penetration)
Blue HAWK Network Adjacent

Gudauta - Blue, Launch Point for RCAF Hornets (Requires a further Blue Airspace breach) - Patriot System Adjacent

———————

Battle One of Last Night - Report:

Initial load out:
4x AIM-120B
2x AIM-9M
2x AIM-7MH
3x Fuel Tank
60 Chaff / 30 Flares

This one doesn’t stick in my memory as well since I ended up mainly being bait. Two 120B’s launched at Red leader pushed him away, but I ended up having to go defensive, being too close to SAMs. Remainder: 2, 2 & 2 on missiles, no CM used.

———————

Battle Two of Last Night - Report:

@Franze pushes into RED Airspace at A28 to trip enemy fighters. I circle Northward towards and around Sukhumi at A35. After an unexpectedly long delay, MiG-29s turn up. At this point Franze is coastal and I am near the mountains moving seaside. I lock up the leader, Franze takes the wingman who is vectoring his way.

My first 120B shot occurs at 35nm and is defeated, bandit turned flank but not cold. He proceeds to try to turn back in, where I follow up with a second 120B missile. Defeated again. Close to 15nm now, I go for a Sparrow while holding the edge of the SAM circle on SA now flying east to the mountains again. He turns cold, runs into friendly SAM coverage and I have to break off to avoid going in - Sparrow loses track and is down. Small chaff usage to break SAM Launch tracking.

Missile Status:
120B = 0
7MH = 1
9M = 2
CM: 40+ Chaff / 30 Flares

Franze appears to be under attack now, so I swing around to flank the wingman, that battle occurring 39nm from me. Before I can close, Franze downs his opponent (He can explain his fight). At this point, Red leader decides to come back into the fight on me. I extend North to friendly SAMs while passing SA data to Franze, who begins to engage. As we close on friendly SAMs bandit begins to maneuver and Franze calls for me to re-enter the fight. While turning back in, it’s splash two and we’re clear.

Low on weaponry, we return to carrier. Our initial idea was Franze as bait, and me being hunter. Both time it ended in a reversal - I ended as bait for his kills, after scaring one opponent defensive.

2 Likes

When Blue shoots an AIM-120 at Red, how does Red know it was targeted such that Red will turn away? I have this idea that Red doesnt know a missile is OTW until the -120 goes active.

Correct, they tend not to react until the missile is active. At closer ranges, this can be dangerous as they can have a shot coming your way before it goes active. While you have a technical advantage, it’s still somewhat a game of chicken. You hope that they turn cold to defend and break their own lock. They may not, chaff may decoy your missile and theirs is still coming with more energy as it was launched later/closer. You have your own defensive crank to perform, which may save you.