Is the pattern just a visual irregularity? MFUZ set to VT, EFUZ to Instant, HT to 1500 leaves a tiny little burst that doesn’t do much. MFUZ set to PRI, EFUZ to instant makes a big, large area that seems to do more damage as well as hit a much larger area.
1 Like
I second this.
I might be wrong, maybe not using the proper setting borks the bomb.
What happened to rugged outdoorsman flying Beavers with canoes strapped to the float struts? Things have made a 180 with regard to function over fashion up there IMO ![]() Has this Winter been too mild? Is there a dearth of poutine?
Has this Winter been too mild? Is there a dearth of poutine?
3 Likes
Mild? YES!
We’re getting out first real snowfall here in the Toronto area this weekend (the forecast says).
Hell, it hasn’t even been really cold until these past couple days.
I went snowboarding up at Blue Mountain and near the base of the hill, there were some soccer fields with green grass!!
3 Likes
Maple syrup in the external tanks. Gotta get that stuff to market and protect it at the same time.
3 Likes
You stop! Mild! Bah!
What a difference between Toronto and Fredericton! Yesterday we had a high of -2 Celsius and a low of -22. If you are bad at math, that is a 20 degree shift from 7AM to 7PM! 12 Hours!
Then again there is a storm on it’s way here on Sunday from the US (thanks @Tankerwade!) where we could get either 30 cm of snow (1 foot) or 50 mm (2 inches) of rain … but that depends on where that transition line falls and we probably will not know unto Saturday ![]() Our weather is chaos over here on the east coast.
Our weather is chaos over here on the east coast.
2 Likes
I am really looking forward to adjusting burst height. With a HOB of 1500’ the pattern is so tiny, I currently see no reason to use Rockeye other than specifically against individual tanks. Against anything unhardened or dispersed, GP bombs are just overall more effective. This is in stark contrast to the 28’000 Rockeye dropped during Desert Storm, which was the bomb of choice against soft targets.
With the current damage modeling in DCSW that one would do nothing at all.
That is a great tip. I just used this for the first time and it works fantastic against SAM sites. Basically the CBU open immediately after dropping.

This salvo of 5 Mk-20 released from 6’000 ft resulted in pattern that had a 200 m diameter. Not everything was destroyed, as to be expected with the decreased bomblet-density, but damage against this soft target was substantial.
7 Likes
@NineLine, @Wes, @MBot – I think I’ve cracked the mystery:


It’s not the altitude that matters, but the pitch of the canister when it explodes. The reason me and @Wes were getting devastating effects at low altitude, CCRP drops was because the canister was bursting at a 10-15 degree pitch, which seems to cause the submunitions to scatter in a much wider arc. The Community A-4E and Harrier don’t have the fuzing options that the Bug does, so it will always burst at 1500ft for them. So if they drop from a dive or high altitude, the canister is pointing at a more extreme angle and this causes the subs to centralize. The Bug, having the option to instantly pop the canister, means that when Primary and Instant are selected, the canister bursts a short time after release – and at a typical dive angle, allows for a larger spread.
I tested by making a Harrier invulnerable and pitching up in vertical flight right at the 1500ft mark and this caused the subs to suddenly spread in a wide pattern. The Bug, using Primary and Instant can cover a large area when dropped from 12000ft, as seen in the last picture.
5 Likes
Tacview doesn’t track the individual bomblets by chance? Might be easier to visualise if it does.
1 Like
I found using an airfield view and moving the point of view to get a good perspective of the target works well when observing cluster munition effects. I used that a few times with the Viggen glide cluster-bomb to adjust the proscribed spread for the mission. ![]()
Mission of the Week
Red Flag Iron Hand
This week’s mission takes place in the Nevada map as part of a Red Flag exercise.
Due to the large file size, it cannot be attached. Please use this link:
https://drive.google.com/open?id=1a_…LqcQVfPpICWcMK
Your flight is one component of a larger strike into RED territory that consists of fighter sweeps (F-15C), strike (Tornados), and SEAD/DEAD (F/A-18C and F-16CJ). Your flight targets are two SA-6 SAM sites 20 nm southeast of Tonopah. These threats must be eliminated prior to the Tornado flights crossing the fence.
RED air activity is expected to be high and consist of MiG-29, Su-27, and MiG-23.
Note 1: This mission uses real radio traffic from a Red Flag exercise, but it is solely for atmosphere and has no bearing on the mission you are flying.
Note 2: This can be a difficult mission with numerous threats and allied flights. This is designed for experienced Hornet pilots.
If you enjoy this mission, be sure to check out the Red Flag campaigns for the A-10C, F-15C, AJS-37 Viggen, and M-2000C on our e-Shop and Steam.
TASK:
Destruction of Straight Flush SA-6 SAM radars at WYPT 7 and 8.
In addition to the two SA-6 SAM sites, two MiG-23 Floggers fron the Red Eagles squadron will scample out of Tonopah AFB to intercept you. Both aircraft must be splashed.
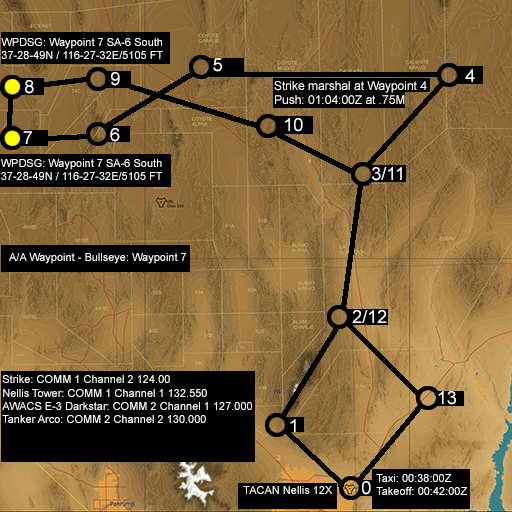
MISSION PLAN:
Communications:
Strike: COMM 1 Channel 1 124.00
Nellis Tower: COMM 1 Channel 2 132.550
AWACS E-3 Darkstar: COMM 2 Channel 1 127.000
Tanker Arco: COMM 2 Channel 2 130.000
Players:
Chevy 1 and 2: F-15C north and south CAPs
Chevy 3 and 4: F-15C sweep
Colt 3 and 4: F-16CJ SEAD/DEAD
Colt 7 and 8: F/A-18C SEAD/DEAD
Uzi 1, 2, and 3: Tornado Strike
Arco 1 and 2: S-3B tankers
Texaco 1 and 2: KC-135 tankers
Pontiac 1: C-130 Compass Call
TACAN Nellis 12X
Schedule:
Startup: 00:25:00Z
Taxi: 00:38:00Z
Takeoff: 00:42:00Z
Strike marshal at Waypoint 4
Push: 01:04:00Z at .75M
A/A Waypoint - Bullseye: Waypoint 7
Targets:
WPDSG: Waypoint 7 SA-6 South
37-28-49N / 116-27-32E/5105 FT
WPDSG: Waypoint 8 SA-6 North
37-37-15N / 116-28-00E/5328 FT


8 Likes
These are a nice idea @NineLine - will give it a go.
1 Like
Looking forward to this I keep thinking the red flag campaigns should be in my library maybe this will make people like me press the buy button ![]()
It’s the price of two cheap coffee or one expensive one. even though they (the A-10C and F-15C ones) are short, they are worth it. Now the Mirage one, that’s a whole other bag of chips… ![]()
So, I’ve figured out how to win in the Strike Fighters mission of the week. It took me about 6 tries, but this seems to work.
You must deal with the two MiG-21 threats on your nose. You can’t just lob an AIM-7 and ignore them if they survive. The Hornet that is at your 11 o’clock high when you spawn in will most likely shoot the right one, so I suggest targeting and finishing the left one. If they defeat your AIM-7s and blow through your flight, they will turn and engage you from behind. And since they are not configured for strike like you are, they can and will hunt you down if you ignore them. But don’t give up altitude to handle the MiGs. You will need this to survive ingress to the target.
I wish that the Tomcats spawning at your distant 9 o’clock would perform offensive CAP, but they seem uninterested. A SEAD Hornet flight trailing your will deal with the SA-6 threat while you fight MiGs. IME, they will finish their tasking about 4-5 mins into the mission, so you don’t have to wait long.
Once the MiGs have been destroyed and the SA-6s are down, you can configure for A/G. I like stores page on left DDI and EW on the right to help identify threats as you approach the target. YMMV. A good plan is to follow the pair of Hornets to your east who are also heading to the same target area.
Approaching from the south will take you over manpad and AAA threats, so plan on staying high as long as you can plan on a medium altitude release. Egress east/northeast. Turning out to the west will prolong your exposure to existing AAA and manpad threats. Turn right and take up a course to waypoint 2.
If you make this far, the Stennis is in the area of waypoint 3, but on a northwest track. Get a TACAN fix on the boat heading to waypoint 3 and correct as needed.
Good luck!
3 Likes
I’ve got a Hornet question. In a recent update the countermeasures systems have been expanded. Before I could just click the Bypass and pop them as needbe, manually. This no longer works without some fiddling in the EW page. And yes, I’ve got Master Arm - On. Is there a new sequence? Thanks! -Jeff
I didn’t know it was updated. You should still have the basic method on bypass which by memory the switch has to be full up. Switch in the middle allows programne release.
1 Like