We do…
![]()
No, not really.
It’s sometimes good for the model builders soul to just finish a kit and not worry about the outcome.
We do…
![]()
No, not really.
It’s sometimes good for the model builders soul to just finish a kit and not worry about the outcome.
Nice!
How do you do the aerial wires? They look good, I’m almost at that step with mine and trying to think of the best way to do it.
looks like RF-4 , noice !
I have not built a model in ages but I will give you an old tip. Put some Plastic Sprue from the model over a candle till it gets soft. Stretch it and it will make like a wire. While its soft you can shape it. A tiny drill bit makes a hole to put it in the model with a little glue. Experiment with the streching part till you get the thickness and lengh you want. Dont burn down the house. Good Luck!
yup, thats exactly what I do too
That’s funny, when I was a kid I did almost start a fire trying to create “battle damage” by using the bare light bulb on a model - was going really well until all of a sudden it wasn’t!
Thanks for the tip, I tried that at some point a while back but couldn’t get the hang of it, will give it another go.
I used to do the stretched sprue trick that Maico mentioned, but these days I use invisible thread and paint it dark gray.
I used hair, preferably a straight, black hair.
unfortunately Megan Fox is not my roommate ![]()
Knocking myself down a peg with a kit that’s almost on its way to the trash bin. I’ve got this old Hornet kit. Got to the decal stage and they were so old and brittle they just completely fell apart. The fitment of the kit was atrocious to start with, but anyway…
One perk of Japan is being able to order replacement decals from Hasegawa directly, which I’ve done a couple times. Sadly they don’t make this set anymore, so I got the decals for this one.
Got in a rush and decided to apply these decals over the paintjob I already did…to find out my blue section over the nose goes way too far forward, and I can’t correct it because I already applied the modex partially overlapping with the blue paint I would have to paint over with gray. I should have painted over that to begin with…
And that’s what happens when you rush a project you’re just not really invested in. Financially not a big deal, maybe $15, but still seems a waste. Shelved it for now.
Somedays you get the Bear, Somedays the Bear gets you. Walk away… You will feel better about it someday… not now. Love the Spitty.
getting close!
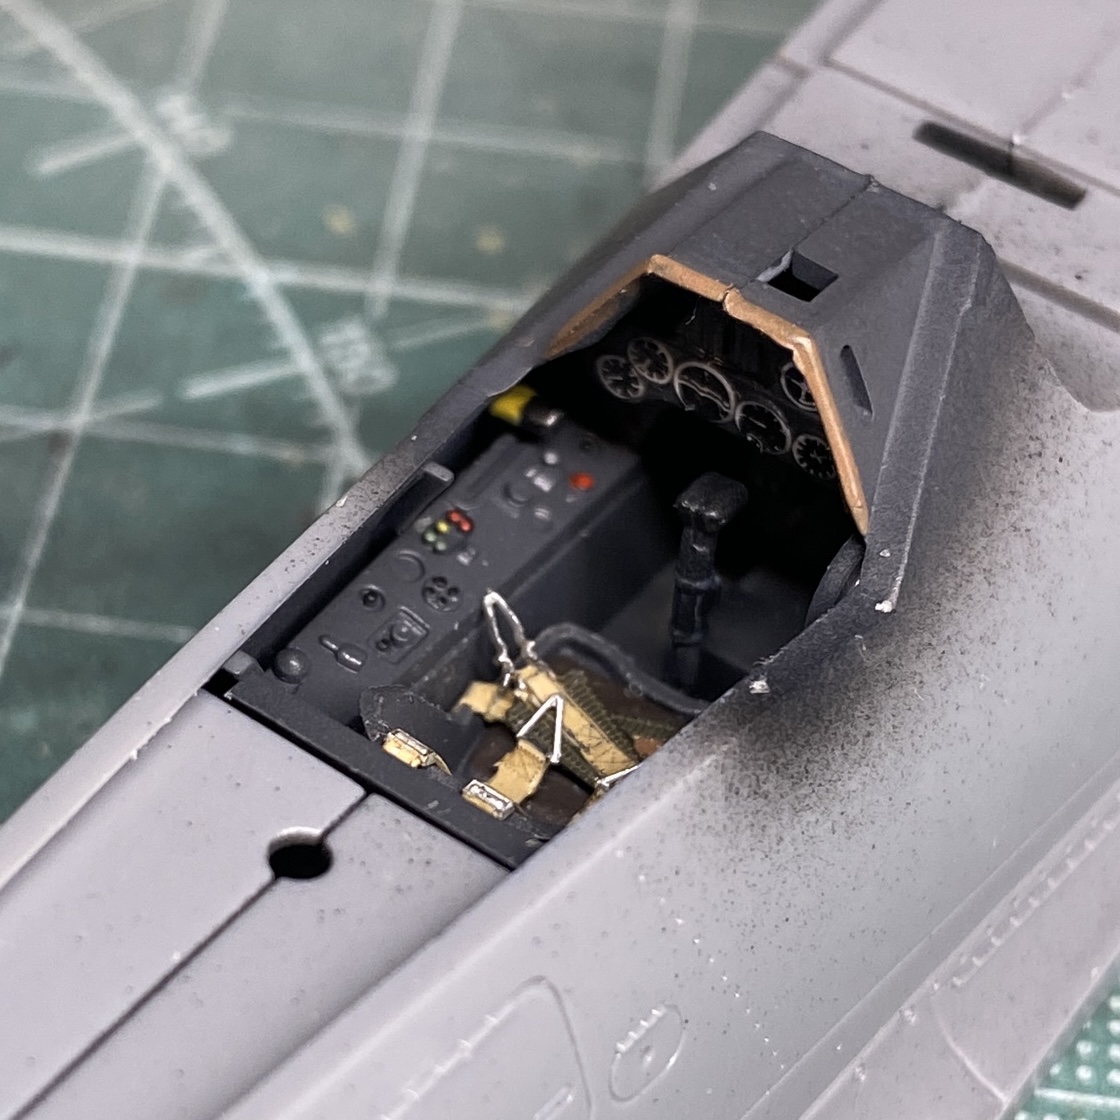
Feeling okay about it all in all, was thrilled with managing to get on that first aerial, and that tiny ring and bead sight.
Then I just had to go and push it by trying to get on those little grab handles by the cockpit… came out all blobby and horrible, had to yank them - hopefully I’ll be able to patch/repaint so the damage isn’t noticeable.
I don’t think I have the heart to try them again, or if I do maybe I’ll try that thin wire trick I’ve seen people use, and drill tiny holes. I can’t see how to have success with the PE besides blind luck.
PE can get finnicky. I used to be bad with those tiny parts like AoA probes even with the out-of-the-box builds so I started adding them at the very last, and doing my best to visualize how parts may block other parts or my hands or my tweezers so I can prioritize.
I told myself I’d start on the Tamiya 1/72 Tomcat but my dopamine-deprived brain got intimidated by the 50-step process so I’m knocking out kits with fewer parts.
Slightly older Tamiya Anton kit. Adding FineMolds seatbelts. I absolutely love their seatbelts. Relatively inexpensive, four sets in a box, and they have so much texture and 3D-ness that decals and PE seatbels lack.
Cool, those look good! What are they made out of?
oh , and if thats not enough , one can always start to rebuild some nice kit into something else … like I started with the lovely 1/144 Academy F/A-18 making it YF-17 ![]() ( there is no guarantee it will ever be finished
( there is no guarantee it will ever be finished ![]() )
)
but to ease my mind I have already ordered this one for quick build
nice job imo . looking at the deep panel lines , and the shadows they cast , its like not heavy panel lining is required with such kits .
btw sometimes I am thinking like going back to brush coloring the kits
Thanks, yeah panel lines seem to be particularly tricky in 1/72 - I went back and forth a few times about how to do these, and then when you add in how they look in photos vs the naked eye, it gets hard to make a ‘final’ decision.
I would love to figure out how to brush color without seeing the brush marks! I know it’s possible, as there are people out there who can do it but I am not one of them - the other day I brush painted over those tiny little areas where the grab handles were, and have now spent hours sanding just trying to make it not look brushed on.
I’m not quite there yet either but this is what I’ve learned about brush painting acrylics so far: