DCS F-15C Combat Guide for Beginners
By @Sryan - June 9, 2016
Originally published at: Articles - Mudspike Forums

Mudspike contributor Bryan AKA Sryan first added this excellent DCS F-15 Guide in our forums and we felt it deserved the biggest audience possible, so we’ve added it as a Reference article here. Thanks Sryan!
The F-15 is a great plane to get started with about air combat in DCS world. Taking only weeks to months to master her avionics and systems, compared to the years most of us need for a full DCS module. It’s also a fun plane to unwind in after flying the more complicated DCS aircraft. I specialised this guide into combat applications. So things like landing it, starting up or how to navigate is best learned elsewhere, like in the manual. I wrote the guide so that someone transitioning from civilian sims or aerobatics can still understand everything. So some things may appear very mundane to the more experienced here. There are many functions in the F-15, and many of them are useful in combat. I recommend you set up some or most of those to your stick and throttle, depending on what you have and what you’re comfortable with. But for your convenience I’ll add the default keyboard commands for most of them. I will also repeat abbreviations often in order to allow yourself to get used to them. Let’s get started, shall we?
INTRODUCTION: COCKPIT AND FUEL
Let’s take a look at what cockpit elements are useful in combat, besides the HUD.

Starting from the bottom left and then following clockwise we are seeing the:
- MPCD (Multipurpose Color Display) Useful as it displays current stores and remaining countermeasures and ammunition.
- VSD (Vertical Situation Display) The ‘radar’ screen.
switching over to the right side we now see the:
- TEWS (Tactical Electronic Warfare System) but let’s call it the RWR (Radar Warning Receiver)
- CMS (Counter Measure Systems) lights
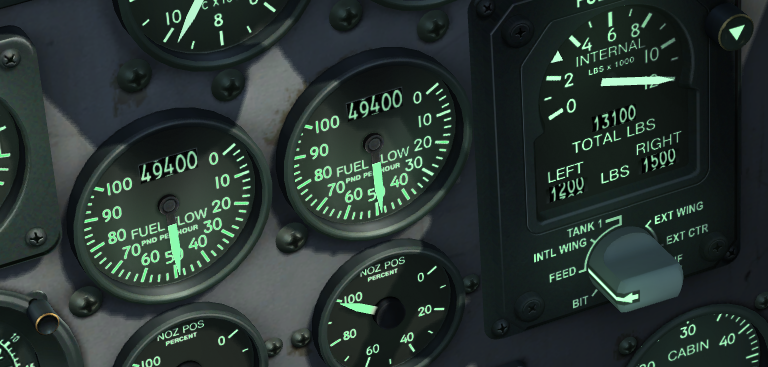
- The fuel indication
Perhaps you did not expect the fuel indication in a combat guide, but I thought it would be a useful place to start. After all, no plane gets very far without fuel. A fighter that can fly very far can be useful, and for that reason alone the Russians put over 8 metric tons of fuel in some of their models. Fuel has disadvantages though. It’s heavy, and heavy things tend to be slow and unmaneuverable. Not very good attributes for a fighter. The United States Army Air Corps already had a solution for this during the second world war. Drop tanks. These drop tanks allow the F-15 to have decent range, while retaining maximum maneuverabilty and speed in combat.
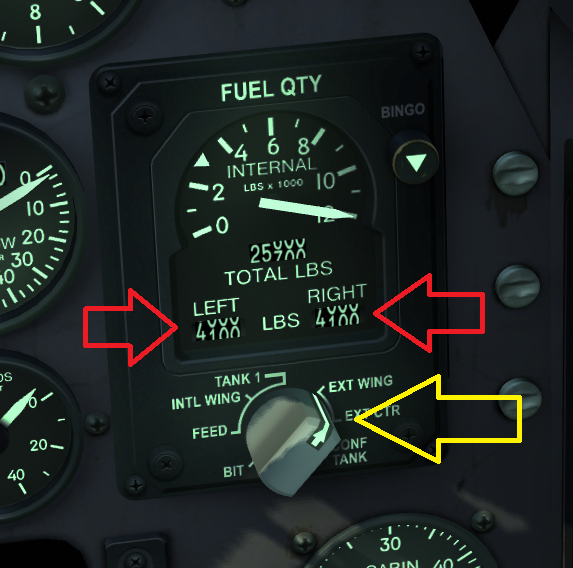
In order to read the level of fuel in the drop tanks, we need to put the system on external. The marked grey knob is operated with SHIFT-D. The red marked displays then read the amount of fuel in the drop tanks. There is also a display that reads the total amount of fuel carried. And an analogue system that reads fuel carried internally. It’s important to note that this analogue indicator only measures up to 12 000 pounds! In reality, more fuel can be carried internally, up to around 13 500 pounds. So if the analogue indicator starts spinning backwards, the drop tanks should have been dropped long ago. This is why it is best to work the grey knob and check drop tank fuel level actively instead of waiting for the analogue system to do its job.

The presence of drop tanks or not is indicated on the MPCD (Multi-purpose color display). In this case I dropped my external tanks. But kept my central fuel tank. You can see this because the outboard indicators say “PYLON” while the central indicator says “FUEL”. You can drop your tanks by pressing CTRL-W. Be careful not to hit that to many times or you will also start dropping stores! You can also drop all three tanks at once with ALT-R. This way you also don’t need to worry about dropping stores. If you still think you’re to heavy to accomplish the mission, you can dump more fuel by holding R. While we are here, it is useful to see that the top-left also has an indication for amount of gun ammo left. “940”. And the amount of chaffs and flares remaining on the top-right.
I’ll discuss the rest of the cockpit elements when the time is right.
WEAPONS
The F-15 is capable of carrying 4 different types of weapons. the AIM-120, the AIM-7, the AIM-9 and the M61 Vulcan.
The AIM-120 Advanced Medium Range Air-to-Air Missile is the most modern, most advanced, most important weapon found on the F-15. Its most important attribute is that it carries a so called active radar. This means that after the missile is fired, it will communicate with the F-15 for some time, through a datalink. This allows the AMRAAM to change it’s course in mid-flight. After a certain moment has passed, called “pitbull”, the AMRAAM activates its own radar and continues the flight on its own. The F-15 can drop the lock and engage something else, or defend itself against missiles or other bandits. If the lock is lost in mid-flight. The AMRAAM will remember the last calculated spot and go active (pitbull) there anyway.

The AIM-7 is a relic when compared to the AMRAAM. The most important difference is that it does not carry a radar-tranceiver. It instead only carries a radar-receiver. The F-15 must maintain the lock all the way to weapon impact.

The last missile available to the F-15 is the AIM-9. While much shorter ranged than the previous mentioned models, the AIM-9 is guided by locking on to an infrared light radiation source. This means aiming and shooting this missile won’t cause you to appear on the enemy’s radar warning receiver. the AIM-9 Sidewinder cannot be mounted directly under the fuselage, only on outboard stations.

The last weapon carried by the F-15 is the on-board M61 Vulcan. Carrying 940 rounds, the F-15 can sustain fire for about 9 seconds.

HUD modes: AACQ (Auto Acquisition)
Auto Acquisition modes are the easiest to fly and fight with. In these modes, the radar or weapon will lock on the first target in sight. The maximum range is about 10 to 15 nautical miles. The first one I want to talk about is vertical auto acquisition. You can enter this mode by pressing “3”. Note that in vertical AACQ you can lock targets that are even higher than the steel ring where the mirrors are mounted. Here’s the HUD indication for Vertical AACQ for, in order, the Sparrow (AIM-7), the Sidewinder (AIM-9) and the AMRAAM (AIM-120)
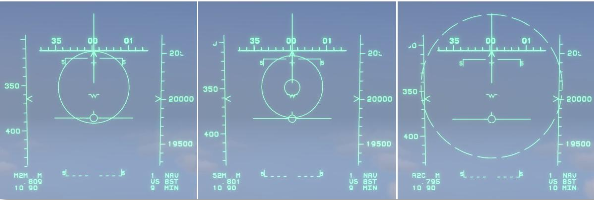
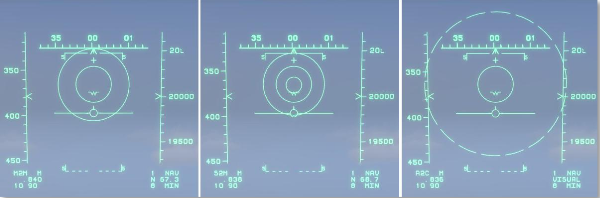
The next one is bore-sight mode. This pretty much speaks for itself. A small circle on the HUD indicates what part of the HUD you need to put over the target. The range is the same. Again the HUD symbology for the Sparrow, Sidewinder and AMRAAM.
The sidewinder also has a couple of his own Auto Acquisition modes. These can by cycled by pressing “6”. The first one I want to talk about is the Seeker Caged mode. You typically enter this mode the first time you press 6. The seeker-head is fixed and cannot move. This allows for some very specific targeting, per example if you’re engaging a package of enemies and you need to engage the highest threat.

The next sidewinder specific AACQ mode is the seeker uncaged mode. In this mode the seeker can look around freely and lock targets in a much larger area.

The last sidewinder specific AACQ mode is the seeker slaved mode. In this mode the radar is active as well. If the radar finds a target, it will direct the Sidewinder seekerhead to the target. This allows by far the longest locking distance for the Sidewinder, up to around 18km in my experience. Note that the radar is on, though. You’ll appear on the RWR of your enemy, but they won’t be warned should you choose to launch. You go into this mode by being in a Sidewinder AACQ mode in the first place and then pressing ” i “.

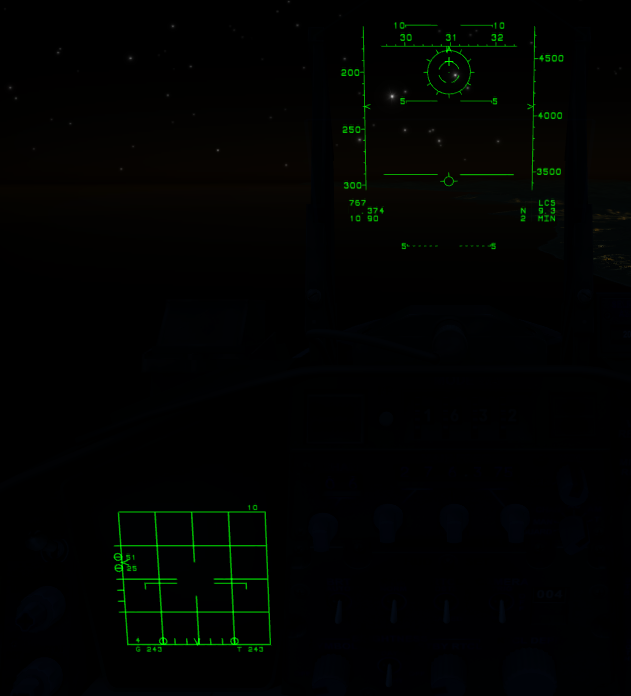
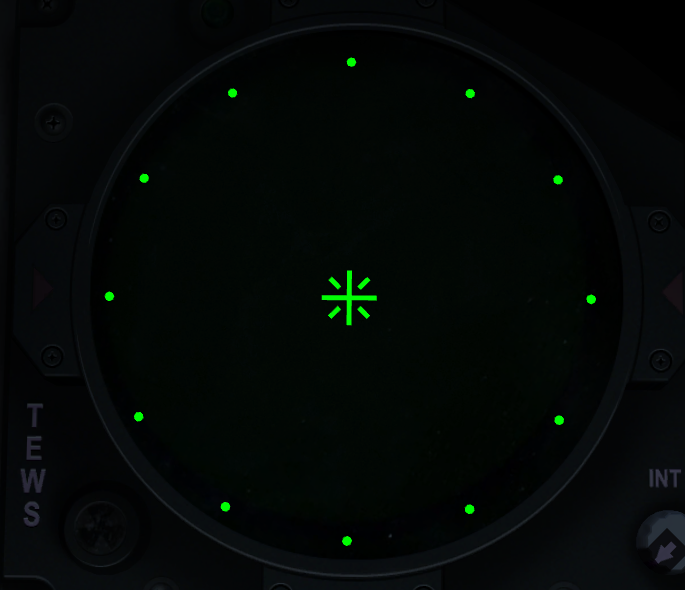
The last Auto Acquisition mode there is is gun AACQ. Unfortunately the only way to check if you are in this mode is by checking if your VSD (Vertical Situation Display) is displaying any symbols. If there are no symbols, just the grid, you are not in gun AACQ. If there are symbols like in the image, you are in gun AACQ. You can get into gun AACQ by pressing “C” to go to guns mode and then pressing ” i ” to toggle Gun AACQ. Gun AACQ will give your position away on the RWR.
LOCK!
Let’s take a look at some symbols on the HUD with a little more detail. Some symbols appear both in the combat modes (AACQ and BVR) and when a lock has been achieved. Let’s start with the weapon indicator.

- A means AMRAAM
- 4 means 4 AMRAAMs left
- C means it’s the C model of the AIM-120.

- M is for Sparrow. It probably means Medium ranged missile.
- 2 means 2 Sparrows let
- M stands for AIM-7M
The M for sparrow is probably to deconflict with Sidewinder.

- S means Sidewinder
- 2 means 2 Sidewinders left
- M means AIM-9M
Note that the number is also only for that specific model. So if you load 5 AIM-120C’s and 3 AIM-120B’s you would see A5C and A3B when pressing D to toggle weapons.
Now, let’s take a detailed look at when a lock has been achieved. The amount of information can be overloading. We’ll go through this calmly, handling one color-coded arrow at a time.

Let’s start from the bottom left. We see A2C. Do you still know what that means? Two AMRAAMS of the C model. Below that you will find your speed, expressed in Mach. Below that also your g-loading and the maximum G-force you can endure in that configuration.
On the bottom right, in the orange box, you’ll see the exact range to the target, the time it would take for your missile to strike the target if it was fired now, and the aspect to the target. The important thing to know about aspect if it’s H for Head-on, T for Tail aspect, L for Left aspect (you are looking at the left side of your target and as such he is travelling to the left) or R for right aspect (vice versa).
On the right, along the altitude-tape, you’ll find another range indication. On the top of that you’ll see the scale. In this case the top of the scale indicates 10 nautical miles. the top stripe _ on the scale indicates Rpi. This means Range Probable Intercept. At this range you should be able to hit a target that won’t attempt to manoeuvre to defend itself. A bit lower on the left of the scale we find the Caret (>) This is the exact position of the target on the range. The number next to it indicates the rate of closure. In this case 535 knots. If this number is negative, the target is getting away from you. The next stripe means RTR. Range Turn and Run. A target pulling 9g moves or even turning around and trying to get away should still be intercepted by the weapon. On the bottom we see another indication for the minimum range.
In the middle we’ll see a large circle. This is called the ASE circle. ASE stands for Allowable Steering Error. We also see a small dot, that I boxed in a light blue rectangle. This is called the ASE dot. The more centered the dot is, the better the shot will be and the less the missile will have to steer right after launch, which is a waste of energy. Remember the saying “For the best shot, center the dot”. The ASE circle can grow or shrink depending mostly on range. Attached to the circle we see a line that indicates the target direction of travel.

This is what you see when you locked a target in Gun AACQ (Auto Acquisition)
the + high on top of your HUD is your boresight. This is where your bullets will go. The computer draws a line to the circle, which is where your bullets will be at the range of the target. The system is very intuitive, put the circle over the target in order to shoot him down. Note the thicker part on the circle, this is a visual indication of the range towards the target. Use the size of the target and this indication to judge if the range is good to shoot.
Beyond Visual Range
For BVR, we’ll need to use the VSD (Vertical Situation Display, radar display) a lot. Let’s take a look, shall we?

The Radar display is divided into ranges. On the top-right. We see 40, that means the top line is 40 nautical miles away. The next line is then 30 miles away, the one below that 20, the next one 10 and the last one zero. If the Top right indicated 80 it would have been 80-60-40-20 and if it had said 160 it would have meant 160-120-80-40. Targets that are further away than the scan distance may still be shown along the top of the VSD display. Along the left side we see 18 and 0. This means that at the distance of the TDC (Target Designation Cursor) the radar scans between an altitude of 18 000 and 0 feet. Note that technically the radar points lower than that. So targets who are closer at low altitudes can still be spotted. You can slew the TDC around with “,./;”


It’s possible to slew the narrow scanning zone around. It will follow the TDC (Target Designation Cursor).
Time for our first practical example! AWACS has just called out a bandit somewhere on my right!

By putting the radar into NARROW mode and putting the TDC all the way to the right I prevent my radar from wasting time by scanning left of me. The bandit quickly shows up on the scope.
Beyond Visual Range: Pulse Repetition Frequency
Let’s take a look at my current situation.
One bandit is close-by and beaming me. Meaning the direction he is travelling in is perpendicular to my own. Another bandit is further away but he’s hot, meaning he is coming straight at me! Meanwhile, on the VSD. On the bottom left we constantly see some sort of indication pulsing…
MED/HI/MED/HI/MED/HI/MED/HI/MED/HI/MED/HI/MED/HI/
This is your PRF ( Pulse repetition frequency). A beautiful Wikipedia article was written about PRF, and I’ll save you from explaining exactly what it means right now. What you need to understand is that High PRF is good for detecting targets that are coming straight at you, even at longer ranges. A Medium Pulse Repetition Frequency is good for detecting targets that have a low closure rate, but not at high distances.
Let’s see what we get to see in the VSD (Vertical Situation Display), shall we?


This time I’ve put her on High PRF. Now we can see the bandit at 44 miles (Note the top right!! The bars now mean 80-60-40-20!). No sight of that bandit just of my nose beaming me.
You should use your SA (Situational Awareness) to dictate what mode you’re in. If you should expect a long range head-on, use high. If you expect to merge or fight a beaming bandit, use MED. It may be ‘easy’ to just leave it on ILV ( Interleaved, pulsing med-high) but it may be a bad idea. It would take a long time to scan the same airspace, in the same mode. Allowing bandits to get close and then not allowing a lock because the airspace is scanned in the wrong mode.
Beyond Visual range: Lock-on!
Let’s proceed to lock the target again. The amount of information will be enormous again. Let’s calmly follow a clockwise pattern and use colour coded arrows to indicate what we’re talking about. Some things are duplicate with what we’ve seen on the HUD. I’ll say the value the indication reads out and then explain what it means.

Top-right. Red arrows
- 397, This is the speed of your target. Indicated in TAS (True Airspeed)
- 11R. Aspect again. I am looking at the right side of this target.
- 336, The targets course.
Right side, brown arrows
It’s important to realise that all these symbols are related to range.
- The top arrow is pointing at some sort of triangle. This means Raero. Or Range Aerodynamic. This is the maximum distance the weapon can travel. Think of it as the distance the missile would fall on the ground or water if fired right now.
- 879>, This the rate of closure, as well as the position of the target on the range scale. Like on the HUD if the value is negative he is getting away from you. the > is called a caret.
- the _ This is called Rpi. This means Range Probable Intercept. It’s also on the HUD. You will strike a target at this range that will not attempt to maneuvre to dodge the weapon.
- The top of the box indicates the start of Rtr. Range Turn and Run. Targets doing 9g or trying to get away should still be destroyed if the caret is inside the box.
- the bottom indicates minimum range for the weapon to fire.
Bottom. Grey arrows
In order to keep up with the clockwise pattern, we’ll do right to left.
- M7SEC means that if fired now, the missile should impact in 7 seconds.
- IL76. The F-15 is equiped with a piece of technology called NCTR ( Non-Cooperative Target Recognition) Allowing it to detect the type of aircraft you are targetting. A lot of times, and very often at long range, this place will say UKN (Unknown).
- G 719 indicates your own speed. Indicated in knots as ground speed.
- STT means Single Target Track. So only capable of following one target, but in high quality, this opposes TWS (Track While Scan), we’ll get to that later.
Left, Yellow arrow
not much on this side fortunatly! phew!
- 13-1. This means the target flies at 13 100 feet altitude.
Center, Turquoise indications
- ASE circle and ASE dot. ASE means Allowable Steering Error. Still remember this from the previous chapters? For the best shot, Center the dot.
- Something that looks like >|—– This is the target. With direction of travel. Keep on the Display at all costs if possible.
SHOOT, SHOOT!

When the F-15 computer thinks you are in a good position to take a shot, it will display a small star below the target box. The yellow arrow indicates where. Note that it may still be a bit to far as the F-15 is ‘okay’ with a shot at Rpi ( Range Probable Intercept) against fighters.
When a missile is airborne, the G indications dissapear. Two numbers appear, marked by red arrows. If firing an AMRAAM, the left number means time to pitbull. How much time is left untill the missile goes active and the lock can be dropped. the right number means time to impact.
Beyond Visual Range: Track While Scan
The next chapter is about Track While Scan. You can enter TWS mode by pressing RCTRL i. You can only use TWS in narrow mode. TWS has a few advantages.
- When firing an AMRAAM, the RWR of the enemy will not indicate so untill Pitbull
- It’s possible to lock several targets at once
- It’s possible to engage several targets at once with AMRAAMs
- You’ll get a limited amount of info about all enemies. More informative so than RWS (Range while scan, the default radar mode)
I’ll explain TWS with a practical example.


Countermeasures and Self Defense
Let’s take a look at the cockpit elements important for self-defense.

We’ll see the TEWS (Tactical Electronic Warfare System) Display, although we’re going to call that RWR (Radar Warning Receiver) from now on. We also see the CMS (CounterMeasure System) lights. Let’s start with those, as those are easy.

The CHAFF and FLARE lights stay on for up to 3 seconds after they have been dropped. You can drop both at the same time by pressing Q. You can drop specifically flares by pressing DELETE and chaff by pressing INSERT. When the quantity of countermeasures gets low, the MINIMUM light goes on. Refer to the MPCD (Multipurpose Color Display) for exact quantities remaining.
Electronic Warfare
Perhaps you’ve ever seen an F-16 or A-10 passing by carrying some sort of pod.
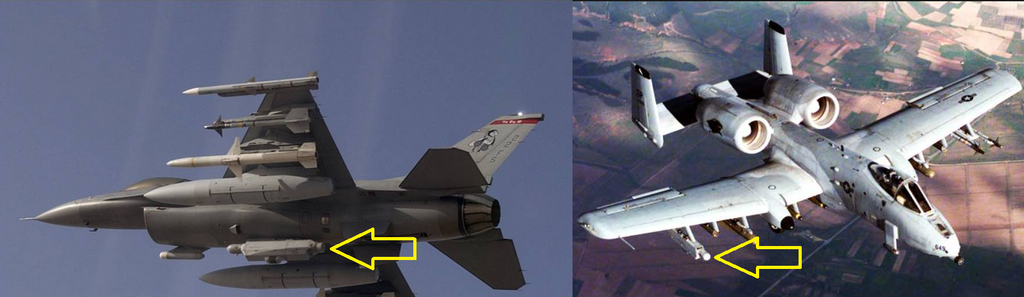
This pod allowed them to perform electronic warfare, confusing hostiles radars. The most important role for that equipment is to prevent the enemy from properly locking the aircraft. However you will rarely see an F-15 with such a pod. The reason? The F-15 was designed from the ground up to be good at E-WAR. This can be seen by the fact that, even for a fighter, an exceptional amounts of antennas protrude from the fuselage.

I’ll try to give a rather short description of what these do. We’ll call it ECM, for Electronic Countermeasures. Radar is good for two things. They’re right in the name of it. RAdio Detection And Ranging. It can detect if there are things out there in the first place, and it can tell how far away it is. It’s mainly the last capability of radar that ECM messes with. Radar works by sending pulse of electromagnetic radiation which moves at the speed of light (which is also a form of electromagnetic radiation). The speed of light is very high, but not infinitely high. About 300 000 000 metres per second. Or a bit over a billion kilometres per hour. The time it would take for a radar pulse to reach a target and come back is measured in microseconds, µs (pronounced as microsecond or musecond, mu is the greek letter µ). In order to hit a fighter jet at 50km distance with a radar pulse, and then travel back to the source takes 333µs. So if there’s always 333µs between sending a pulse and receiving it back, you figured out the range to target.
But what if, just for fun you know, started emitting the same pulses as the hostile aircraft? How much time does it then take for each pulse? 250µs? 100? 75? 20? 5? 0,25? Also wich sent pulse belongs to wich received pulse? I don’t know because I am receiving more pulses than I am sending out..
You now have a basic understanding of ECM. It’s important to know that ECM does not conceal you in a layer of stealth or something. Quite the opposite. You’re being quite noisy and easily detected. It’s just not possible to dial in the range. It’s possible to burn through ECM at close ranges, roughly WVR (Within Visual Range).
You turn on the ECM suite by pressing E. The X around the + will start to flash for about 10 seconds. After the 10 seconds the X stays on permantly. ECM is active, the rest is automatic. It’s important to note that enemies can now send radar guided missiles locked on to your jammer. Because they can’t calculate a range, they can only follow a pure pursuit course (coming directly at you). You will receive no warning from this radar guided missile. The mode is called HOJ (Home on Jam).

This is what it looks like on the radar display when a hostile is jamming you.

Naturally. The F-15 is also capable of destroying hostile jammers. Note that HOJ is printed on the screen in a very large fashion to warn the pilot he may be firing in some sort of degraded mode. All sort of important info like target aspect, range direction of travel etcetera are missing.
I’m Defensive: Infrared missiles!
Explaining how to defend against IR missiles is easier to do so than radar guided missiles. IR missiles simply don’t give off any warning at all. You’ll find IR missiles mounted on short-ranged air defense (SHORAD) systems, on enemy fighters, on some helicopters, as shoulder fired weapons and as self-defense weapons on many aircraft like ground-attack planes.

There’s honestly only two ways of knowing an IR missile is heading for you.
- You visually saw the launch or the smoke from the rocket motor.
- You had the SA (Situational Awareness) to understand you where in the WEZ (weapons envelope zone) of an enemy.
What can you do?
- make some moves! You should not expect to defeat a missile with just manoeuvres, but that doesn’t you should make it easy for the enemy. By doing manoeuvres you force the missile to follow you. This expends valuable energy for the missile.
- Drop a healthy amount of flares. In combination with the above, you can make confusing patterns, maybe causing a missile to go for a flare instead.
- Drop out of afterburners! Who would target a flare if you can go for a juicy afterburner instead?
I’m defensive! Radar guided weapons
In this section I am going to explain how to defend against radar guided weapons. Now I could tell you how to beam, what the 3-9 lines means, to deploy chaffs etcetera. But I thought it to myself. What if I could really make you understand how a Pulse Doppler radar works? That would be more beneficial than letting you make arbitrary maneuvres without understanding reasons for succes or failure. With that in mind, I wrote the next chapter. It applies both on the defensive against most enemy radar guided weapons, as well as when on the offensive. After all, the F-15C is also equiped with a Pulse Doppler Radar. So recognize when an enemy uses information like this against you and act accordingly.
Terminator Vision: How does a Pulse Doppler Radar see the world?
Whoever has seen a Pulse Doppler radar, wether in real life or in pictures, could think they are pretty alien looking devices. A large electronic piece of equipment, with wires and tubing coming in and out, and a large, often flat antenna at the end, wich usually has the ability to move. This all hidden in a nosecone that is completely translucent, but only to radiowaves. Surely there can be no comparison to something as mundane as the human body?
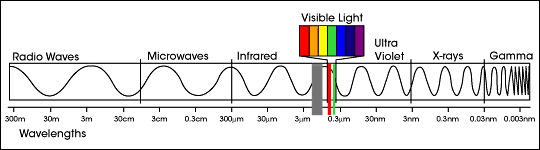
Technically, Radiowaves are waves of a type we call electromagnetic radiation. Another type of electromagnetic radiation is.. Normal every day light. The very type coming of your screen right now. There are major differences ofcourse. The cellphone right next to you can communicate with the closest cell tower with no problems, while your vision is limited to the very room you are in now. You cannot see very far in bad weather, but the radar at your local airport has every nearby airplane on their scope. In order to visualize the radar, I’m going to compress the wavelength, λ from metres into micrometers (µm) In order to allow you to see them! Technically, a specific hue of yellow sits in the middle of the visible spectrum, but in order for the best contrast I’m going to ‘calibrate’ my radar to green.
© NASA
This is what you see with your own eyes when flying over a specific part of the Georgia terrain near the mountains. beautiful, is it not?
This is the very same scenery as seen through a Pulse-Doppler radar. Important to note that all the colours are gone. I’ll explain more about that later. Also the beautiful atmosphere, wich reflects a lot of blue colours, is not very good at reflecting radar waves. Any targets high in the air have nothing but cold, dead space as their background.
We see an F-15 that is travelling away from us! but somehow it has a different colour than the background. This is because by travelling away from us, the F-15 causes reflected radarwaves to have a lower frequency, their wavelength elongated. This causes it to appear to be of a different colour to the Pulse-Doppler radar. It is now very visible, and could possibly be locked on to. This effect is called Redshift8.
We now see an F-15 coming right at us! The effect is reversed. The frequency is increased, the wavelength gets compressed. It now appears blue to the Pulse-Doppler radar!
This concludes the first learning objective of this chapter. A Pulse-Doppler radar is sensitive to motion of objects closing in or receding.

A vision based on movement. Quite useful when one has to fight fast-movers, don’t you think? However, what would happen if we didn’t close in or recede from the doppler radar all? Just perfectly sideways? We now don’t close in or recede from the radar any more than the surrounding terrain.
With only cold space as our background we are still very visible.
However with only terrain as background we become nearly invisible! An important thing to remember is that it may take longer for a pulse to return from the background terrain than it would from your jet. So under certain conditions ( either high altitude or at slant angles) The lock could possibly be maintained.
For the next learning objective. I have a task for you to do. I want you to look up some images of 4th generation fighters. The F-16, The F-15 (naturally) and also some newer or stealth designs. The F-117, the B-2, the F-22 and the F-35. I want you to take a good look at the air intakes especially. Even to the untrained eye, it is apparent that the designers went through a great deal of effort, even on the 4th gen, to hide the first stage compressor blades, “the fan”. On the stealth designs, the fans are not visible at all from the outside. The fifth generation US/NATO fighters appear to have some sort of system that can block the view on the fans, called a diverterless inlet25 which also has other benefits. In-case you didn’t see any of those, I’ll provide one image.

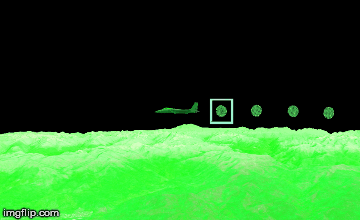
With those images fresh in mind, let’s take a look at the complete opposite. An abomination in terms of RCS (radar cross section). The A-10C Thunderbolt II. Also known as the Warthog, a favorite aircraft for many readers of this article, I’m sure.
In this angle, the Warthog is approaching us and thus appears blue. However, there is something special about the fans. Fans typically move at a high subsonic speed. In this angle, half of the blades are moving away from us,they appear red to our radar. The other half is approaching us, and appear Violet (You can think of violet like blue, but worse). This effect is about as attention grabbing to the Pulse-Doppler radar as a poison dart frog is to your humanoid eyes. It is also an important component of the NCTR (Non-Cooperative Target Recognition) system. The computer ‘understands’ these are the intakes and with other parameters, calculates the distance between them and compares this with a table of known aircraft models. The last thing is that the fan, by its very nature is, constantly moving. This means that whenever a new pulse arrives at the target aircraft. The fan will be in a different position. Each and every pulse than has a chance to be reflected ‘perfectly’ of a fan blade. Increasing visibility. The chance is increased if the repetition frequency of the pulse is higher. What are you supposed to learn? The F-15 may give his position and presence away if flying directly at a hostile. That’s the only way you can get to see the fans on the F-15.
There is a weapon in your arsenal that allows you to defend yourself against radar.. It’s called Chaff. Chaff are strips of aluminium, tin or plastic coated with a metal that reflect radar waves. The purpose of this is to present ‘fake targets’ to the enemy.
Chaffs are very hard to see under normal conditions. So I will use a cloud to represent chaff. Like all other objects, Chaff appears coloured to the radar.
Chaff doesn’t fly very fast. It pretty much floats a few hundred milliseconds after it was dropped. Like all other non-moving objects, it appears green. This radar is not fooled by the enemy. Let’s hope the pilot had something nice to eat during his last meal because it was probably his last. Dropping chaff is near useless when approaching or receding from the enemy. You can only hope a bundle of chaff blocks the radar from looking directly at you if you are receding. So what happens if we combine the knowledge with what we learned before? If we fly directly sideways and then deploy chaff?
Jackpot! Add in background clutter and it will be even more effective! With my knowledge about Pulse-Doppler radars now shared, I’ll explain how to evade radar guided weapons.
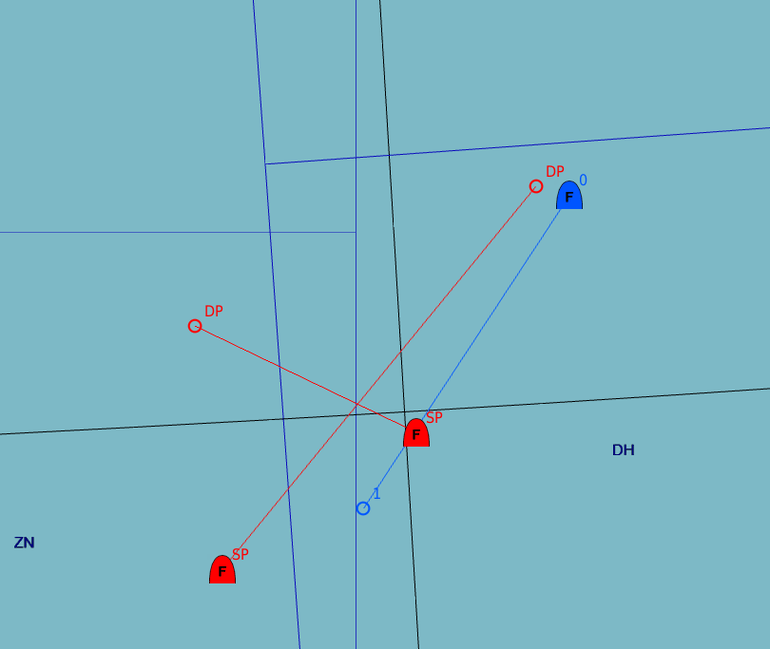
The Radar Warning Receiver

So here it is. The Radar Warning receiver. Can you guess which enemy is the closest? The Clam Shell appears to be the closest to me. The MiG-29/Su27/33 seems to be a bit further of and that SA-15 the furthest away.

It turns out they are all more or less an equal distance away. This is the first learning objective. The RWR cannot calculate any range. It just represents the received signal strength by placing it closer to the center. Some units (A50,E3,EWR) are always ‘stuck’ on the outer ring regardless of signal strength because they can never be a direct threat to you. Some units are more energetic in their emissions (Like the “clamshell”) compared to others (Search radar on an SA-15 Gauntlet)

That SA-15 has got me locked!

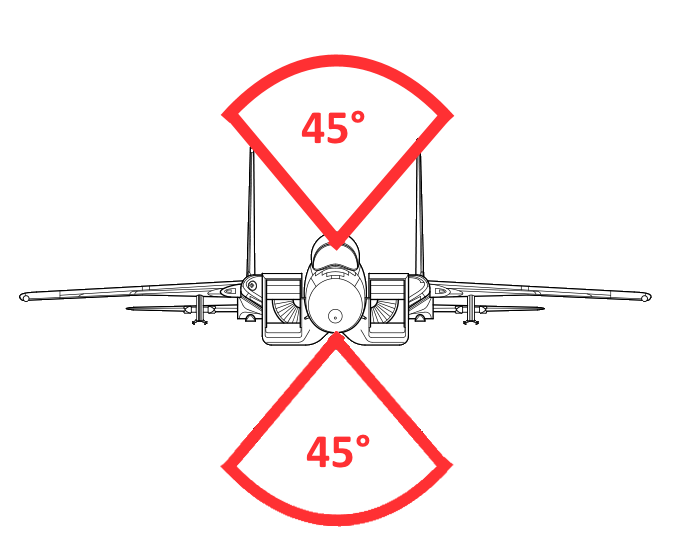
Looks like I got rid of him Or did I? The RWR has full 360° coverage but there are two large blindspots. The RWR cannot detect targets directly above or below you in a 45° cone. By showing my belly to the Gauntlet I’m just exposing my blind side to him.

The results..
You’re in a tight spot.. Two of these guys are trying to kill you, the other two are trying to save you, who do you run to cover for?

If you ran to the left you would have lived. If you ran to the right, you might have died. ..But they’re all 15’s?
Some of these 15’s have a chevron (^) over them. That means they are airborne. These are F-15’s. The other guys don’t have that. So they are SA-15 Gauntlets.

Here we see 3 bandits illuminating me. The Bandit on my 8 ‘o clock is considered to be the highest threat by the RWR. It is not doing anything special just yet but the RWR thinks this is the most likely foe to take a shot at you. This is why it has a diamond around it. The Bandit on my 5 ‘o clock was the last detected foe by my RWR. This why half a circle is drawn around this bandit. When you hear the beeps that the RWR detects a new foe, you should look for this circle for bearing and identification. So far there is nothing special about the third bandit on my 2 ‘o clock.

A bandit has me locked now. If he decides to shoot, the bottom circle will flash. I often heard the question if people should beam the missile or the bandit. You should beam, if battlefield conditions allow, the source of radiation. This where the Doppler effect originates from. If an enemy aircraft is painting you, the radarwaves originate form that aircraft. Once the radarwaves reach you, they get ‘recolored’ depending on your movement. The missile then looks for these coloured waves. In case of an active missile (AIM-120 or R-77) You should, again beam the source of radiation, so in that case the missile.

Active radar missiles are indicated by an M

Okay who the hell is targeting me? By pressing RSHIFT-R you can change the RWR mode so that only people locking on to you are shown! Great for quickly getting Situational awareness in a cluttered environment.

Anti-Air Artillery is always shown with an A on the RWR. It could be friendly Gepards or PIVADS, it could also be a hostile Shilka, tread with caution.

The only exception is the SA-19 Grison, also known as the Tunguska. This shows as S6 on the RWR. The S6 should concern you. It has both guns and, currently the only in DCS but several systems like this exist, laser guided anti-air missiles. These missiles don’t give off any warning like heatseekers, except to planes equipped with a laser warning receiver like the A-10 and Ka-50. These missiles can effectively reach out to about 8 to 10km.

Remember that by keeping the radiation source perfectly on your 3 ‘o clock or 9 ‘o clock you have the best chance of defeating radar guided weapons, in combination with chaff. A few small random movements can help as the Pro-Nav missiles will continually update their course in an attempt to intercept you. Some maneuvres may help defeating missiles, like the Immelmann or Split-S if battlefield conditions allow and the missile was fired close to its maximum range, but you should rarely expect to defeat missiles with maneuvres alone. They are typically way faster than you and can pull many more G forces than you can. Some more advanced knowledge about defeating radar weapons is embedded in the following examples.
Practical examples
Long Range Fighting: A BVR fight.
No two fights are ever the same. I thought I’d share my standard procedure on how to handle a BVR duel. you should adapt to the conditions though. I like to compare BVR fights to ILS landings. When flying, it’s comfortable to look outside the aircraft and to the HUD for indications. What safer place to position an enemy than in the center of the HUD? Like with ILS landings, this can be a deadly mistake. It may take some learning to get your face out of the HUD and relying on your instruments instead. Let’s take a look at the situation. Try not to focus purely on the instruments either though. Keep track of what is going on outside as well and don’t get sucked into the green goo!
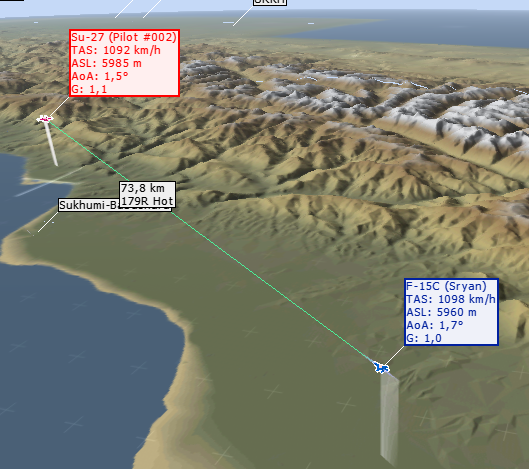
An enemy aircraft. with the same speed and the same altitude. We’re in a head-on.

Since I know this is going to be a head-on I put the radar in HIGH PRF (Pulse Repetition Frequency). This causes the enemy to quickly show up on the radar.

Immediately I decide to drop my tanks. Those big drag inducing things. This allow me to attain my maximum speed. This is good for your missiles, because those missiles are like your children. They inherit all your stuff. In this case I mean altitude and speed though. A missile launched at low altitude at stall-speed will not get very far. A missile launched at 40 000 feet at mach 2.4 will get much much further.
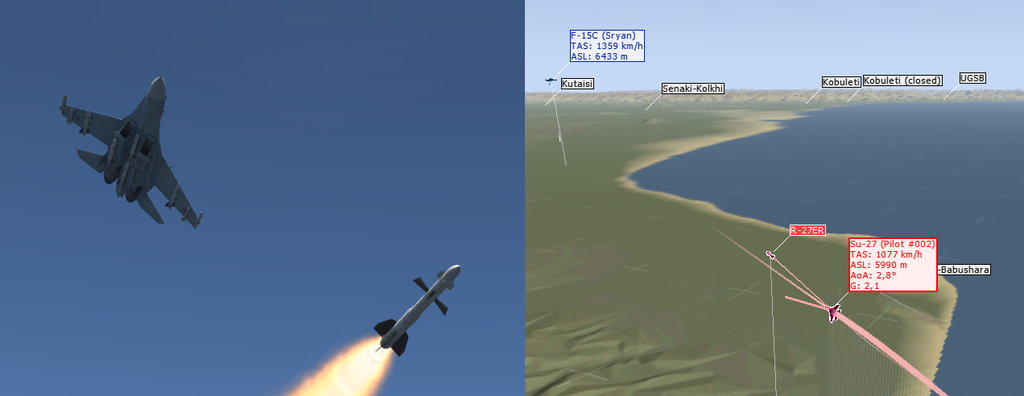
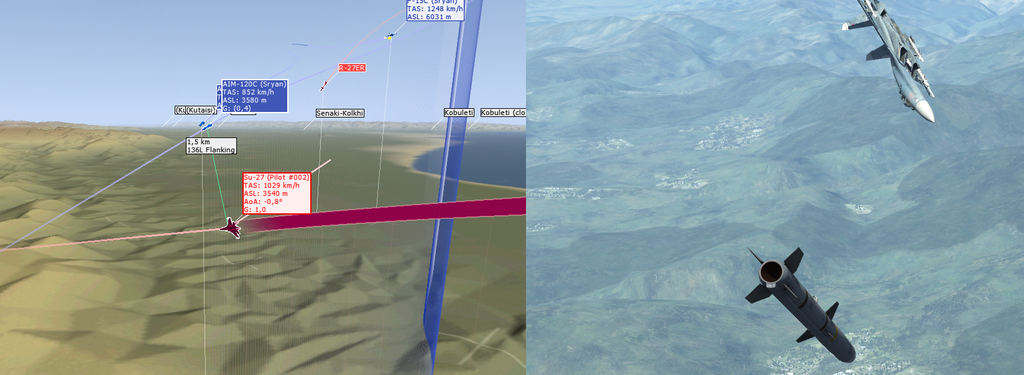
The next image is a scary part for many new F-15 pilots. But a fact of life. Russian missiles have more range than US ones. At least the R27-ER when compared to the AIM-120. You’ll receive a launch warning before you are in range yourself. Not quite scared yet. I decide to keep the ASE dot centered for a little while longer in order to close the gap.

FOX-THREE! I fired this missile about halfway through RPI, Range Probable Intercept. I don’t expect this missile to produce a kill. but the active radar will hopefully suppress my enemy. I need to start worrying about that R-27 though.

I do something called Cranking. Instead of flying dead-on towards the target. I turn either left or right, in this case right. To get the enemy as close, but not in excess of 60° of my side. The missile could just float in the air before. Waiting long enough for me to fly into it. Now the missile needs to spend energy to follow my turn, expending energy. The close rate is also highly lowered, and the total distance travelled needed increased. Allow me to visualize.

Allow me to apply some Paint art to get my point across.

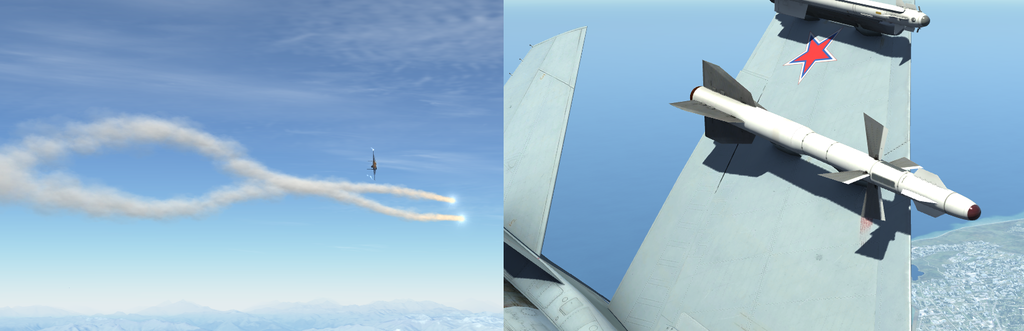
I started to turn back into him. As soon as I center the dot, I fire off my second AMRAAM. I expect this to be the killer shot. From this point on, I start to regularly drop a few flares. Reason being that deadly enemy R27-ET. An infrared guided missile that, while not as ranged as the ER, is still a missile for the application at the medium range.
Tacview images of my second turn. You can see that R27-ER was not even capable of keeping up the turn. Its energy is depleted. The first AMRAAM has the enemy suppressed. He can’t risk pointing his nose at me in order to launch weapons.
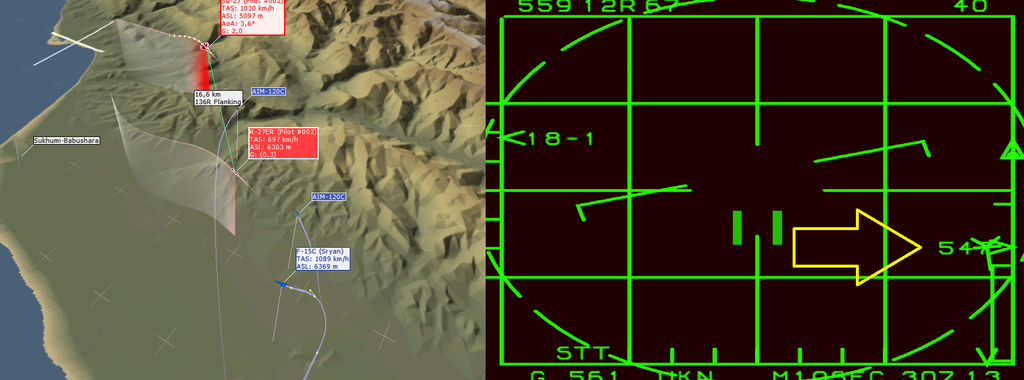
It turns out I was right. The killer AMRAAM strikes a few seconds before the suppressing AMRAAM.
Advanced Practical Examples
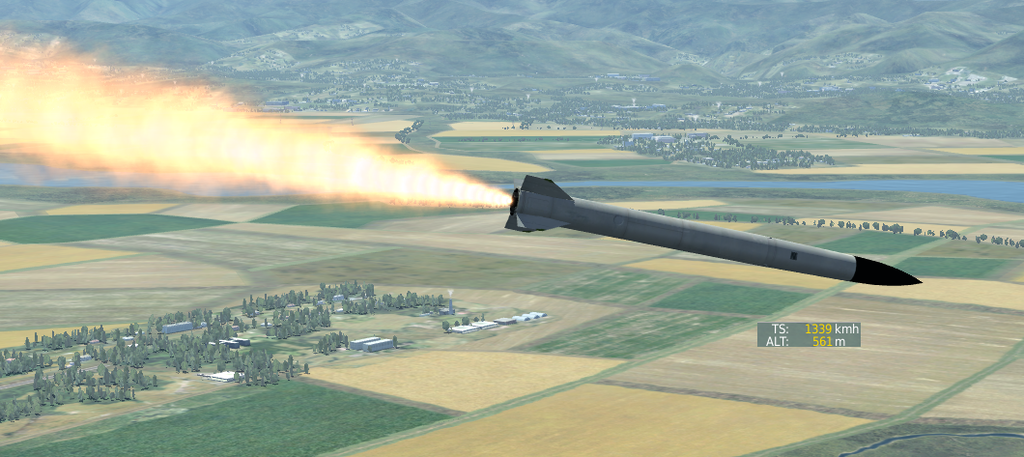
Hyperspeed kill. Letting the Raytheon© brochure swell with pride.
The situation is as follows: The Russians have conquered much of Georgia, However recent fighting has seen the depletion or destruction of much valuable equipment and ammunition. An IL-76 is inbound to resupply the Russians. Fearing rebel equipped with MANPADS supplied by NATO, the IL-76 cruises at high speed, at high altitude. An SA-10 Grumble side protects the airfield, and the Moskva cruiser is at sea (not visible, not even present really, but let’s pretend it is). The Russians are not concerned about any air attack. NATO commanders resenting the retirement of the F-14 and their AIM-54 Phoenix missile. It’s up to the USAF to try the job using an F-15 with a pair of AIM-120 AMRAAMs. Even at the closest point, as the Candid turns to land at the airport, the “depth” inside the WEZ (weapons envelope zone) of the Grumble is over 40km. I just took off and am inbound, overland, from Turkey. It will be my job to produce a kill from outside the WEZ.

My first job is to set the radar up correctly. I’m expecting radar contact at an extreme distance. So I’ll set the bar to 160-120-80-40-0. I put her in high PRF. and Narrow the scan-zone down.

The first part of training, about the fuel will come in handy. I’ve already ditched the heavy tanks as I prepare to gain speed. It will be a duel about having less enough to be light enough to reach high speeds. But also having enough to (virtually) make it back home.
Being low and slow at the start. I decide to remain level and accelerate to a high sub-sonic mach number. Once I achieve that I proceed to climb – steeply – to about 40 000 feet.
Having achieved just that I start to dive back down again. I have several reasons for this. By gently pushing the stick forward instead of choosing for an instantaneous turn I artificially lower my AoA (angle of attack). This reduces my drag allowing me to accelerate faster. The thin air does not really feed my engines enough oxidizer for optimum acceleration and the force of gravity can assist in my speed up. I proceed to slowly dive down to around 28 000 feet. Until the air proves to thick to really accelerate in.

We have arrived at our first real learning objective for this example. Take a good look at the speed indications, and tell me if you really understand their meaning.
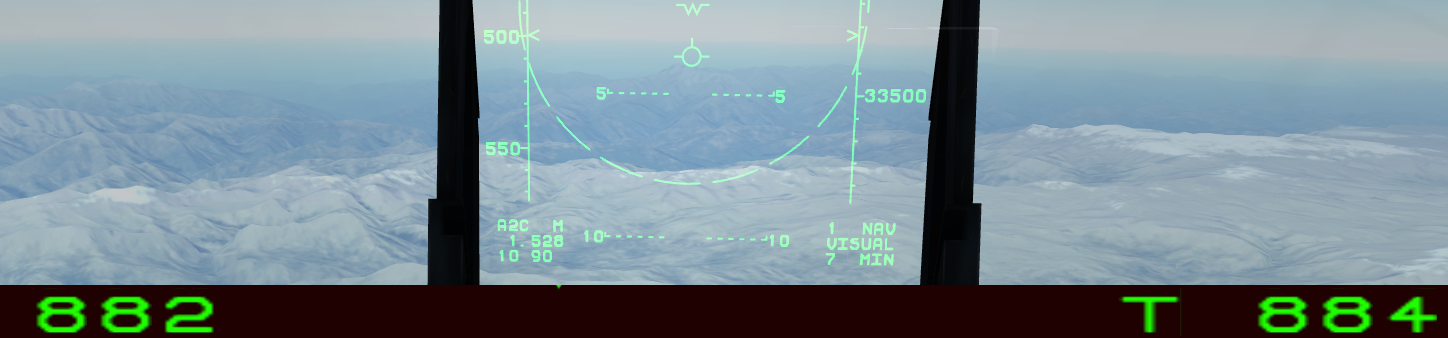
When I wrote this guide I said I presumed you knew a thing or two about flying. Hence I did not discuss say, the four fundamental forces of flight. This also means I presumed you understood the difference between IAS,TAS,GS, CAS (Calibrated Airspeed) and Mach. If you really do, feel free to skip ahead. But since I see many players not truly understanding, I thought I would share some insights. If you do not understand why the HUD indicates a speed of 500 knots. while the Mach indicator indicates 1.525 Mach, a speed beyond the transonic region, and two weird numbers on the radar display, which are again both different. G 882 and T 884 ( That’s 700km/h faster than the HUD speed..) Then continue reading!
Many guides begin by explaining IAS, Indicated Air Speed. But I want to start with GS. Ground speed. Ground Speed is something that everyone understands. You can think of Ground Speed as your speed in 3D space, with the earth as our reference frame. If my job is at a position 50km away, and my car drives at 50km/h, I will be there in 1 hour. If the airport I want to land at is 200 nautical miles away, and my plane is doing 200 knots GS, I will be there in 1 hour.
It turns out planes don’t only care about their speed across the ground. Some time ago I saw a plane taxi from one side of the airfield to another just to take off. But I am sure you didn’t take another route to work this morning because the wind was blowing from the east! Apparently they like it when the wind blows over their wings, it makes them feel.. Light as a feather. So planes also measure their speed relative to the air surrounding them, as well as to the ground below. Let’s recap what we learned so far in a short summary, using the car as our example.
My car does 50km/h and the wind blows with 20km/h. Directly head-on for demonstration purposes.
- My car is driving at 50km/h across the ground (50km/h GS)
- My car is.. moving through the air at a speed of 70km/h indicated (IAS) if I would live at sea-level.
- My car is moving through the air at a (guesstimated) speed of 64km/h indicated (IAS) If I lived 3km high in the mountains.
I can hear you thinking.. What the…? you didn’t tell us about that! so allow me to explain. The Indicated AirSpeed is measured by a device called a pitot tube. You can look around on google what they look like. The ones mounted on the nose of the F-16 and MiG-29 are very cool looking. Since I want you to explain how they work, and why you need to understand it, I’ll grab a more technical drawing.
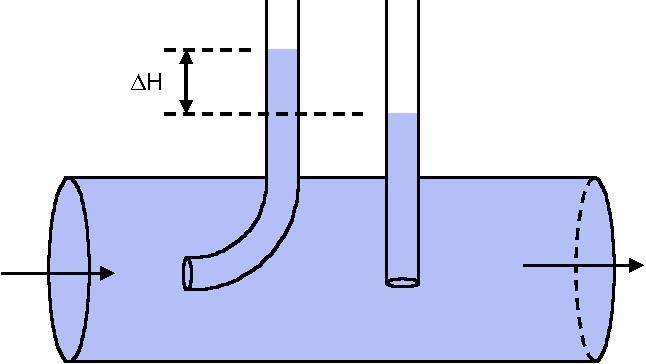
© Wikipedia.nl
Inside the pitot you can see two tubes. One appears to just be aimed downward. This device measures the normal air-pressure. Let’s say this device measures the static pressure. The other part appears to be sitting in the wind. It measures what we shall call the dynamic pressure. By calculating the differences the device can read out the indicated airspeed. But the device is tied to pressure. At higher altitude, the pressure is lower. So the device gives a lower reading than the actual True Airspeed is. Useless right? It turns out to be an advantage. The pressure is related to the density. If the pitot tube is detecting a lower pressure, the wings will feel like as if less air is moving across them, and they will want to provide less lift. They need a certain amount of molecules moved over and under their wings in order to provide a certain amount of lift. This means that critical flight regimes, like stalling, occurs at the same indicated speed at all altitudes! I often hear people saying “IAS is your speed but with wind effects added”. That is not false but the pressure/density system is also an important part! The winds don’t exactly blow over 300 knots in my mission!
My statements are testable in the simulator. By taking the F-15 to extreme altitude, you will stall, even at supersonic speed. Unfortunately not quite testable would be by taking an aircraft to an altitude over 100km. Above this altitude, also known as the Kármán line, any wing will stall if it was not already at orbital speed.
Getting to the point.. IAS is a pilot’s speed indicator. It tells important information about how the aircraft is expected to behave at the given speed and altitude. Since you’re a pilot at any given time you’re touching the controls it has a prominent spot on the HUD. with visualised indications if it changing ( the HUD-tape). GS is the navigator’s speed indicator. It is useful only when you need to work out to get from A to B. Not as important at any given time. It is hidden on the VSD. You can also use your Mach to get an estimation for distance travelled. If you are doing mach 0.8 you are doing about 8 miles a minute. at Mach 2.0 you’re doing about 20 miles a minute, True Airspeed is the combatant’s speed indicator. This gives the best indication of what the bandit is doing compared to you and his airmass. If you understood what CAS,IAS,TAS,GS and Mach where all about you can continue reading now.
Studying the avionics has paid off. I achieve a lock on the bandit candid at 125 nautical miles. About 231 kilometres.

I line up with the ASE (Allowable Steering Error) dot in order to achieve a perfect collision course intercept (well.. it’s a head-on)

Apparently my IAS still appears quite low. The groundspeed indicator reveals I am actually moving at 2315km/h through the 3D environment.

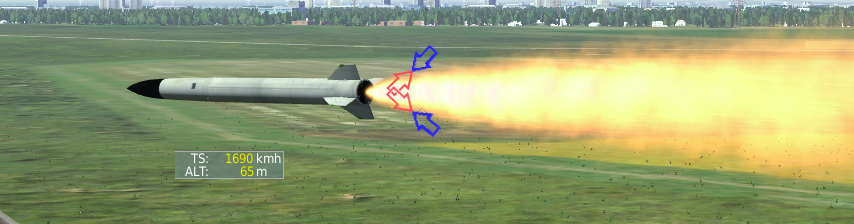
At near Mach 2.3 I pull up a little and let that missile fly! Distance to target: 64.5 miles or 120km. Time to pitbull: 65 seconds. time to impact: 74 seconds. The second missile follows soon.
Both AMRAAMS reach a speed of nearly 6000km/h TS ( you can think of true speed as IAS, but the pressure actually calibrated to the surrounding air. So this is the real speed compared to the surrounding airmass. A pro-tip is that you can toggle between IAS and TS, and infobar off completely using CTRL-Y)
Since we have the bandit locked in TWS, we must manually work in order to keep the radarcone on target.
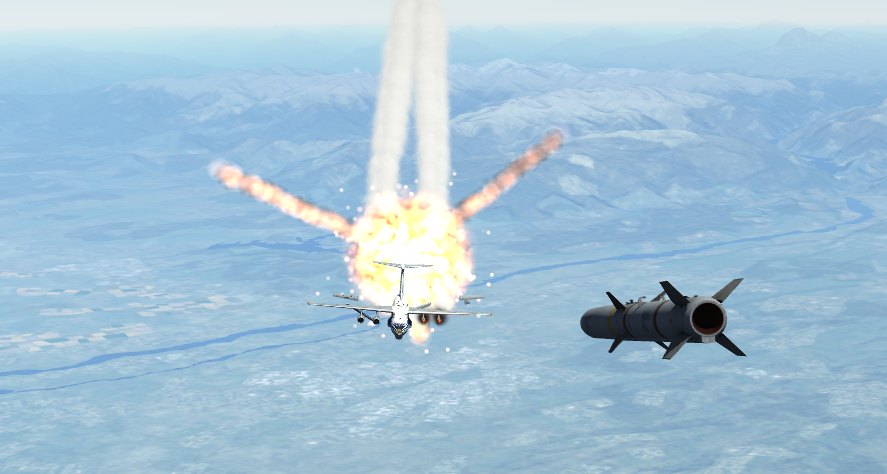
AMRAAMs slamming through the windshield.

F-15 doing a get away back to Turkish territories at 2768km/h True Airspeed.
So what about that SA-10 Grumble?
I never knew if I actually crossed into the SA-10 WEZ (Weapons Envelope Zone) or not. I highly doubt it but you can never be sure. The SA-10 is no fool, however. An F-15 approaching at over twice the speed of sound is going to cross the WEZ sooner rather than later, if he does at all. As faith would have it, the SA-10 decides the time is right took a shot right as my slammers (AIM-120) come of the rail.The SA-10 predicts that I maintain my course and enter the WEZ where the missile will be waiting for me. In the worst case I am forced to divert, disabling me from accomplishing my mission. Technically this would count as a successful mission completion for the Grumble, denying air superiority and power projected from the air. Or so he thinks. The SA-10 is a weapon I rather not take any chances with, as it is the second most potent anti-air weapon in the Russian arsenal, after the SA-21 which is not modelled in DCS.
I’m at high speed, at high altitude, still around 40 000 feet. I turn away from the threat. Attempting to get him on my 3-9 line and “turn green” to his radar. However I have options to do more things. I could climb further, possibly use a passing space shuttle for cover. I could dive back down low, or I could simply sustain my current altitude and try to keep my speed up in the turn.
What do you think I would do? What would you do?
By choosing to dive, the SA-10 reacts by choosing a low altitude course to intercept me. Let’s first discuss what advantages I deny by not allowing him an opportunity to climb. A fighter pilot who is low, but has speed, could choose to initiate a climb. This converts his speed into altitude. The pilot might think this is an agreeable deal. After all, altitude is useful, and it can be converted back into speed at the pilot’s command by diving. He trades his kinetic energy for potential energy. A flying object which converts speed for altitude is like you converting your money for gold and oil. The return product is still valuable. This also counts for a surface to air missile. Also, under typical conditions, you will never win a climbing duel with a missile.
Let’s now take a look at the disadvantages the SA-10 faces by choosing a low altitude flight-path. I’ll start with a commonly known one. That would be drag. At low altitudes, drag is worse than at high altitude, because the air is denser. A flying object at low altitude must spend energy to push the air out of his way in order to allow him to get to his objective. This spends energy (more so than at altitude). This is like trading in your money for raw sewage. Pushing air out of the way provides no benefits for flying objects, and neither does it for surface to air missiles.

The next reason is probably not as known as drag. Before I mention the next hindering aspect on missiles related to altitude, I want to talk about air pressure. Air pressure is all around us. Take a look around the room, do you see any objects being destroyed by air pressure right now? Probably not. So it’s probably not a significant force in air combat, right? A quick look around on the internet reveals some interesting stuff.
Apparently the forces caused by air pressure are capable of doing unspeakable things, if allowed to manifest as is the case with a vacuum tank. At sea-level, the air pressure can exert a maximum force of about 10.1 Newtons on each squared centimetre, or about 101000 N/m². This is diminished as altitude increases. So how does this relate to air combat?

This was seen in the rocket equation by the fact that that the ambient pressure P0 needs to be deducted from the rocket pressure Pe in order for the rocket thrust equation to be correct.
![]()
So whats the lesson for this chapter? If battlefield conditions allow, you should dive in order to defeat a SAM without delay. Every second that the missile spends at low altitude is advantageous. SAM motor burn times are measured in seconds, and every one of those spent burning at low altitude is advantageous. So do not hesitate if you detect a launch.

My tactics actually Made the SA-10 dive. and fly at a very low altitude before figuring out he would never reach me by keeping flying this low. These missiles where easily defeated.
Addendum: The forum post that originated this article has had some great discussion. You can check that out here on our forums:
https://forums.mudspike.com/t/dcs-f-15c-combat-guide-for-beginners-by-sryan-very-img-heavy/2063

