Wow. It kind of creeps up on you over the years, but our level of graphics in flight sims is insanely good now. It’ll be interesting to see what the next 5 years or so brings.
4 Likes


FYI, Forkboy2 just dropped Southeast US and along with it a new util to convert JPG → DDS, which is waaayyyy faster. Mine went from 2.85 sec per tile to probably something like .75 sec per tile.
1 Like
Very cool!
Let’s all meet over at @BeachAV8R’s back yard:
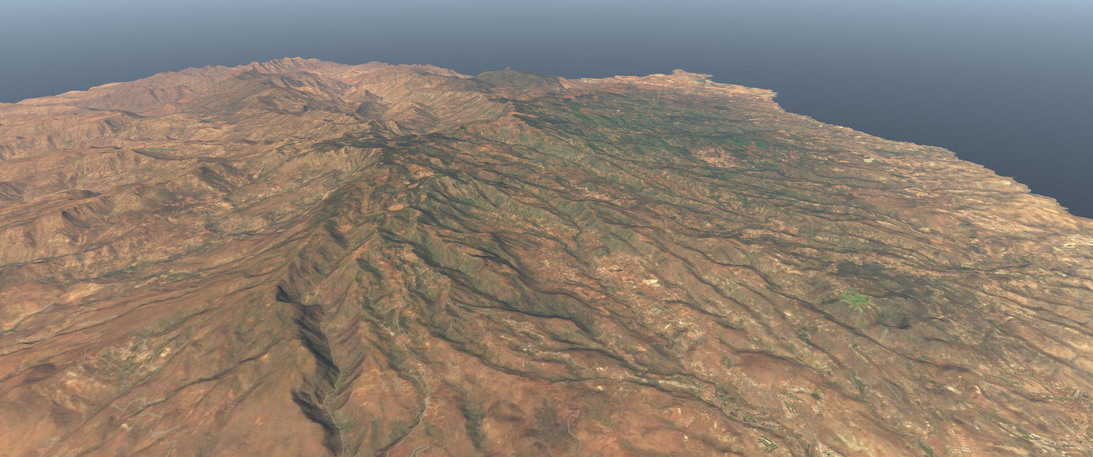
Southeast US (Georgia, South Carolina, North Carolina and parts of Tennessee)
Source - GA-2015-1m / NC-2016-1m / SC-2015-1m / TN-2016-60cm
Custom Water Masks - Yes
Updates/Patches - None
Zoom Level - 16 (17 within 6 km of airports)
#DDS Files - 6,669
Download Size - 22.5 GB
Other Notes - None
2 Likes
I have been waiting till I had enough RAM to load them but here are a couple of shots of the UHD mesh for the Alps


http://www.alpilotx.net/downloads/x-plane-10-uhd-mesh-scenery-v1/
I will use Ortho4XP to get better textures but it looks pretty good.
Oops US Scenery thread @fearlessfrog you may feel the need to split this topic
2 Likes
You were getting 2.85 sec per tile and now are getting .75 sec per tile!? Wow. I downloaded Forkboy2’s California files and am now using the converter he recommended for Macs. That converter is taking 30 to 35 seconds per tile.
I have an iMac Regina 5K, 27-inch, with a 3.2 GHz Intel Core i5 processor, 8 GB of DDR3 memory, and an AMD Radio R9 M390 2 GB graphics card.
California seems to have 16,000 jpg tiles. My computer has been running for about 30 hours and has converted only 2000 tiles. I estimate it will take my computer 9 days to convert all of California’s jpg files to dds files.
Does that sound right?
1 Like
Hey Lon, that sounds very slow. It might be that your GPU is not up to the task. I think that mine usually take between 2 to 3 hours. I’m not home now, but if memory serves, there is also an option to have your CPU do the conversion. There is a little test script that you are supposed to run that directs one way or the other. Why don’t you run the CPU version and see if that is quicker. Sorry for the lack of specifics, but don’t have the material in front of me atm.
Likewise. To do a big region like CA took my machine a few hours…I can’t remember my CPU/GPU split…but it was something like 60% GPU and 40% CPU.
There’s a big difference unfortunately in the GPU DDS conversion tools (that are Nvidia only, as they use something called the CUDA library for those graphics cards) and a CPU-only way that the Mac tools use. The biggest constraints would be CPU clock speed followed by I/O speeds (basically how quick is your disk, SSD helps).
It might be worth just trying your own Ortho creation @Lon - or at least make a small area using Bing etc and then compare speed of that vs extracting these pre-baked ones. Info on that here:
1 Like
Thanks for your responses. They explain why my iMac is taking so long to do the conversions. Fortunately, I can see that dds files are actually being created and that jpg files are being automatically deleted. Fortunately too, the conversion process doesn’t prevent me from simultaneously using the iMac for other purposes, and doing that doesn’t slow down the conversion process. All I need to do now is remain patient. Thanks again for your help.
2 Likes
I’m on a thread revival binge today.
Hey, I just grabbed and converted Idaho for my XMas2018 leg today and used the latest Very Fast DDS Conversion. Results:

I used the GPU to convert the number of files to be at 60/40 split to CPU. But looking at the results, it looks like the CPU 20 minutes ahead of the GPU threads (go ahead RTX haters and ignite your flamethrowers ![]() ) . Or am I reading this wrong?
) . Or am I reading this wrong?
Edit: Should have said that I was watching a YouTube video while this was going on ![]()
I’ve always had better luck going with about 30/70 GPU/CPU split… At first I thought my 1080 would churn through the tiles faster than the CPU, but I was wrong.
1 Like
Here is an interesting project called Global Photoscenery IFR. It is ZL13 ortho for the entire world. ZL13 is probably good enough for enroute mid altitude stuff. I haven’t tried this yet, but just figured I’d post it up as an option. This is Part I, according to the author Part II will be ready very soon.
Part I and II together will be a 130GB download (according to what the author has posted) and decompress to 400-500GB.
I hesitate to post this because I haven’t given it a whirl yet…but plan to as soon as I get it downloaded and installed. I think the download will give you JPGs which will have to be converted to DDS files via the DDS Conversion Tool…

1 Like
Doing the DDS conversion now. 20,000+ files…so it will be a bit… ![]()
Alrighty. So I have a general verdict on this Global Photoscenery, and it should come as no surprise. The purpose of the scenery is to just flesh out the world a little bit and provide for some perception of “the palette” of the world from mid to high altitudes. In that respect, it works. Of course, higher zoom level scenery also does that, but then you do have to go find it and/or make it yourself, and then make a small investment in many terabytes of disk capacity.
This package (at least Part I) gives you half the world (with the other part coming) in perhaps some areas of the world where nobody has made orthos, or data to make the tiles might be a bit harder to come by.
I’ve been spoiled by the higher resolution Forkboy orthos, so I knew the muddier textures wouldn’t look as great, but for areas where I don’t have ortho, this is a reasonable stand in. I simply have this world ortho scenery package listed below my Forkboy and custom orthos so that they only kick in in areas that I don’t have higher resolution tiles.
So here are some representative images from the Global Ortho. It also does come with overlays, which provide the autogen and stuff like that.
Here is Mexico City from around 25,000’ - as you can see, it works pretty well, gives you a general feel for the terrain and population center…

Down low, you can see there isn’t a lot of fine detail in the city blocks and overall terrain. It is intentionally that way simply to keep the size of the package within the realms of a single package.

Here is a good compare/contrast between Forkboy ortho resolution and the Global package. This is Idaho, on the right is Forkboy and the left is Global package…again, you can see the muddier looking, lower res ground imagery. Keep in mind, this imagery is all overlaid on AlpilotX mesh, so the actual contour of the scenery doesn’t actually change…it is just the imagery.

Another comparison, this time Forkboy ortho on the left, Global on the right…

Grand Canaria at low altitude…low resolution tiles as expected…

At 15,000’ it looks reasonable though…

And 25,000’…
Havana, Cuba…

Havana at 25,000’…

Havana at 10,000’…

Gibraltar area…

Looking across toward Morocco…

So yeah, it fills in some gaps. Would I rather have higher resolution for the entire planet? Sure, but this will work for long cross country flights where I don’t have coverage. Also, your individual airport scenery and (if it includes ortho) should trump the Global package, so as you descend in and get close to your landing airport, you should see higher resolution imagery.
I think it is a pretty nice little project that has its place in X-Plane.
Edit - one more. I wanted to see what the border of the Global scenery looked like versus the default in the Sahara…

Dakar…

1 Like
Likes it, looks definitely beter than default.
Size of files is significant but with some autocompresion turned on I think this could work prety good.
Bringing this back from the dead, but when using the forkboy orthos, is there anything special you have to do to the files to make autogen work? I converted them to DDS, followed this video

And the Ortho works, Airports show up, but there are no trees or autogen buildings, or lights at night (other than airports). Any help is appreciated.
1 Like
SCENERY_PACK Custom Scenery/yOrtho4XP_Overlays/
SCENERY_PACK Custom Scenery/Global Airports/
SCENERY_PACK Custom Scenery/Orbx_OrbxlibsXP/
SCENERY_PACK Custom Scenery/PPlibrary/
SCENERY_PACK Custom Scenery/R2_Library/
SCENERY_PACK Custom Scenery/RA_Library/
SCENERY_PACK Custom Scenery/RD_Library/
SCENERY_PACK Custom Scenery/ruscenery/
SCENERY_PACK Custom Scenery/Sea_Life/
SCENERY_PACK Custom Scenery/The_Handy_Objects_Library/
SCENERY_PACK Custom Scenery/world-models/
SCENERY_PACK Custom Scenery/XAirportScenery/
SCENERY_PACK Custom Scenery/Orbx_A_GB_Demo_TrueEarth_Custom/
SCENERY_PACK Custom Scenery/Orbx_B_GB_Demo_TrueEarth_Overlay/
SCENERY_PACK Custom Scenery/Orbx_C_GB_Demo_TrueEarth_Orthos/
SCENERY_PACK Custom Scenery/ZZZ DD Polish Airports vol.1 Terrain/
SCENERY_PACK Custom Scenery/Colorado_2015_1m/
SCENERY_PACK Custom Scenery/zzz_uhd_global_scenery4/
SCENERY_PACK Custom Scenery/zzz_hd_global_scenery4/
Thats what the end of my scenery file looks like.
I am not sure what it would do to put yOrtho4XP_Overlays on top. It’s usually right above the Ortho photo lines (e.g Colorado_2015_1m and ZZZ DD Polish…). It’s said it doesn’t matter where to put the libraries. I usually just leave them right above the yOrtho4XP_Overlays, and below everything else. I put sceneries like Orbx right below Global Airports just to make sure it’s not blocked by anything. In your case here, it shouldn’t matter, assuming you were just checking CO scenery.
And not to be snarky - CO might not be the best place to find a lot of trees. I am sure you were checking urban areas and places where trees are expected. For lighting, check out extended lighting Bringing extended night lighting to XP - XP11 Scenery - X-Plane.Org Forum.
1 Like