VPC Mongoos T-50 Review
By @Troll - September 11, 2017
Originally published at: Articles - Mudspike Forums
Mudspike Contributor Jörgen “Troll” Toll shares his impressions of his recently acquired VPC Mongoos T-50 joystick.
A newcomer in the PC flight simulator hardware market, a Belarus based company, Virpil has released its first flight controller, the Mongoos T-50 Flightstick.
Being somewhat of a flight simulator controller aficionado I was intrigued by the design of the controller gimbal, and just had to take a closer look.
Thrustmaster used to be the epitome of high-end flight-controllers. While still good, they have serious competition these days. Older flight simmers may remember the F-16 FLCS, F-22 Pro, TQS, Cougar and Warthog. All masters in their class. We flight simmers owe a great deal to Thrustmaster for blazing the trail so others could follow.
All the Way From Russia
Some have followed this trail all the way from Russia.
A lot of good flight-controllers come from Russia these days. We have VKB and BRD, and now VPC. Gotta love TLA!* They are all thriving on the fact that we flight simmers want good quality flight control hardware. We want realism.
Virpil, from The Republic of Belarus, is the latest name to be added to the list of quality flight simulator hardware contributors. Virpil released a Thrustmaster compatible stick grip in the spring of 2017, to be followed by a joystick base a few months later.
The release of the base was slightly delayed due to manufacturing schedule and design refinements. Quite frankly that was just what to be expected from a new company with a new design. All that behind them, initial production batches are being delivered to their customers as I write this review.
In addition to the initial stick grip, they have added a left hand version and a limited black edition. They are also selling flight controller mounts and flight stick extensions of their own design.
Ordering from Virpil was easy to do. Just register at their website and pay by credit card or bank transfer. The package was sent with tracking. Don’t be surprised if this takes at least two weeks. Visit the Virpil website here: https://virpil.by/en/


A Closer Look at the Mongoos T-50
The stick grip is based on the OKB Avia Avtomatika stick, found in the Sukhoi T-50 and is fully compatible with the Thrustmaster Cougar and Warthog interface. Thrustmaster initially designed their Cougar and Warthog HOTAS controllers with the ability to swap stick grips, unfortunately they haven’t yet followed up on the promise of new grip designs. Virpil is, as far as I know, the first on the market with a commercially available Thrustmaster compatible stick grip.

The Thrustmaster interface on the VPC T-50
The 5 pin mini DIN connector of the VPC T-50 is on the end of a cable, unlike the Thrustmaster design, which is mounted in place. This is to allow for mounting the stick in a rotated angle. The VPC stick base connector is also loose, to allow for mounting a Thrustmaster stick grip in a rotated angle. Yes, the T-50 stick grip can be used on a Thrustmaster Cougar or Warthog base, and the Cougar and Warthog stick grips can be used on the VPC T-50 base. How’s that for compatibility. I guess you can call it a hommage to Thrustmaster, the great-grandfather of flight simulator controllers.

The VPC Mongoos T-50 side by side with a Thrustmaster Warthog stick grip.
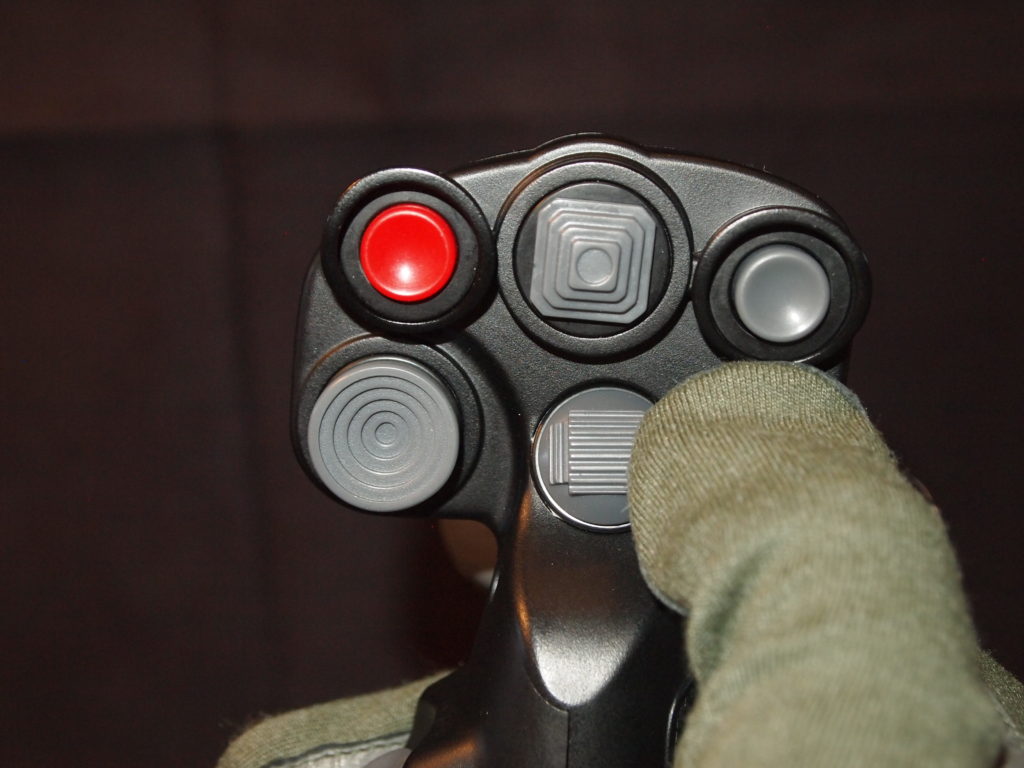
The Mongoos T-50 stick grip is made from high quality plastic and has:
- Three 4-way switches (One as a 8 way POV);
- One 2-way switch;
- Five regular push-buttons;
- One dual stage trigger;
- One fold down trigger;
- One proportional brake lever, that also works as a switch.
The switches are of the OMRON brand, which are considered to be of high quality.


In addition to this it has an adjustable palm rest that can be raised or lowered.
We Brake for Nobody!
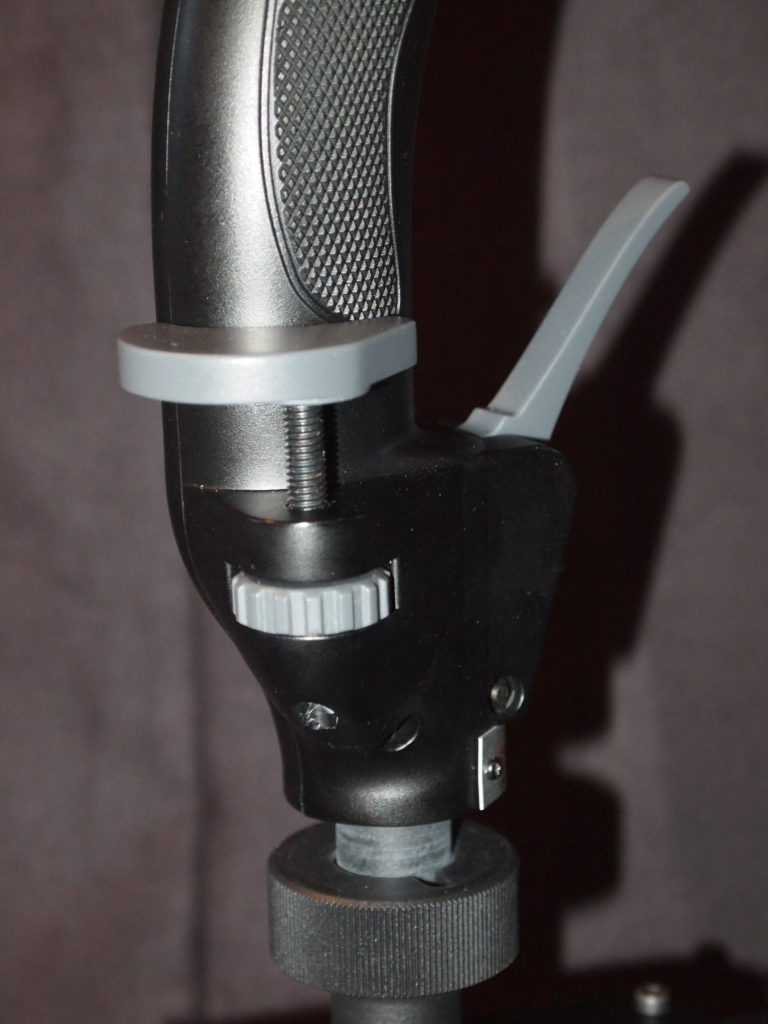
Proportional Brake Lever
The proportional brake lever is a new addition. Where the Thrustmaster sticks have a paddle switch, the T-50 has a proportional lever. This is really useful for many Soviet/Russian fighters, and even the very British Supermarine Spitfire, that controls the wheel brakes via a motorcycle handlebar style brake lever. If you are used to flying mostly modern western aircraft you have undoubtedly been spoiled by steerable nose wheels, or tail wheels, and toe brakes, controlling differential brakes on either main gear wheel. And if you have, you have probably felt the frustration of taxiing the DCS: L-39C, MiG-21 or Spitfire Mk.IX where the brakes are controlled by a single lever, and brake force distributed differentially by rudder pedal input. Especially the Spitfire, with its brutish Merlin V12 and enormous propeller, can be a handful on the ground without proper control of the wheel brakes. Enter the T-50 and its proportional brake lever.
Assign the brake lever to the ‘wheel brakes’ axis command and you are able to fine tune the brake force application and tame the tracking of any aircraft that does not have toe brakes. Provided you have rudder pedals, of course.
Unfortunately, due to a limitation of the Thrustmaster Cougar and Warthog bases, the T-50 proportional brake lever works as an on/off switch when used on a Thrustmaster base. It will only be seen as a proportional axis when used in conjunction with the VPC T-50 base. The brakelever also activates a switch when compressing the lever, in addition to moving the Z axis. The fact that the Z axis simultaneously activates a switch, makes that axis impossible to calibrate in Windows Game Controllers, as the calibration finishes as the button is closed, and that happens halfway through the Z axis travel. A dedicated VPC software is under way.
Sticks and Stones…
The T-50 stick grip feels very ergonomic and solid. Now, in a direct comparison with the metal Thrustmaster Cougar and Warthog sticks, it does feel slightly inferior in quality. This is, however, my very subjective and personal opinion. This comes from metal being heavier and more durable than plastic. I still remember feeling the cold metal from the Cougar for the first time. My hand has gotten used to the feeling, I guess.
The T-50 is made from very high quality plastic and feels solid. It’s just that if you are going from the Thrustmaster metal sticks you may feel slightly underwhelmed when clasping a T-50 for the first time. In reality, most real flight-sticks are made from reinforced plastic, so don’t blow this issue out of proportion.
The only issue I can see, with the choice of material, is that the fold down trigger and the brake lever sticks out a bit and may snag something in the heat of a dogfight. Not likely, but I guess it could happen.
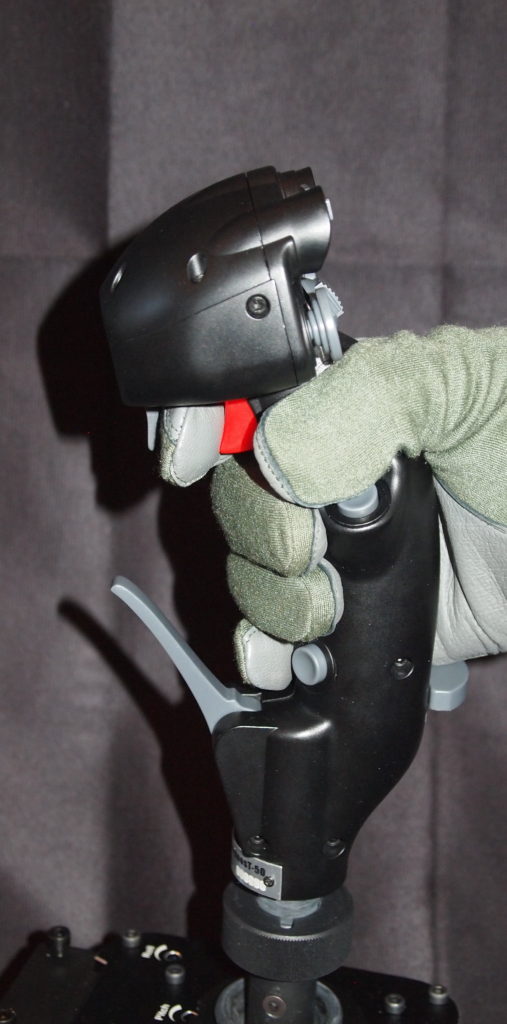
Operation of the button panel on the top of the stick requires some dexterity. This stick is full size, and as such not designed for kids or small hands. I wear size 12 gloves (12 being the circumference of your palm, in inches) and I can reach any button comfortably.


As I don’t have any of the Thrustmaster bases any longer, I can not test the T-50 stick grip Thrustmaster compatibility directly. I do however have a BRD-N stick and that is 100% compatible with the Thrustmaster Cougar and Warthog stick grips. The T-50 works perfectly with the BRD-N base, with the same brake lever limitation as i mentioned earlier.
The VPC Mongoos T-50 base
Following the release of the T-50 stick grip, Virpil released the base. The base has several new features, and is actually very compact.
I have already mentioned the Thrustmaster compatibility interface and the proportional brake lever functionality. The base gimbal is very interesting indeed. The design incorporates cam-spring resistance, which is adjustable by changing the springs and/or the cams. But that is not all. The spring resistance can be adjusted by set screws, without disassembling the base!

First Things First
There are several ways of providing centering forces on a joystick, typically creating a resistance around the center position, that must be overcome to move the stick. This can be totally realistic, or it can be equally unrealistic, depending on what type of aircraft you are simulating. What is certain is that controlling simulated aircraft on a PC is not like controlling a real aircraft with real aerodynamic forces acting on its control surfaces. It is more like flying a FBW (another TLA*) controlled aircraft. So it all comes down to what you are simulating and what your preferences are.
And this is what I love about the VPC Mongoos T-50. You can adjust it to fit almost every need!
Springs and cams
A cam is used to change the moment arm of the spring centering force, thus making the centering force lighter or heavier.
The different cams are designed with a hard center, soft center and no center. The spring force will return the stick to its center position irrespective of which cam is being used. The difference between the cams lie in the “break out force” needed to overcome the center position. Some like a firm center, some like it loose. I like a loose center and a hard centering force, so I swapped the springs to the heavy ones, and mounted the no center cams. (The T-50 base comes installed with the medium springs and the soft center cams)
In order to swap springs and cams, you need to disassemble the base. This may seem daunting for some. You need some metric hex socket screw bits and some basic mechanical know-how. It is not hard to do. I’ll even show you…
- Remove the stick grip;
- Remove the bottom plate by unscrewing the four hex socket screws;
- Remove the U-shaped bracket on the front of the base by unscrewing the four hex socket screws;
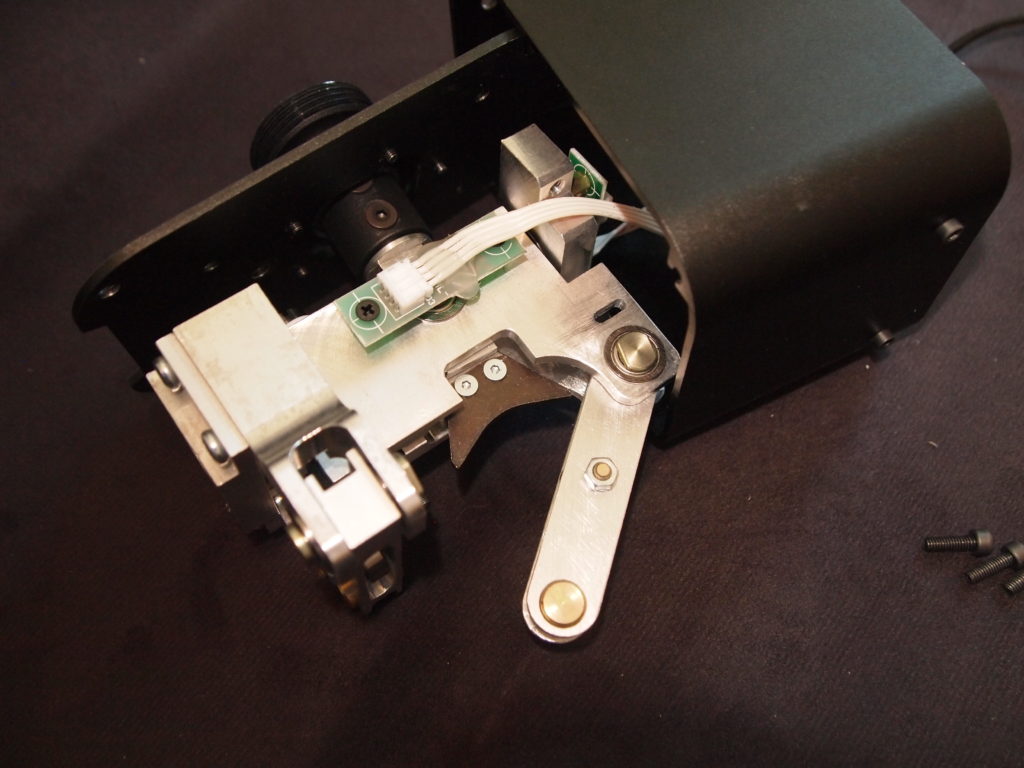
- Unscrew the four hex socket screws holding the base top plate, and unscrew the four screws holding the gimbal assembly to the top plate;
- Unscrew the two small hex socket screws on the back of the base, holding the PCB. These are connected to two nuts and a washer. Pay attention to the way the PCB is mounted so you remember how to put it together again. Also, if you drop one of the nuts, it will be eaten by the carpet monster… You have been warned!
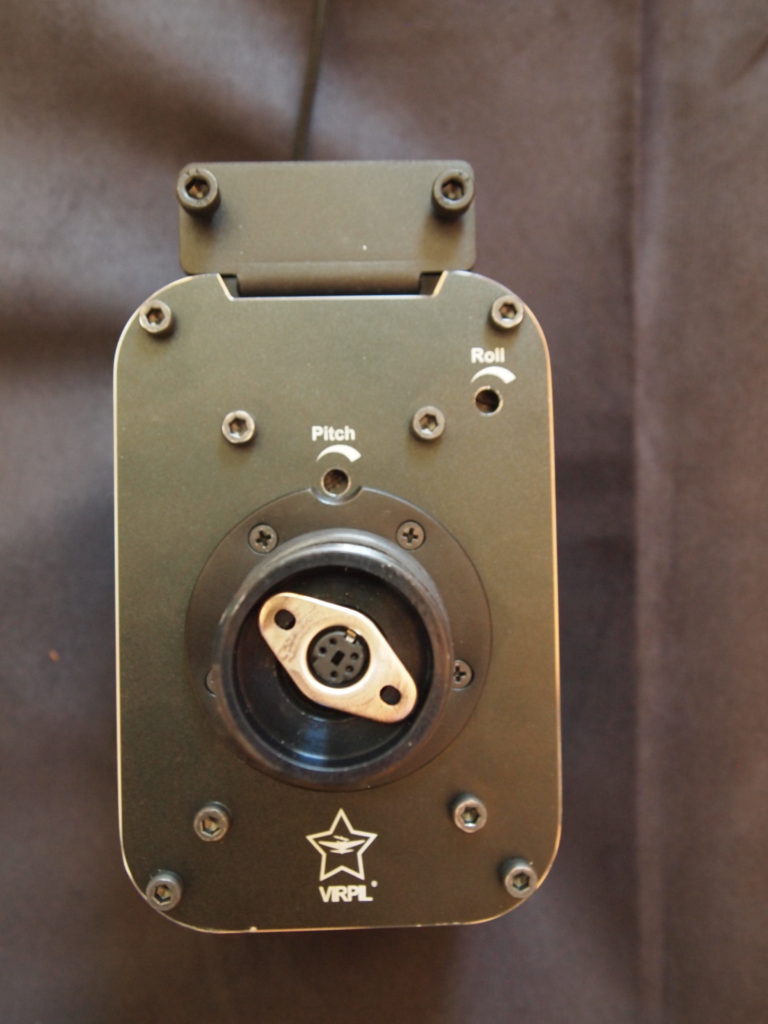
- Unscrew the spring tensioning screws for pitch and roll. The pitch screw must be unscrewed through the hole in the top plate. The roll screw can be unscrewed by simply turning the top plate 90º out of the way;
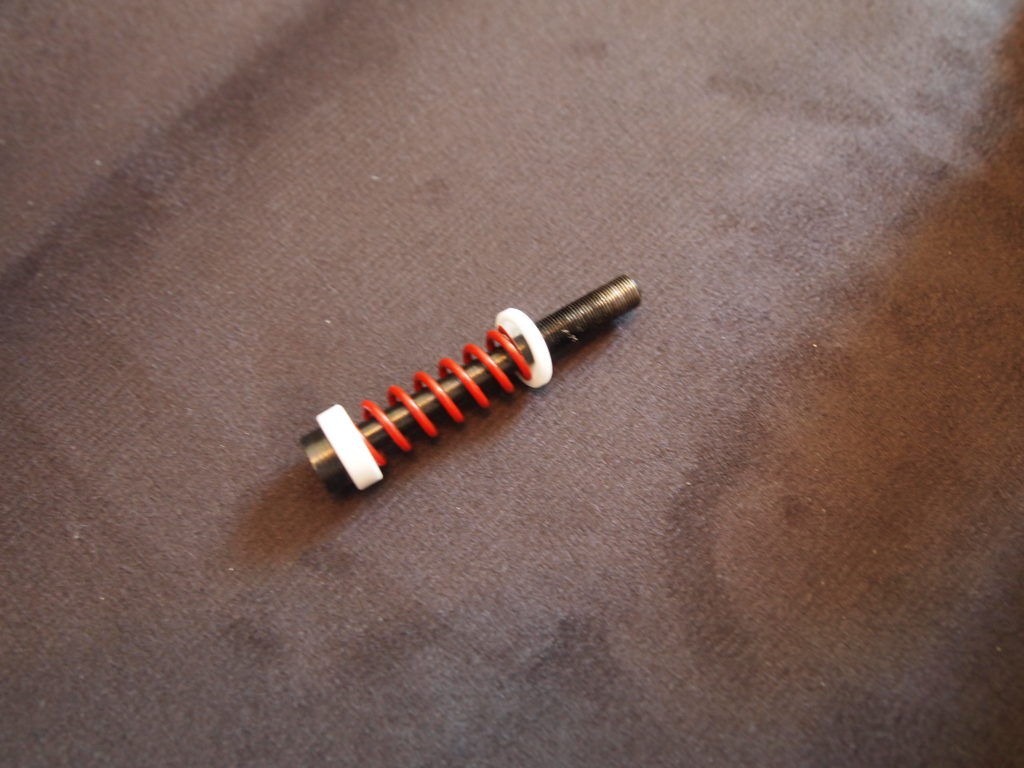
- The spring tensioning screws can now be removed. Pay attention to the orientation of the white plastic collars as you swap the springs;
- If you want to swap cams, now is the time to do so;
- Unscrew the two hex screws, holding the cam, and swap cams;
- Assemble in reverse order;


Did that seem hard to do? It really isn’t. But then again, I build my own flight controls. I totally get that this isn’t everybodys cup of tea. I for one, just love this level of customization.
Hex socket bits 2 – 2.5 – 3 – 4
Some notes regarding this process though…
You will need hex socket bits no. 2, 2.5, 3 & 4.
Be aware that aluminium and brass are soft materials. Be extra careful when mounting the screws. If they feel a bit heavy, when screwing them in again, chances are that they aren’t perfectly aligned with the threads. Unscrew, and try again.
When reassembling the base, mount the U-shaped bracket before tightening the screws that secure the gimbal to the top plate and the top plate to the casing. This is to ensure that the bracket sits firmly against the gimbal body, without a gap.
The hex socket screws holding the cams are countersunk. I advice you to mount the cams and tighten the screws, and then re-tighten them after you have tensioned the springs, and wiggled the stick for a while. This is to make sure the screws are set correctly and that the cams are as snug as possible.
Also, be careful not to damage the PCBs or the sensors.
My Cams Didn’t Fit
I had to use a metal file to open up the gap on my cams, a little bit. In addition, the pitch cam was a little bit too thick to fit the mount, and I had to grind it down slightly.
The cam to the right has been polished.
Also, the cam rolling surface, where the bearing of the spring arm rolls against the cam, needed polishing. This comes from the manufacturing process of the cam. The way they are cut leaves tiny grooves in the surface. These grooves can be felt through the gimbal assembly and it feels like your stick is linked to cog wheels. Virpil are aware of these faults; If this affects you, don’t hesitate to contact [email protected], for replacement parts. Chalk this up as teething problems of a newborn producer.
All that aside, having swapped cams and springs, you can also adjust the spring pre-tension with a flat head screwdriver through holes in the base top plate. A spring has nearly linear force increase, relative to its displacement. Simply put, the force to compress a spring will increase with how much you compress it. If you want a higher centering force, you tighten the pre-tensioning screws.
With the heavy springs, and a loose center cam, the centering force is extremely heavy. I never thought that much spring force could be contained in such a small gimbal. It is a testament to the design of the gimbal and the ingenuity of Virpil. You can use the lightest springs, and get a much lighter centering force, if that’s how you like it.
…are capable of discerning a 0.006º movement around each axis.
I like a strong centering force, but a smooth center transition. This is why I like to use an extension to my controllers. A longer stick means a longer moment arm. This gives me a much more realistic and precise pitch and roll control. Talking about precision, the contactless digital proximity sensors of the VPC T-50 are capable of discerning a 0.006º movement around each axis.
This is what I would describe as “mind control” resolution. With a high centering force and this kind of resolution, you feel connected to your simulated aircraft in a way that can not be described. You adjust the controls by force, more than by displacement. Of course, you are moving the stick. There are no force sensors in the VPC T-50. It just feels like there is.
Speaking of extensions, Virpil make those as well. I got the set of three different extension pipes, 50, 75 & 100 mm and I use all of them, together. This makes the stick tall enough for my purposes.


The extensions are made from aluminium and are of very high quality. They each come with their own cable extension. However, I only need the longest and the shortest cable extension, when I use all three extension pipes. Naturally, these extensions can be used with the Thrustmaster Cougar and Warthog stick grips and bases as well.
The VPC Mongoos T-50 is not designed for desktop use


The VPC Mongoos T-50 is not designed for desktop use. It says so on the Virpil ordering page. And it’s true. You basically need one of the desk mounts from Virpil to use the T-50. If you look at the front of the base, you see a U-shaped bracket with four hex socket screws. The base is designed to be fastened with the U-shaped bracket at the front of the base and not rest on a desktop. Let me tell you why.
If you are using a heavy spring centering force, the aluminium base casing probably wouldn’t be able to withstand the load. The U bracket is mounted directly to the body of the gimbal assembly and stabilizes the gimbal without transferring the load through the casing. Smart, really. I do wish Virpil would make and sell a mount that allows for the base to be attached to the floor of my SimBox though, as I don’t have a desk to attach the mount to.
Closing comments.
How much does it cost?
I paid around $400, plus shipping. That’s because I ordered the T-50 stick grip before the base was available.
If you buy the T-50 stick and base, it will set you back about $350. That’s about $60 more than the Thrustmaster Warthog flight stick which sell at $290. The Warthog may have a metal stick grip, but the gimbal is all plastic. The VPC Mongoos T-50 is the other way around. Plastic stick grip and a metal gimbal. I don’t know about you, but I prefer the latter. And the VPC T-50 does have the brake handle and swappable cams and springs. Or if you broke your Warthog plastic gimbal, like I did, and need a replacement; Consider the VPC T-50, as you can buy just the base.
So, what do I think of the VPC Mongoos T-50?
I like it! I really do! And I would like to congratulate Virpil on their entry into the demanding market of flight simulator controllers. Yes, there are some small annoying problems with the cams and they were delayed. I’m prepared to overlook these problems as Virpil seem to be eager to solve them. To compensate for the delay, they bumped everybody up to expedited shipping and included a cover sock for the stick. Over all they seem to be a class act. I wish them well in the future and I am looking forward to see what that future will bring. There is already talk about a throttle…
* Three Letter Acronyms


