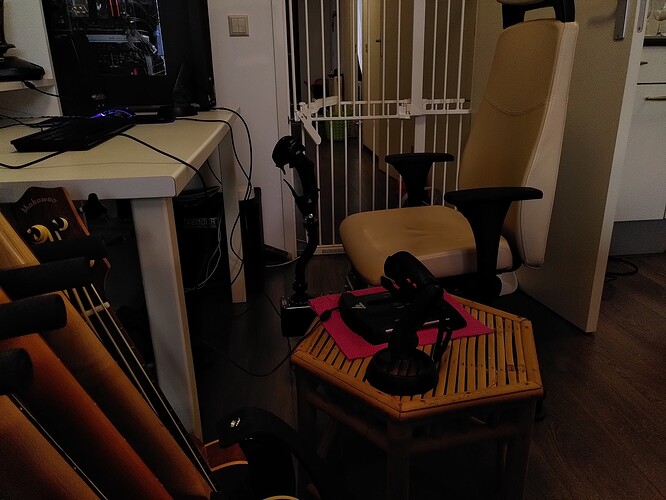
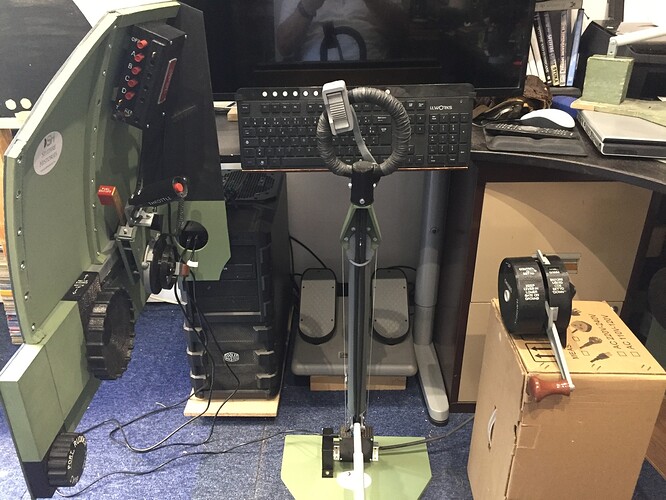
Show us your sim pit!

Hi everyone, I’m new to Mudspike, because one of my team mates from EAF saw this post and suggested I share my Spitfire cockpit with you.
About two years ago I wanted more realism when flying WWII prop and decided to build full scale replica Spitfire MkIX flying controls, particularly with the arrival of the DCS Spitfire. I started off by getting original Supermarine Aviation Works engineering drawings and buying Paul Montforton’s e-book “Spitfire MkIX/XVI”, which I highly recommend.
The design challenge was to include modern electrical components to replace the original mechanical, pneumatic or old electrical systems without altering the exterior aspect & dimensions of the components. I use 123D Design to re-create the parts and Repetier to send the drawings to a 3D printer (Anet A8). Most of the kit is made up from 3D printed PLA with the addition of PVC tubes for control column, spring loaded strut (simulating elevator control rod), aluminium bars (to support a left hand cockpit panel and fit it to a desk or worktop) and real nuts, bolts, screws & washers (the assemblies are more or less put together like the real thing) and 3mm board for the cockpit panel.

The current desk mounted kit includes a portion of left hand curved cockpit panel upon which are mounted rudder & elevator trim wheels, a throttle quadrant with Fuel Cutoff lever, Throttle lever with bomb release button in the grip, an adjustable max take-off stop, Airscrew Control lever, a dummy u/c warning horn switch, and a working friction wheel and lever. This port cockpit panel also includes a replica VHF Remote Controller Unit with 7 user programmable buttons and working dimmer slider. This unit houses an Arduino Leonardo game controller to which all the “cockpit” controls are wired and plugs into the pc via a standard USB cable. The kit has a floor standing control column fixed to a wooden base which can be either ballasted or screwed to the floor. The control column is held in place by a spring loaded strut which keeps the column at its 11° aft rest position and provides increasing resistance as it reaches travel limits. The column has an articulated spade grip with rubberized covering. The spade grip includes a working brakes lever and two-way firing paddle (which allows cannon or machine gun or both) with working safety catch (mechanical & electronic). There is a second game controller at the base of the control column.
I have started work on items for the right hand side cockpit and for the moment I have the Chassis Control Unit which replicates the lever movement of the original and has a working status indicator (Up-Idle-Down). I plan to add other items such as the auxiliary tank cock & jettison lever.

I am also working on a transportable full scale cockpit, which will include the above controls. The idea is to be able to take it to airshows, museums and events so that others can share a realistic Spitfire flying experience. This cockpit will slide apart to allow easy access. The first version is designed for IR tracking with a cut out in the instrument panel and cockpit coaming to allow a screen to be fitted. I plan to build a full scale cockpit section mounted on actuators for use with VR.

Desk mounted kit :


As others have no doubt already said, once you get into this sort of “trip” you never see the end, but I have recently retired and it keeps me out the pub !
The main benefit is of course being able to fly a Spitfire “just like the real thing” without relying on modern HOTAS (Hands On Throttle And Stick) style controls. With this kit no hat switches nor 15 buttons at your fingertips, you fly right hand on the grip with the left hand darting around the cockpit to adjust the trim wheels, throttle, rpm lever and radio buttons. On take off you have to switch hands to operate the chassis lever, with its own particular procedure to get out of the gate, and one can experience how novice pilots often “porpoised” during this maneuver. But I can’t wait to get my VR cockpit in action as a Norwegian friend sent me a video of his cockpit with my controls installed and said it was a truly amazing 3D experience where the controls perfectly match what you see.

Will post up pics of the full cockpit when I get time to do more work on it.

19 Likes

Just a short add-on to the previous post : a pic of the full cockpit work-in-progress :slight_smile:

20 Likes

Hey! Welcome to mudspike @Topsy and congratulation for your work! Nothing short of spectacular! :smiley:

1 Like

Welcome to MudSpike @Topsy! You’ve done an awesome job! Looking forward to updates as you continue!

1 Like

:astonished::astonished::astonished: wow…

And welcome @Topsy :salute:

1 Like

Sorry, one year later… I got a second son… yes I got a spinny chair but the desks don’t line up :smiley:
Since then I replaced my old Vive with a Rift S and a VPC T50.

1 Like

Current pit:

VR and Foxx Mounts


I’m not much of a cable neat freak as I move my flight controllers off to the (left) side when I’m not gaming. :upside_down_face: Our boys like to drive so I need the flexibility of moving the wheels and pedals as well.


Past pits

2011-2012: My original Obutto cockpit
ob1

2012-2016: upgraded to triple 27" monitors https://www.youtube.com/watch?v=pxFwgpZ3yrs

10 Likes

I can finally show my sim pit now that is is more than just a HOTAS on a desk and some pedals below.
Version 1.0, major revisions expected.


In this one, the mount of the stick is still wrong, see this thread

I used some leftover aluminium profiles to create a frame that is clamped below the seat.
Stick: VPC T-50CM2 base + grip + 200mm curved extension
Throttle: Thrustmaster TWCS
Pedals: Saitek
Screen: Samsung Odyssey WMR headset

10 Likes

I don’t know how I missed your post, but that’s awesome!
Seen this? https://heritageflightsim.com/
It would be so incredibly fun to build! I don’t have the space, but it would be fun…

2 Likes

Thanks for the compliments. Thanks for the link to Heritage which I already knew about. The Heritage kit looks great and probably fun to build if you have the money. My controls are cheaper 3D printed in PLA and are probably less resistant and less smooth in finish than the Heritage parts that are 3D printed in ABS with an industrial laser fusion 3D printing process. I spend some time sanding smoothing and painting the parts before assembly to achieve a proper finish. However on the ground we’re not going to be pulling 5 G so we don’t need to build parts as strong as the original. My aim is to reproduce WWII pilot workload with realistic controls movement. As for the cockpit section, a Spitfire cross section at station 7 is wider than a standard door even without the wing stubs, so I needed to find a way around the problem, hence cutting the section into two parts. This also improves access for the less athletic visitors who find it difficult to climb into the cockpit and makes the controls less susceptible to damage.
Good luck with your project!
In the picture below you can see my “light” sim cockpit version with a small desk mounted cockpit panel including the left hand controls : rudder & elevator trim wheels, throttle quadrant with Fuel Cutoff lever, Throttle lever including bomb release button and adjustable max take-off stop, Airscrew control lever and working friction wheel and lever. Above this is a VHF radio remote controller unit with 7 user programmable buttons with LEDs that light up when pressed, working dimmer for night flying. This unit conveniently houses an Arduino game controller. I also make a floor standing control column with its articulated spade grip. The column is held at its proper angle by a spring loaded strut (which simulates the elevator control bar). The spade grip has a two way paddle type firing button (cannon, mg or both) with working safety catch and the brakes lever. I offer the Chassis Unit as an option which is normally wired up to a second controller in the control column.

9 Likes

Did you design and make all the controllers too? Would love to see more details.

Hi Troll,
Yes all the controls are re-designed using original Supermarine Aviation Works engineering drawings as reference to ensure correct scale and exterior dimensions. The design challenge was to replace original mechanical, pneumatic or electrical systems with modern electronics suitable for pc’s. The designs are then further adapted for 3D printing, either so as to fit the parts on the printer bed or to ensure rigidity and finish.
Where possible I have made the sub assemblies as per original SAW drawings and these are then assembled with real screws, bolts, nuts etc as per the original.
This is particularly true for the throttle quadrant which is quite a complex assembly. I have not finished the re-design process as I intend to make up other items such as the Ki-Gass primer pump, the auxiliary tank cock and jettison lever, starter & booster buttons, flaps lever, wobble pump (?), fuel tank pressure cock, main fuel cock lever plus various switches - so i’ve still got quite a lot of work to do.

11 Likes

The ‘ole sim pit got a nice upgrade this weekend. :grin:

Surgically extracting a GTX 1080 and a SSD from an (un)willing donor.

Ready to go!

Also swapped out my old second monitor (tv), for a new 32in tv. Now I just need to decide if I want upgrade my current 32in main monitor to a 40in 4K tv…

Soon…

11 Likes

I’d say…! :sunglasses:
Don’t you just love unboxing all those heaps of silicone?
The smell of fresh electronics…

4 Likes

Not only that, but for me at least there is something…Zen? about having a fresh install of an OS and clean hard drives’s.

3 Likes

I have that motherboard (Aorus Elite version, although unfortunately I am not elite as yet) and those NVMe’s and they work really nicely. Don’t lose your NVMe riser and screw plastic packets! :slight_smile:

3 Likes

I was commenting to Wes last night at how having DCS on a NVMe made my load times with DCS on a SSD feel down right slow. :rofl:

My wife hates me for it, but when it comes to computer stuff anything I don’t use goes back into the box, and the box goes into storage.

3 Likes

My current simpit. I just swapped out old n busted Saitek pedals for snazzy MFG crosswinds. Screwed them to the bit of wood that used to hold the saitek and it works perfectly.

Someone might recognize the bag hanging on the railing that holds my oculus when not in use.

Notice the superbly professional mounting of the throttle unit. I could not have built it any better myself, that thing sits just perfect like that :wink:

Its messy and imperfect, cobbled together from bits of leftover wood but its mine and I love it :smiley:

16 Likes

My son just put the finishing touch to my pit, a sign to keep his little sister out and make very clear what this room is for:

16 Likes

You have impeccable taste…